Windows Enrolment
In this section, learn about end to end user flow for Windows enrolment.
Windows Certificate Enrolment
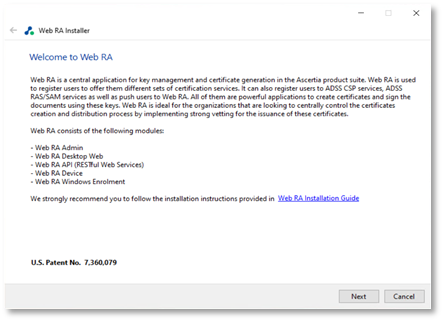
ADSS Web RA Server provides an implementation of the Microsoft WSTEP Windows Enrolment protocol for automating x.509 certificate issuance for public key infrastructure (PKI) clients. These include web servers, endpoint devices and user identities, and anywhere PKI certificates are used, as well as the associated certificates from a trusted Certificate Authority (CA). Windows Enrolment uses certificate enrolment policy to enrol identity certificates based on authentication scheme in deployment URLs. The following workflow explains how Windows enrolment works. (Typical Scenario)
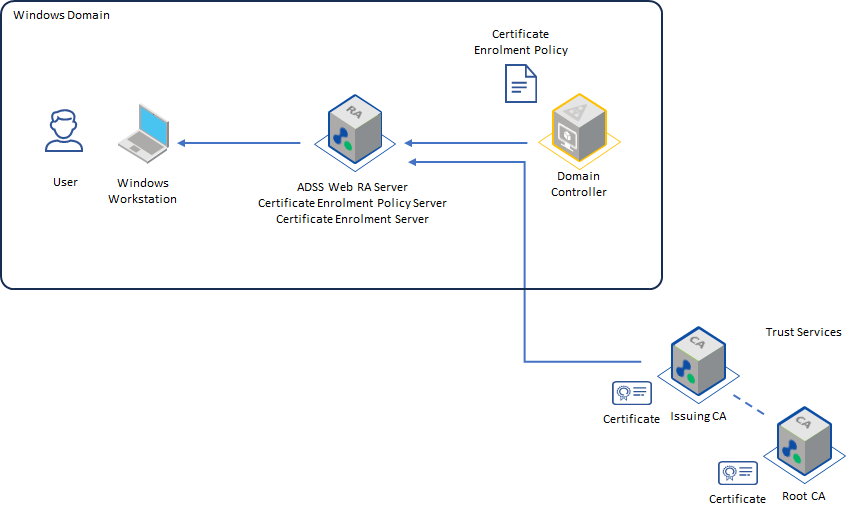
Client connects to the CEP web service over HTTPS.
The Windows Client \ Windows Server computer is configured to enrol for certificates against ADSS Web RA CEP server. When CEP server is configured in the environment, the client will connect to the CEP server via port 443 (HTTPS), and connect to the Certificate Enrolment Policy (CEP) web service.
Administrators can configure via group policy to identify which CEP server to use. The configurations for CEP web service are further explained in this document.
CEP web service queries LDAP.
The CEP service will send an LDAP query to a domain controller to get the following:
- Queries for a list of pKICertificateTemplate objects (Certificate Templates) within the forest.
- Queries for a list of pKIEnrollmentService objects (Enterprise CA’s) within the forest.
- Queries for a list of msPKI-Enterprise-Oid objects within the forest.
Once all the objects are collected and sent back to the client computer, it determines the types of certificates for which it can enrol and which enterprise CAs can issue those certificates. There is a new attribute in the CA’s “pKIEnrollmentService object” that indicates the URLs for the CES servers in the environment to the client computer. The attribute name is msPKI-Enrollment-Servers. The attribute is a multi-valued string so there can be multiple URL’s defined if you need to support different authentication methods.
Client connects to ADSS Web RA CES Web Service over HTTPS.
The client then connects to the Certificate Enrolment (CES) web Service that answers for the Certification Authority that is configured to issue the certificate. The actual CES URL is defined in the msPKI-Enrollment-Servers attribute on the pKIEnrollmentService object for that CA.
Web RA CES Web service requests a certificate
The ADSS Web RA CES web service requests a certificate from ADSS Server and then provides the certificate back to the client.
Deployment Pre-Requisites
The installation of ADSS Web RA Server Windows Enrolment requires the following pre-requisites to be met.
Installation of:
- SMTP Server
- Microsoft Active Directory
- Microsoft Active Directory Clients (Windows 10, 11 or Server 2019, 2022 Domain Members)
- Windows Server 2019 Domain Member for Web RA Server to be hosted
- ADSS Server installed with Root and Issuing CA pre-configured
ADSS Server Pre-Requisites
Before installing the ADSS Web RA Server Windows enrolment feature, ADSS Server must be installed and configured. A Root and Issuing Certification Authority need to be created prior to installing the ADSS Web RA Server. The Issuing CA operator will need to create certification profiles required to issue certificates to Windows users, service accounts and domain computers.
When issuing certificates from ADSS Server using Windows Certificate Templates, it is important to note that the ADSS Server Certificate Template controls the certificate extensions, lifetime, and subject distinguished name, the Microsoft Certificate Template will control which Cryptographic Service Provider or Key Service Provider is used to generate the private key, and if the private key is exportable.
ADSS Server requires the following to be set in the certificate templates:
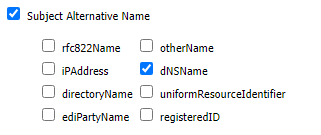
Subject Alternative Naming
Computer and User certificates can optionally contain the following attributes.
- Computer Certificates
- DNS Name
- User Certificates
- Email Address
- User Principal Name
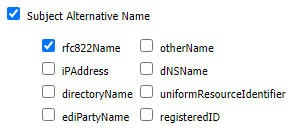
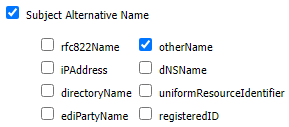
If you wish to issue certificates with any of the above subject alternative names, then they must be enabled in the ADSS Server Certificate Template, within the required certificate template, ensure that the following is enabled to add the required subject alternative name entries:
Note: Subject Alternative Names can contain multiple entries, it is common to see Email Address and User Principal Name in user certificates.
|
Subject Alternative Name value |
ADSS Server profile certificate extension Subject Alternative Name |
|
DNS Name |
dNSName |
|
Email Address |
rfc822Name
|
|
User Principal Name |
otherName
|
Subject Distinguished Name Handling
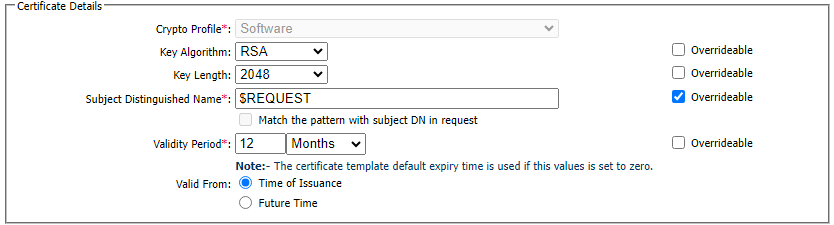
When ADSS Web RA Server sends a request to ADSS Server, the Certificate Enrolment Web Service queries Microsoft Active Directory to acquire information about the user or the computer requesting a certificate, in order to ensure that ADSS Server issues a certificate with the correct Subject Distinguished Name, you must ensure that the following is set within the ADSS Server Certification Profile:
Set the Subject Distinguished Name to $REQUEST and mark this as Overridable
Custom Extension Handling
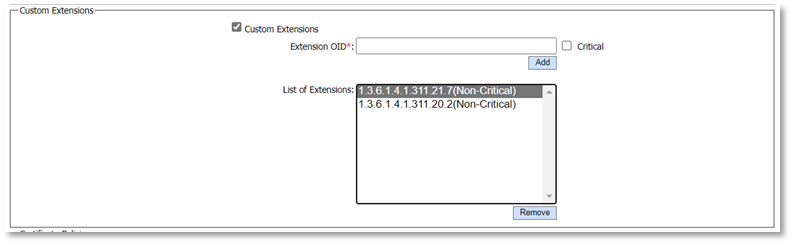
Certificate templates must contain the following OID as a custom extension, note this does not need to be marked as critical, both represent Microsoft certificate extensions related to Microsoft Certificate Template and Certificate Types:
- 1.3.6.1.4.1.311.20.2
- 1.3.6.1.4.1.311.21.7
To serve the purpose of this document, we will configure ADSS Web RA Server to issue certificate templates in Microsoft Active Directory that map to ADSS Server Certificate Profiles\Templates that are listed below:
- Computer Certificates
- With Digital Signature Key Usage
- Client \ Server TLS Extended Key Usage
- User Certificates
- With Digital Signature Key Usage
- Client TLS Extended Key Usage
ADSS Web RA Server Pre-Requisites
Before configuring the ADSS Web RA Server Windows enrolment feature, the following pre-requisites are necessary:
- Install Windows Authentication IIS Security Feature.
- External connectors for:
- ADSS Server
- SMTP Server
- Microsoft Active Directory
- Authentication Profile for Microsoft Active Directory
- Certification Profiles created at ADSS Server
- Create a service plan.
- Create an enterprise.
- Create a default role with Windows enrolment profile.
- Share certificate using the SDNs filter in the specific role.
- Import a license and allocate certificate quantities to the test enterprise.
- Ensure that all firewall ports are open that ADSS Web RA Services require.
Configure Active Directory
The following system and environment pre-requisites need to be fulfilled prior to the installation of the ADSS Web RA Server Windows Enrolment feature.
Domain Membership - If using Kerberos Authentication for Windows User and Machine enrolment, the server hosting ADSS Web RA Server must be a member of the Windows Domain where you plan to issue certificates.
Create a Windows service account
A Windows user account is required for the ADSS Web RA Server application pools to run.
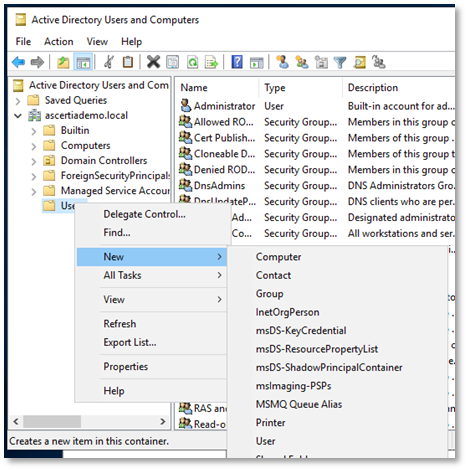
- Log in to the server hosting Active Directory as a member of the Domain Admins and Enterprise Admins groups.
- Expand Start > Windows Administrative Tools > Active Directory Users and Computers.
- Active Directory Users and Computers management console will be displayed.
- From the left panel, expand the domain, right-click the Users container, click New > User.
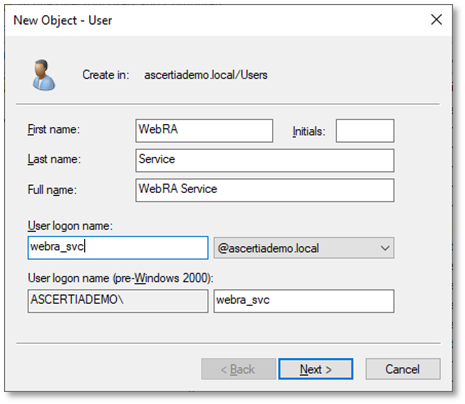
- The New Object – User will appear. Enter a First Name, Last Name, and User logon name, click Next. The following is an example:
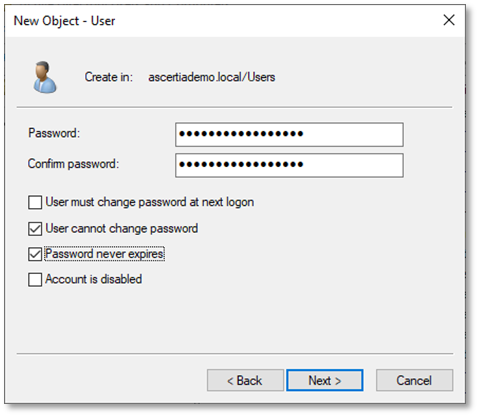
- Enter and confirm a strong password, uncheck User must change password at next logon, and check User cannot change password and Password never expires, click Next.
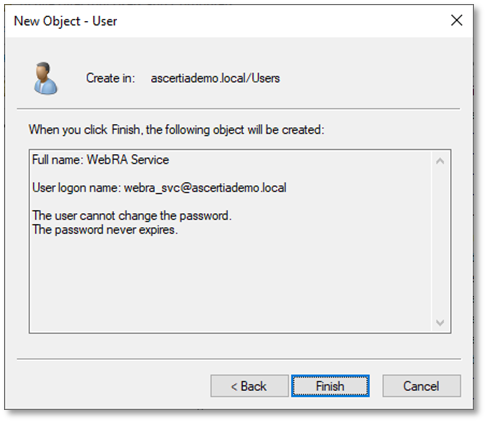
- The summary dialog will appear, click Finish.
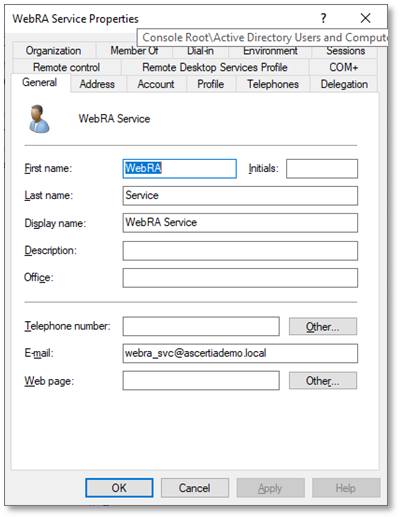
- You will be returned to the Active Directory User and Computers management console, right-click the new service account and select Properties.
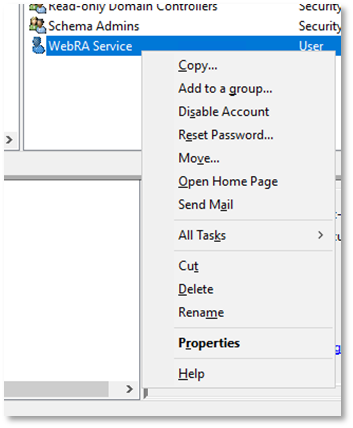
- The Service Account User Properties dialog will display, enter their email address in the E-mail field, and click OK.
- You will be returned to the Active Directory User and Computers management console, close the management console, the service account has been created successfully and is ready for use with Web RA.
Create Windows Groups
Windows Certificate auto-enrolment uses certificate templates that are stored in Active Directory. These templates instruct the Microsoft Certificate Services client where it should generate keys, the key length, if the private key should be exportable, etc.
During enrolment, clients download the certificate templates and check the Windows permissions on these templates to see if they have the permission to enrol or auto-enrol. Certificate template administrators set the enrol and auto-enrol permission when they create these templates. For this document a group will be created that will be used in the certificate templates to control enrolment.
- Log in to the server hosting Active Directory as a member of the Domain Admins and Enterprise Admins groups.
- Expand Start > Windows Administrative Tools > Active Directory Users and Computers.
- Active Directory Users and Computers management console will be displayed.
- From the left panel, expand the domain, right-click the Users container, click New > Group.
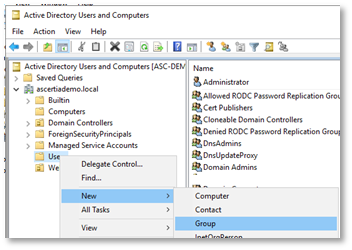
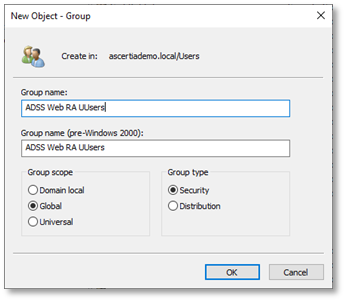
- The New Object – Group dialog will display, enter ADSS Web RA Users in the Group name field, and click OK.
- You will be returned to Active Directory Users and Computers management console; the new group will have now appear on the right panel.
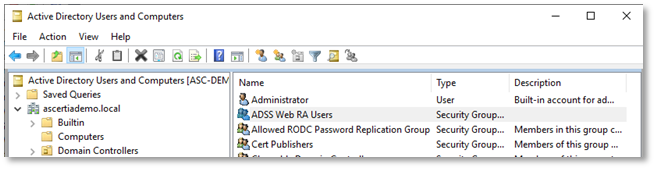
- You have successfully created the Windows Certificate Enrolment Group.
- Repeat this process for ADSS Web RA Computers.
Active Directory Schema Requirements
For Windows enrolment using ADSS Web RA Server, the Windows domain must have the 2016 Active Directory schema or later.
Check and verify the Active Directory schema version, open a PowerShell window and run the following command:
Get-ADObject (Get-ADRootDSE).schemaNamingContext -properties objectVersion
Example Output
Windows PowerShell
Copyright (C) Microsoft Corporation. All rights reserved.
PS C:\Users\Administrator> Get-ADObject (Get-ADRootDSE).schemaNamingContext -properties objectVersion
DistinguishedName : CN=Schema,CN=Configuration,DC=ascertialab,DC=local
Name : Schema
ObjectClass : dMD
ObjectGUID : 984aee09-52f6-4e9a-8a5a-c948e113ebe8
objectVersion : 88
Adding Windows certificate templates to Active Directory
The ADSS Web RA Server Windows enrolment service is Ascertia’s implementation of the WSTEP protocol. The Ascertia WSTEP service will use Windows certificate templates when enrolling users, computers, or domain controllers with your Windows-native endpoints.
If Microsoft Active Directory Certificate Services is already installed in your Active Directory, the Certificate Templates feature is already installed and the certificate templates have already been published, you can skip this section. Otherwise, you must install the Certificate Templates feature using either Windows PowerShell or the Windows Server Manager graphical interface.
Adding the certificate templates feature using PowerShell
To add Certificate Templates using Windows PowerShell, complete the following procedure.
- Log in to the server hosting Active Directory as a member of the Domain Admins and Enterprise Admins groups.
- Open an elevated PowerShell window. Expand Start > Windows PowerShell, then right-click Windows PowerShell > Run as administrator.
- Run the following command.
PS C:\Users\Administrator>Add-WindowsFeature RSAT-ADCS-Mgmt
Example Output
Windows PowerShell
Copyright (C) Microsoft Corporation. All rights reserved.
PS C:\Users\Administrator>Add-WindowsFeature RSAT-ADCS-Mgmt
Success Restart Needed Exit Code Feature Result
------- -------------- --------- --------------
True No Success {Active Directory Certificate Services Too...
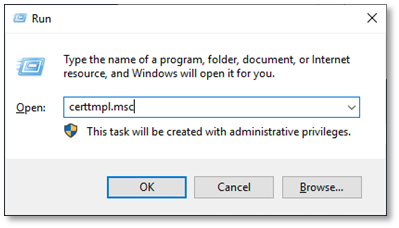
- Run the following command to launch the Certificate Templates Console.
PS C:\Users\Administrator>C:\Windows\System32\certtmpl.msc
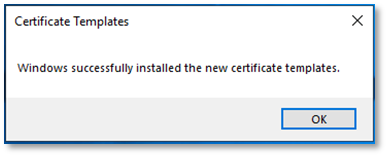
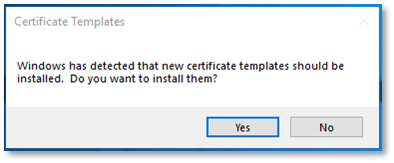
- A Certificate Templates installation dialog will display, click Yes to install the new certificate templates.

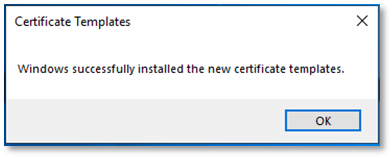
- Click OK to the installation success message.
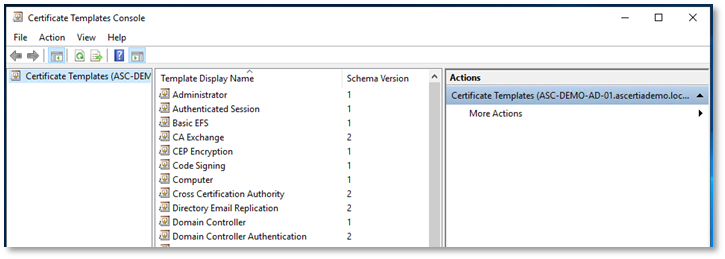
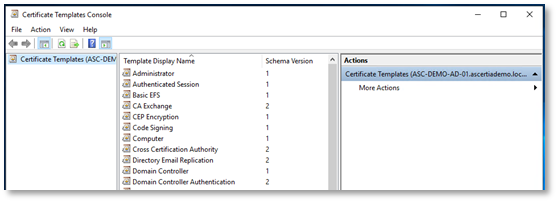
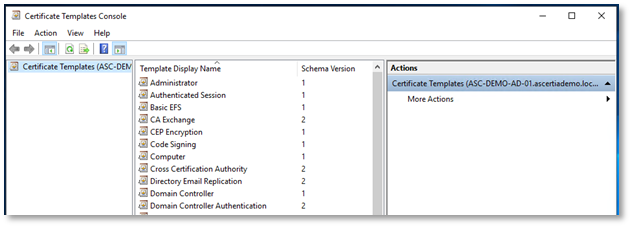
- The Certificate Templates Console will appear.
Adding the certificate templates feature using Server Manager
To add Certificate Templates using the Windows graphical interface, complete the following procedure.
- Log in to the server hosting Active Directory as a member of the Domain Admins and Enterprise Admins groups.
- Launch Server Manager. Select Start > Server Manager.
- The Server Manager Dashboard will be displayed.
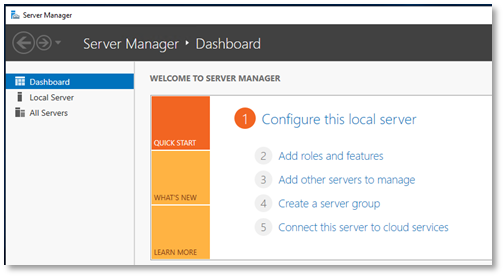
- Click Manage > Add Roles and Features.
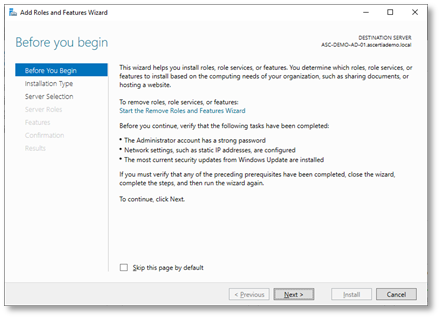
- The Add Roles and Features Wizard will launch, at the Before you begin dialog click Next.
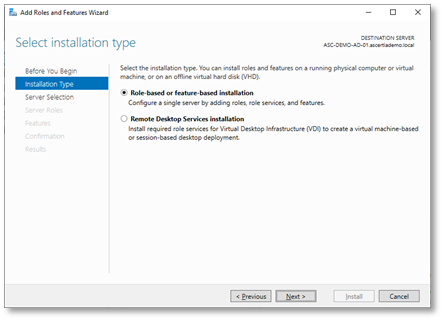
- At the “Installation Type” dialog click Next.
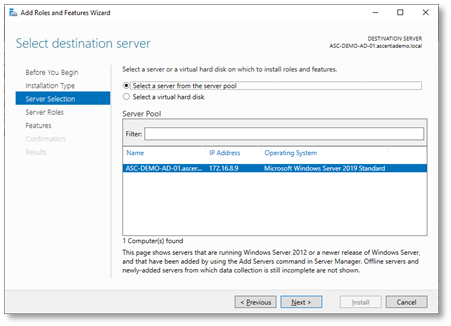
- At the “Server Selection” dialog click Next.
- At the “Select Server Roles” dialog click Next.
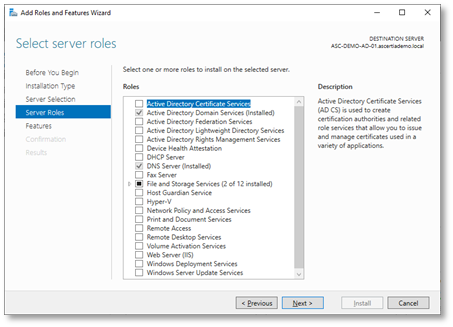
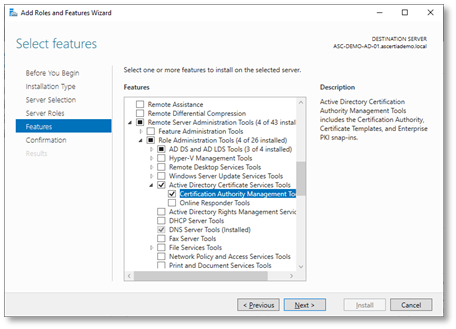
- From the Select features dialog, expand Remote Server Administration Tools (4 of 43) > Role Administration (4 of 26) > Active Directory Certificate Services Tools and tick the check box to select Certificate Authority Management Tools, click Next.
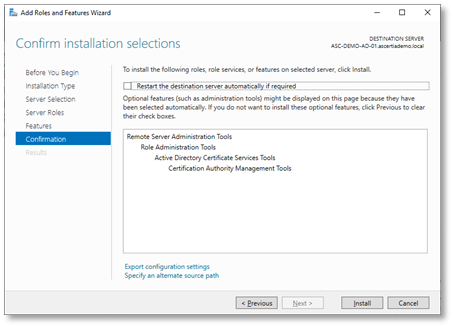
- At the “Confirm installation selections” dialog click Install.
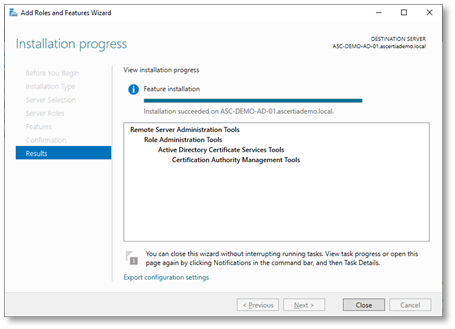
- Once the installation is complete, click Close.
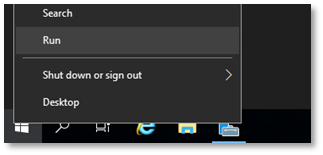
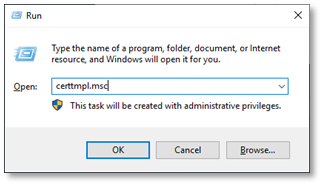
- Right-click Start, then click Run.
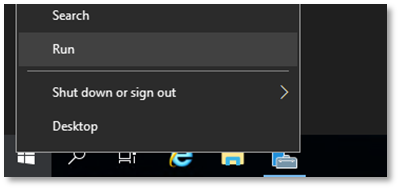
- In the Run dialog, type certtempl.msc, click OK.
- A Certificate Templates installation dialog will display, click Yes to install the new certificate templates.
- Click OK to the installation success message.
- The Certificate Templates Console will be displayed.
Creating Windows certificate templates for Web RA
The ADSS Web RA Server Windows Enrolment Service uses Windows certificate templates to enrol users, computers, service accounts, or domain controllers with Windows-native endpoints. Create the required Microsoft certificate templates using the Microsoft Certificate Templates management console. For example, users may require certificates with two key pairs (such as Digital Signature and Authentication) or one key pair (such as non-repudiation).
Create a new Windows Certificate Template
- Log into an Active Directory domain controller as a member of the Domain Admins group.
- Right-click Start, then click Run.
- In the Run dialog, type certtmpl.msc, click OK.
- The Certificate Templates Console will be displayed.
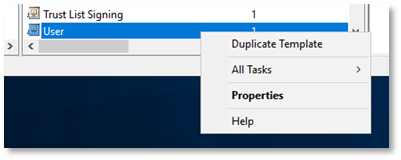
- From the list of available certificate templates, right-click the User template and select Duplicate Template.
- The new duplicated template will appear. Set the following for the two templates we will create for this document:
- ADSS TLS User
- ADSS TLS Server
Create User Certificate Template
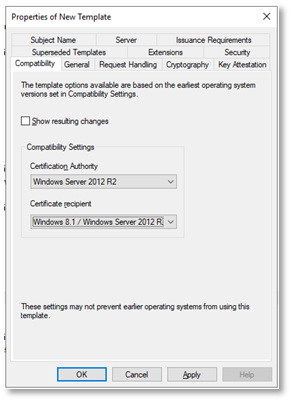
- In the Compatibility tab make the following changes:
- Deselect the Show resulting changes check box.
- Set the Certification Authority drop down to Windows Server 2012 R2.
- Set the Certificate Recipient drop down to Windows 8.1 / Windows Server 2012 R2.
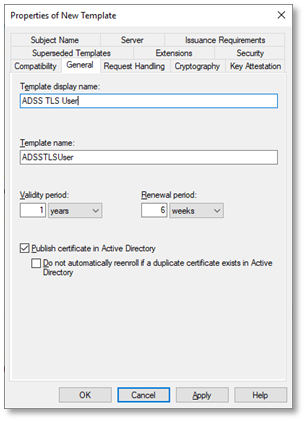
- In the General tab, make the following changes:
- Set the Template display name to ADSS TLS User.
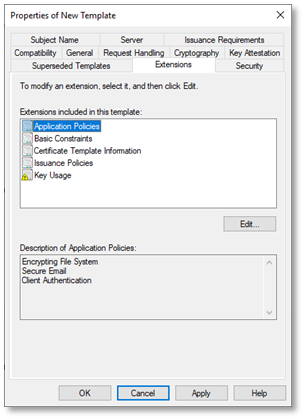
- In the Extensions tab, select Applications Policies and click Edit.
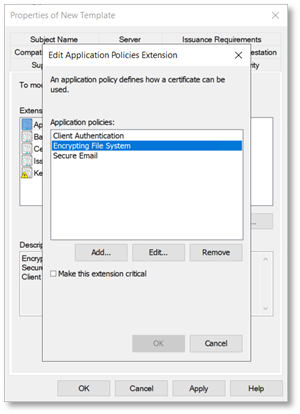
- The Edit Application Policies Extensions dialog will display, highlight Encrypting File System, and click Remove. Repeat for Secure Email, and then click OK.
- Select the Security tab, click Add.
- The Select Users, Computers, Service Accounts, or Groups dialog will display, enter ADSS Web RA Users, this is the group created earlier, click Check Names, click OK.
- You will be returned to the properties of the new certificate template security tab, tick the check boxes for Enrol and Auto Enrol. This will allow users who are members of the ADSS Web RA Users group to enrol and auto enrol via Microsoft Group Policy, click OK.

- You have successfully created the Windows certificate template for users. This process can be followed again to create other certificate templates with other key and extended key usages depending on use case requirements.
Create Device Certificate Template
- From the list of available certificate templates, right-click the Computer template and select Duplicate Template.
- In the Compatibility tab, make the following changes:
- Deselect the Show resulting changes check box.
- Set the Certification Authority drop down to Windows Server 2012 R2.
- Set the Certificate recipient drop down to Windows 8.1 / Windows Server 2012 R2.
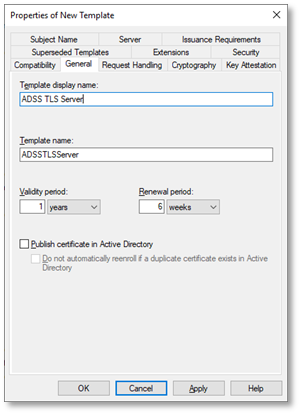
- In the General tab name the following changes:
- Set the Template display name to ADSS TLS Server.
- In the Extensions tab, select Applications Policies, ensure the following are listed in the description of Application Policies field:
- Client Authentication.
- Server Authentication.
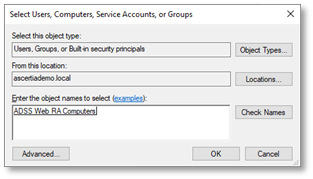
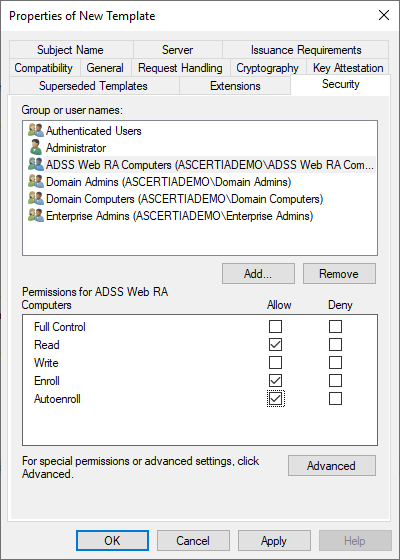
- Select the Security tab, click Add.
- The Select Users, Computers, Service Accounts, or Groups dialog will display, enter ADSS Web RA Computers, this is the group created earlier, click Check Names, click OK.
- You will be returned to the properties of the new certificate template security tab, tick the check boxes for Enrol and Auto-Enrol. This will allow computers who are members of the ADSS Web RA Computers group to enrol and auto enrol via Microsoft Group Policy, click OK.
- You have successfully created the Windows certificate template for computers. This process can be followed again to create other certificate templates with other key and extended key usages depending on use case requirements.
Installing ADSS Web RA Server
ADSS Web RA Server should be installed by following the installation steps defined within the product installation guide.
- IIS + required features.
- .Net Windows Server Hosting 6.0.16.
- IIS URL Rewrite Module.
ADSS Web RA Installation
The Windows enrolment feature will only be available when the administrator installs the ADSS WEBRA Server with Windows enrolment from the installer. ADSS Web RA installer will include Windows enrolment module separately.
- Extract the ADSS Web RA Server installation package to the following path
C:\ascertia\WebRA-v2.8-Win64-12Jun2023
- Using Windows Explorer, navigate to C:\ascertia\WebRA-v2.8-Win64-12Jun2023\setup, double click install.bat
- The Web RA installer will launch, at the Welcome dialog, click Next.
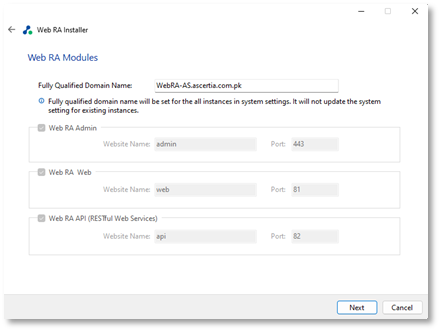
- The Web RA Modules dialog will display, it is recommended to use Fully qualified domain name (FQDNs), enter the Web RA Servers FQDNs, click Next.
- The Windows Enrolment Modules dialog will display, tick the Windows Enrolment checkbox to install this feature, click Next.
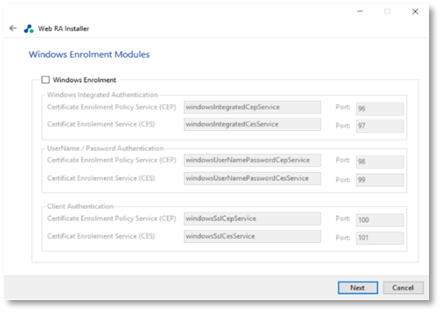
The following fields describe items in the screenshot above.
|
Authentication Mechanism |
Windows Enrolment Web Services |
Description |
|
Windows Integrated Authentication |
Certificate Enrolment Policy Service (CEP) |
Installer will deploy CEP service with Windows Integrated Authentication on this site and port. |
|
|
Certificate Enrolment Service (CES) |
Installer will deploy CES service with Windows Integrated Authentication on this site and port. |
|
UserName / Password Authentication |
Certificate Enrolment Policy Service (CEP) |
Installer will deploy CEP service with UserName/Password Authentication on this site and port. |
|
|
Certificate Enrolment Service (CES) |
Installer will deploy CES service with UserName/Password Authentication on this site and port. |
|
Client Authentication |
Certificate Enrolment Policy Service (CEP) |
Installer will deploy CEP service with Client Authentication on this site and port. |
|
|
Certificate Enrolment Service (CES) |
Installer will deploy CES service with Client Authentication on this site and port. |
Please refer to the ADSS Web RA installation guide for detailed steps for the installation process.
Import CA certificates into Microsoft Group Policy
Microsoft clients that are domain members who will rely on group policy configurations for certificate enrolment requires the Root CA and Issuing Certificates be added to a domain group policy and that certificate enrolment policy servers are added to enable clients to manually or automatically enrol.
ADSS Web RA Server leverages TLS Server certificates to secure access to enrolment and administration interfaces of the product, it is required that Web RA Server is a domain member and as a result will have the Root and Issuing CA certificates published to its certificates stores by group policy
For the following process, you will need to copy the Root and Issuing CA certificates to the domain controller.
- Log in to the server hosting Active Directory as a member of the Domain Admins.
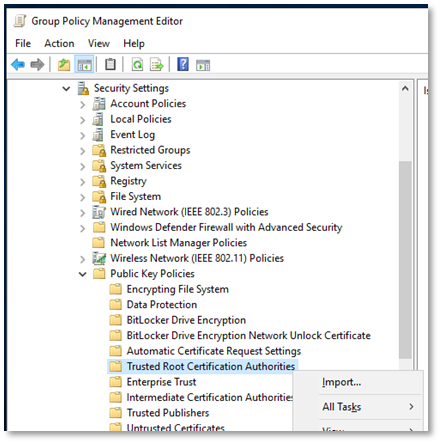
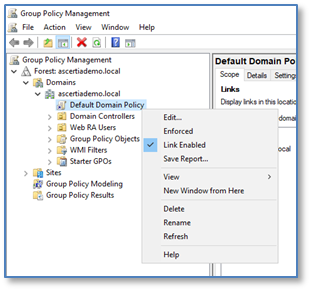
- Click Start > Administrative Tools > Group Policy Management.
- The Group Policy Management console is displayed. Expand Forest:domain_name > Domains > domain_name, right-click Default Domain Policy and select Edit.
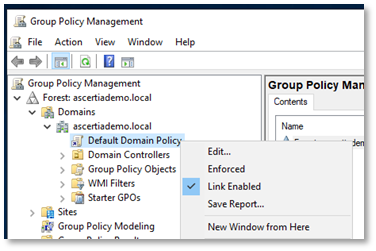
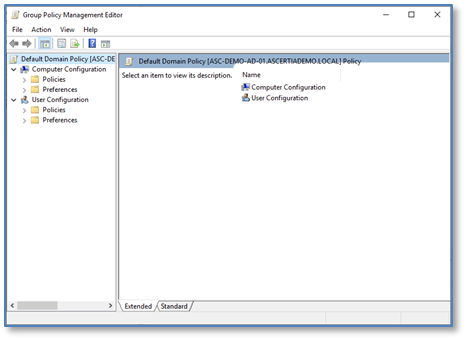
- The Group Policy Management Editor will display.
- From the left panel, expand Computer Configuration > Policies > Windows Settings > Security Policies > Public Key Policies, right-click Trusted Root Certification Authorities, then click Import.
- The Certificate Import Wizard will launch at the Welcome dialog, click Next.

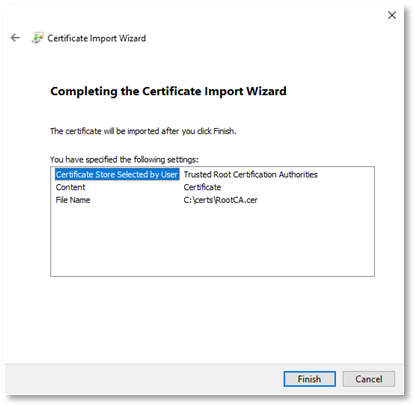
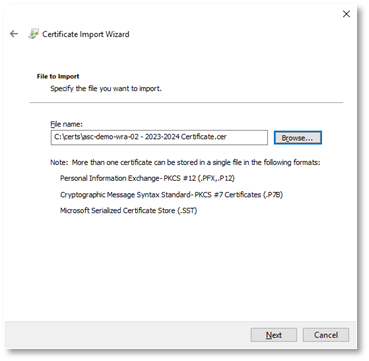
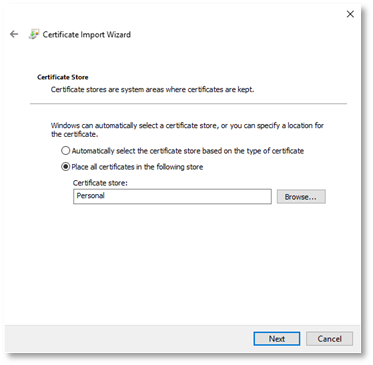
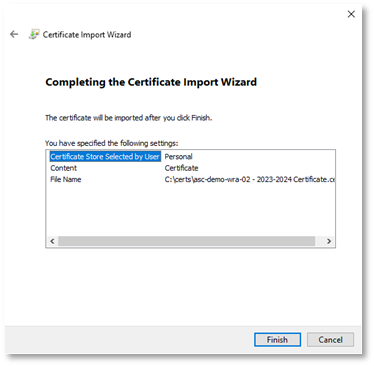
- At the File to import dialog, browse the Root CA Certificate, click Next.

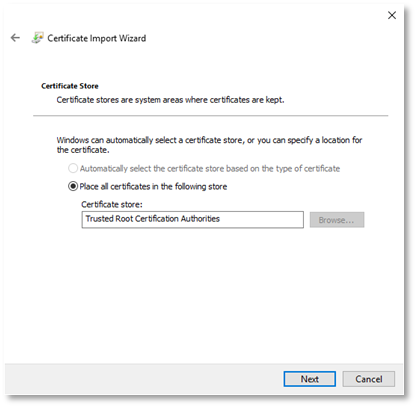
- At the certificate store dialog, accept the defaults, click Next.
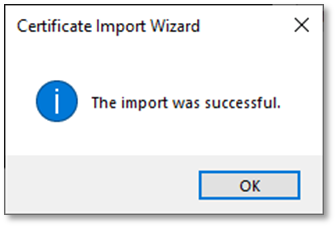
- At the Completing the Certificate Import dialog, click Finish.
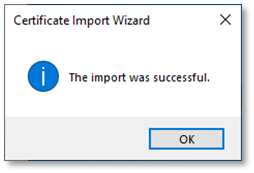
- Click OK to the success message.
- You will be returned to the Group Policy Management Editor where the Root CA certificate will now display on the right panel.
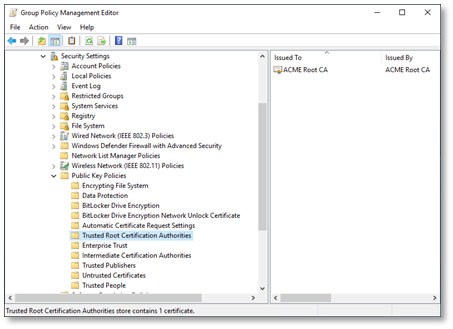
- Select Intermediate Certification Authorities from the left panel and repeat the same process for the Issuing CA certificate.
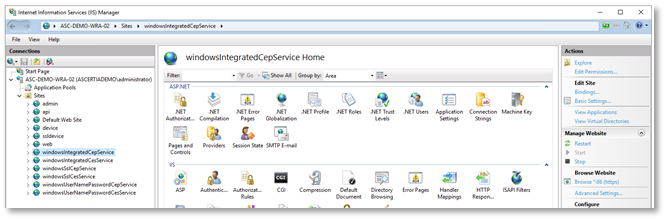
Configure IIS for Web RA Server
The Certificate Enrolment Policy Web Service and Certificate Enrolment Service are installed as an application in Microsoft Internet Information Services (IIS). Microsoft IIS requires a TLS certificate so that the Certificate Enrolment Policy Web Service can accept certificate enrolment requests over HTTPS.
The following section describes how to issue a TLS certificate for Microsoft IIS.
Creating a CSR for the Web server certificate
The Certificate Enrolment Policy Web Service and Certificate Enrolment Service are installed as applications with in an instance of Microsoft Internet Information Services (IIS). Microsoft IIS requires a TLS certificate so that the Certificate Enrolment Policy Web Service and Certificate Enrolment Service can process certificate enrolment requests over HTTPS.
The following procedure describes how to create a certificate-signing request (CSR) in Microsoft IIS for a certificate. A CSR contains information that the issuing CA will use to create the certificate.
Create a CSR for Microsoft IIS
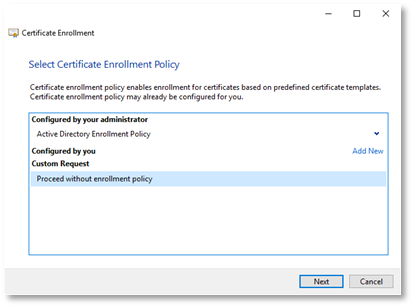
- Log into the server where Web RA will be installed as a domain administrator
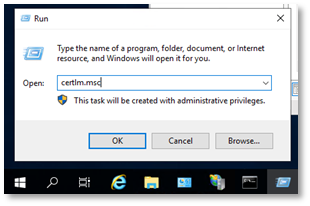
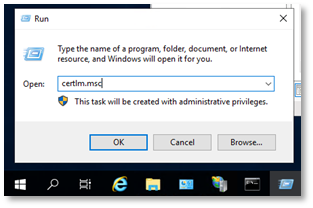
- Right-click Start > Run, type certlm.msc, click OK.
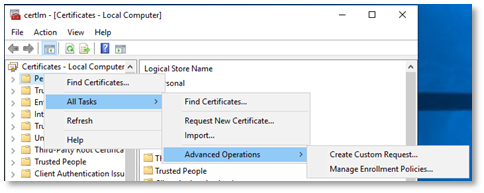
- The Local Machine Certificate management console will display, right click Personal and select All Tasks > Advanced Operations > Create Custom Request.
- The Certificate Enrolment wizard will launch, click Next.
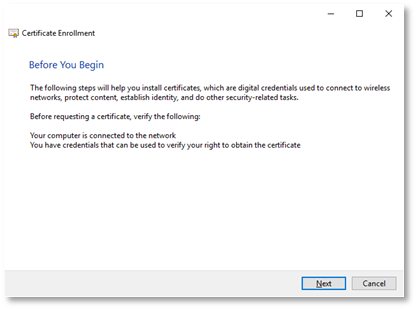
- The Select Certificate Enrolment Policy dialog will display, select “Proceed without enrolment policy” enrolment click Next.
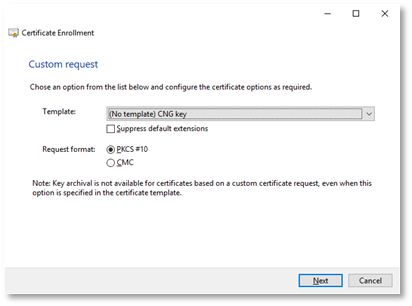
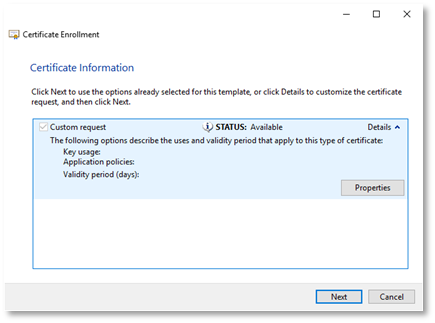
- The Custom request dialog will display, click Next.
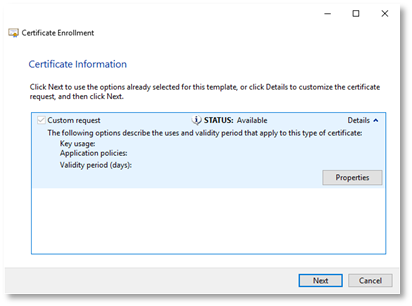
- The Certificate information dialog will display, click the down arrow next to Details and click Properties.
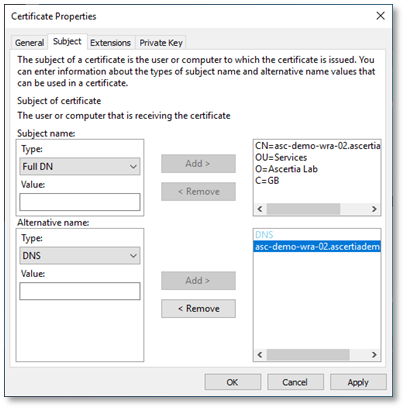
- The Certificate Properties dialog will display, select the Subject Tab, in the Subject Name field, ensure that Full DN is selected for the Type drop down and enter the following in the Value field, click Add.
|
|
This is a sample value and should be updated to reflect the DNS name and certificate contents you require for your installation. |
CN=asc-demo-wra-02.ascertiademo.local, OU=Services, O=Ascertia Lab, C=GB
- In the Alternative Name field, select DNS from the type drop down and in the Value field, enter the following value, click Add.
asc-demo-wra-02.ascertiademo.local
|
|
This is a sample value and should be updated to reflect the DNS name and certificate contents you require for your installation. |
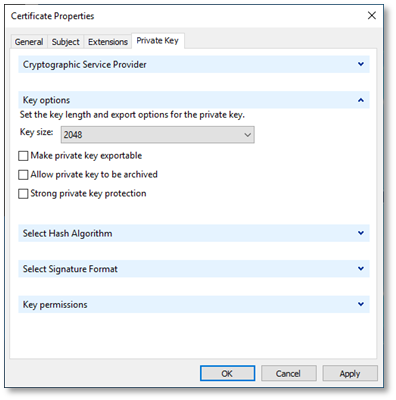
- Select the Private Key tab, click the drop down arrow for Key Options and set the key size to 2048, click OK.
- You will be returned to the Certificate Information dialog, click Next.
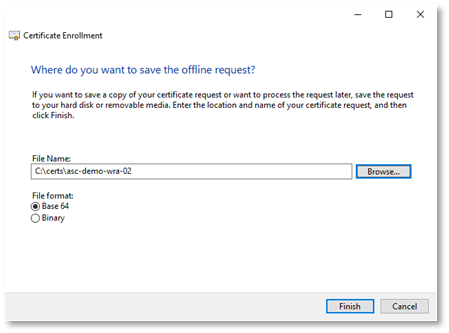
- The “Where do you want to save the offline request?” dialog will display, enter a disk location for where you want to save the request to and click Finish.
- The CSR is saved ready for processing.
Issuing the Web server certificate with ADSS Server
Copy the CSR to the server hosting ADSS Server and access the ADSS Server console as an operator with permissions to access the Issuing CA.
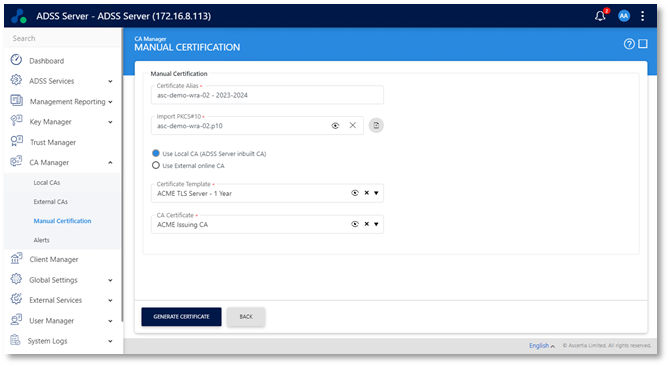
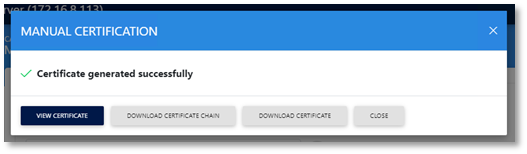
- From the ADSS Server Console, navigate to CA Manager > Manual Certification and supply the following information, click Generate Certificate.
|
|
This is a sample data, update according to the naming of your environment and systems. |
- Certificate Alias: asc-demo-wra-02-2023-2024.
- Import PKCS#10: browse to the CSR created from the Web RA Server.
- Select Use Local CA (ADSS Server inbuilt CA) radio button.
- Certificate Template: ACME TLS Server – 1 Year (Set to your TLS Certificate Template Name).
- CA Certificate: ACME Issuing CA (Set to your Issuing CA Certificate).
- The ADSS Server CA will process and issue the certificate, the Certificate Generated Successfully dialog will display, select Download Certificate Chain and save the p7b file to disk.
- Click Download Certificate and save the .cer file to disk.
- Copy the .p7b and .cer files to the server hosting Web RA.
- Log into the server where Web RA will be installed as a domain administrator
- Right-click Start > Run, type certlm.msc, click OK.
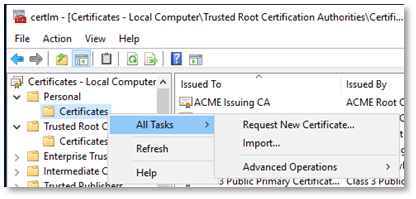
- Expand Personal, right click Certificates select All Tasks > Import.
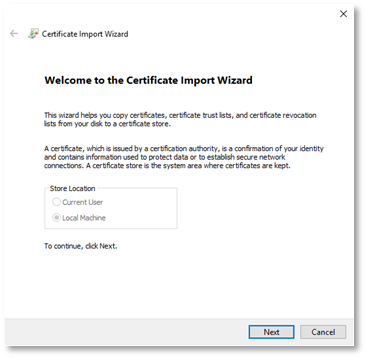
- The Certificate Import Wizard will launch, at the welcome dialog, click Next.
- The file to import dialog will display, browse to the certificate that was issued by ADSS Server, click Next.
- The Certificate store dialog will display, click Next.
- The completing the certificate import wizard dialog will display, click Finish.
- Click ok to the success message, the Web RA TLS Certificate has successfully imported.
Update IIS TLS Certificate bindings
When ADSS Web RA Server installs, by default it installs a self-signed certificate and creates a binding in IIS for each of the Web Sites used by ADSS Web RA Server. The following table provides a summary of the site name, the ports used, and what purpose of the sites.
Make sure that all the ports, which you are using for your bindings, have access from the deployment server.
|
Site |
TLS Port Binding |
Usage |
|
Admin |
443 |
ADSS Web RA Administrative Operator Portal |
|
API |
82 |
ADSS Web RA API’s |
|
Device |
83 |
SCEP, EST, ACME and CMP device enrolment |
|
SSLDevice |
85 |
EST with TLS authentication Certificate |
|
Web |
81 |
ADSS WEB RA Web Operator Portal |
|
windowsIntegratedCepService |
86 |
CEP service using Windows authentication |
|
windowsIntegratedCesService |
97 |
CES service using Windows authentication |
|
windowsSslCepService |
90 |
CEP service using Client authentication |
|
windowsSslCesService |
91 |
CES service using Client authentication |
|
windowsUserNamePasswordCepService |
88 |
CEP service using username and password authentication |
|
windowsUserNamePasswordCesService |
89 |
CEP service using username and password authentication |
Update the TLS binding using Internet Information Services (IIS) Manager
To add/update the IIS TLS site bindings using the Microsoft Internet Information Server Management console, complete the following procedure.
- Click Start, select Windows Administrative Tools, select Internet Information Services (IIS) Manager.
- Expand the server hosting Web RA > sites, highlight admin in the left panel, select Bindings from the right hand action panel.
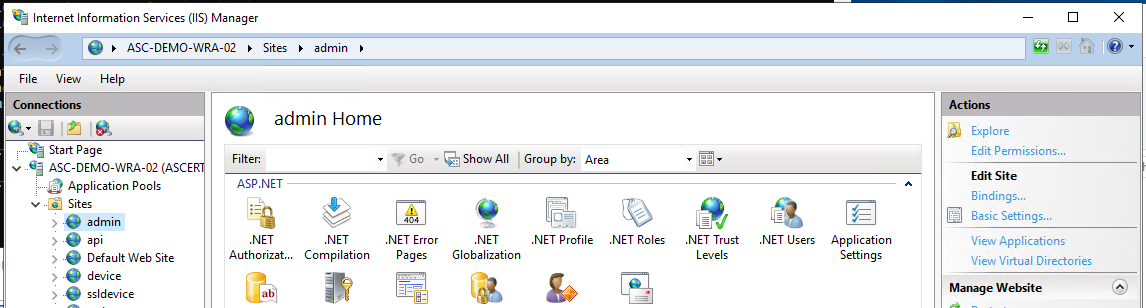
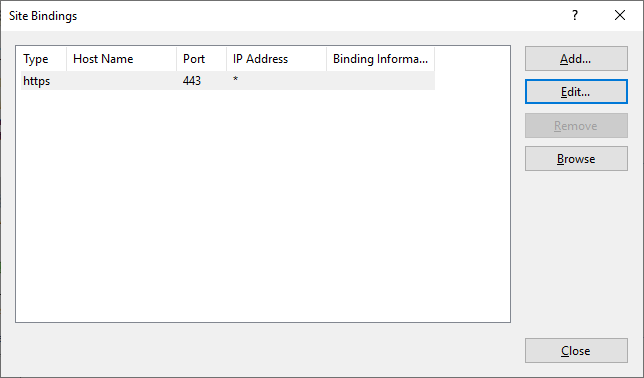
- The site bindings dialog will display, select the https site binding and click Edit.
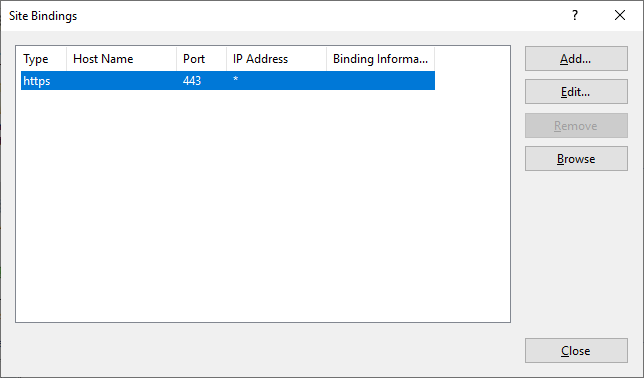
- Select the new certificate from the SSL certificate dropdown, click ok.
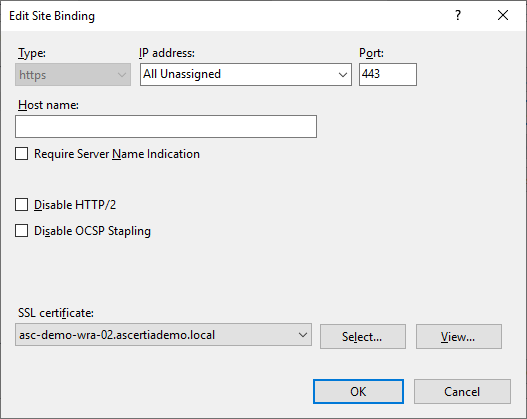
- You will be returned to the Site Bindings dialog, click Close.
- Repeat this process for api, device, ssldevice, web and all other IIS sites that is installed for ADSS Web RA Server.
Update the TLS binding using PowerShell
To add/update the IIS TLS site bindings using Windows PowerShell, complete the following procedure.
- Log in to the server hosting Active Directory as a member of the Domain Admins and Enterprise Admins groups.
- Open an elevated PowerShell window. Select Start then right-click Windows PowerShell > More > Run as administrator.
- Run the following command to install WebAdministration module.
PS C:\Users\administrator.ASCERTIADEMO>Import-Module WebAdministration
- Run the following command, this will locate any certificate with asc-demo-wra-02 in the SDN.
$cert = Get-ChildItem Cert:\LocalMachine\my | Where Subject -Like '*asc-demo-wra-02*'
- Run the following command, to update all IIS TLS bindings.
Foreach ($Binding in (Get-ChildItem IIS:\SslBindings\)) {
# Remove current binding
$Binding | Remove-Item
# Add the binding again using the new certificate
# (Bindings using hostname instead of IP address use a slightly different path)
if ($Binding.Host) {
$cert | New-Item -path "IIS:\SslBindings\!$($binding.Port)!$($binding.Host)"
}
Elseif ($Binding.IPAddress) {
$cert | New-Item -path "IIS:\SslBindings\$($binding.IPAddress)!$($binding.Port)"
}
}
Example output
IP Address Port Host Name Store Sites
---------- ---- --------- ----- -----
0.0.0.0 443 my admin
0.0.0.0 81 my web
0.0.0.0 82 my api
0.0.0.0 84 my device
0.0.0.0 85 my ssldevice
0.0.0.0 86 my windowsIntegratedCepService
0.0.0.0 87 my windowsIntegratedCesService
0.0.0.0 88 my windowsUserNamePasswordCepServic
e
0.0.0.0 89 my windowsUserNamePasswordCesServic
e
0.0.0.0 90 my windowsSslCepService
0.0.0.0 91 my windowsSslCesService
Configure Windows Authentication
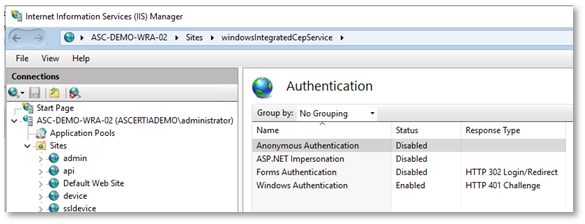
Windows integrated authentication is also known as Kerberos authentication. This enables users to log in with their Windows credentials using Kerberos or NTLM. The client sends credentials in the Authorization header. Windows authentication is best suited for an intranet environment. It uses the security features of Windows clients and servers. The web browser supplies the current Windows user information on the client computer through a cryptographic exchange involving hashing with the web server. If you want to authenticate, you should deploy ADSS Web RA CEP Service on Windows Integrated authentication mechanism.
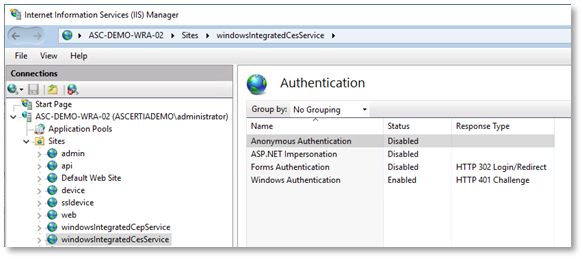
ADSS Web RA Server requires the windowsIntegratedCepService and windowsIntegratedCesService web sites to have Windows Authentication enabled and anonymous authentication disabled.
- Expand Start > Administrative Tools > Internet Information Services (IIS) Manager.
- The Internet Information Services (IIS) Manager management console will be displayed.
- Expand the Server > Sites and select windowsIntegratedCepService.
- Double-click on Authentication in the centre panel. Select Windows Authentication in the centre panel and select Enable from the actions panel on the right.
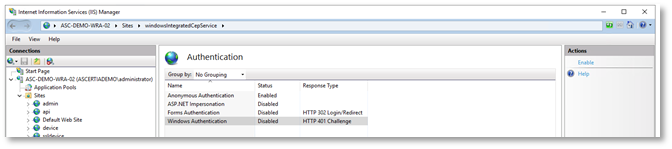
- Select Anonymous Authentication in the centre panel and select Disable from the actions panel on the right.
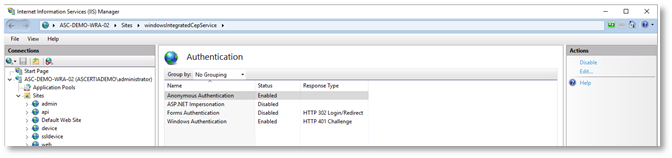
- Windows Authentication will now appear as enabled and Anonymous Authentication will now appear as disabled for the windowsIntegratedCepService. Repeat the same process for the windowsIntegratedCesService.
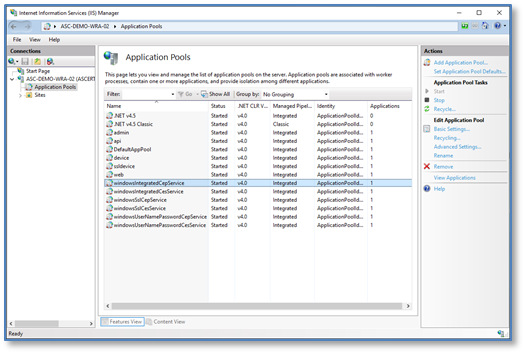
Configure IIS Application Pools
ADSS Web RA Server IIS application pools need to be configured to run using the Windows service account created earlier.
- Expand Start > Administrative Tools > Internet Information Services (IIS) Manager.
- The Internet Information Services (IIS) Manager management console will appear.
- Expand the Server and select Application Pools from the left panel.
- Select windowsIntegratedCepService from the centre panel. Click Advanced Settings from Actions in the right panel.
- The Advanced Settings dialog will display, select the ApplicationPoolIdentity field and click the Edit button.

- The Application Pool Identity dialog will display. Select the Custom account radio button, and then click Set.
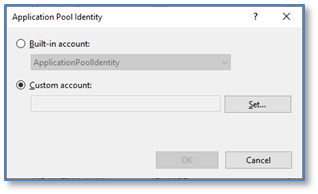
- The Set Credentials dialog will display. Enter the username as domain\username, then enter and confirm the password, click OK.
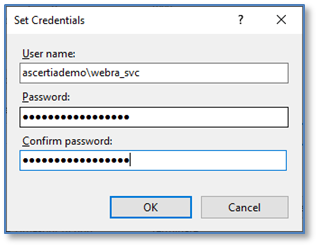
- You will be returned to the Application Pool Identity dialog, click OK.
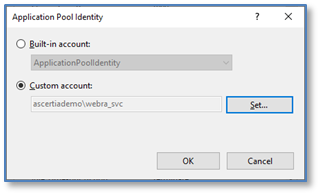
- You will be returned to the Advanced Settings dialog, click OK.
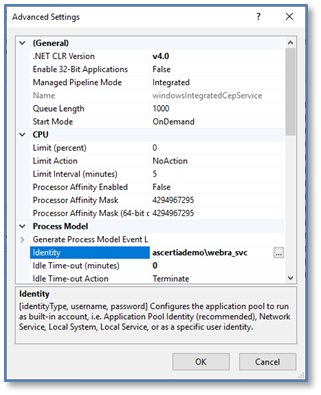
- You will be returned to the Internet Information Services (IIS) Manager management console, note the Identity for the windowsIntegratedCepService has now been updated to the new identity.

- Repeat this process for the windowsIntegratedCesService.
- Once complete, right-click Start > Run, type cmd, click OK.
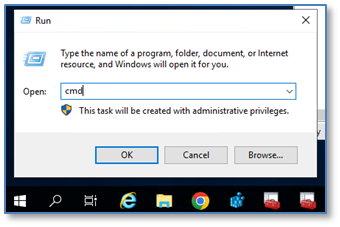
The Windows command prompt will display, type the following command, press enter:
C:\Users\administrator.ASCERTIADEMO>iisreset
Expected output
C:\Users\administrator.ASCERTIADEMO>iisreset
Attempting stop...
Internet services successfully stopped
Attempting start...
Internet services successfully restarted
ADSS Web RA Server Configuration
Before configuring Web RA for Windows Enrolment, you will need the following:
- Root CA Certificate from ADSS Server.
- Certificate Templates, ADSS Certificate Profiles, Client ID and Secret from ADSS Server.
- Microsoft Certificate Templates to map to ADSS Server Certificate Templates.
- Microsoft Active Directory:
- Domain controller host
- Domain controller port
- Domain User Id and password
- Simple Mail Transfer Protocol (SMTP):
- SMTP Server Address
- SMTP Server Port
Following the installation of ADSS Web RA Server, the Windows enrolment feature must be enabled for any role who will need access to this feature. Use the following process to enable Windows Enrolment for the desired role.
Access Control
The default roles that are installed with ADSS Web RA Server are not granted access to the Windows Enrolment feature; these must be enabled to configure the product.
- Access Web RA administration portal as an administrator with permissions to assign the Windows Enrolment settings to roles. Navigate to Access Control > Roles >
 > Edit.
- Select Windows Enrolment and then click Save.

Enable Windows Enrolment
By default, when ADSS Web RA Server installs the Windows enrolment feature, it is disabled and must be enabled and configured by an administrator.
- Access Web RA administration as an administrator with permissions to enable the Windows enrolment feature, navigate Configurations > Windows Enrolment.
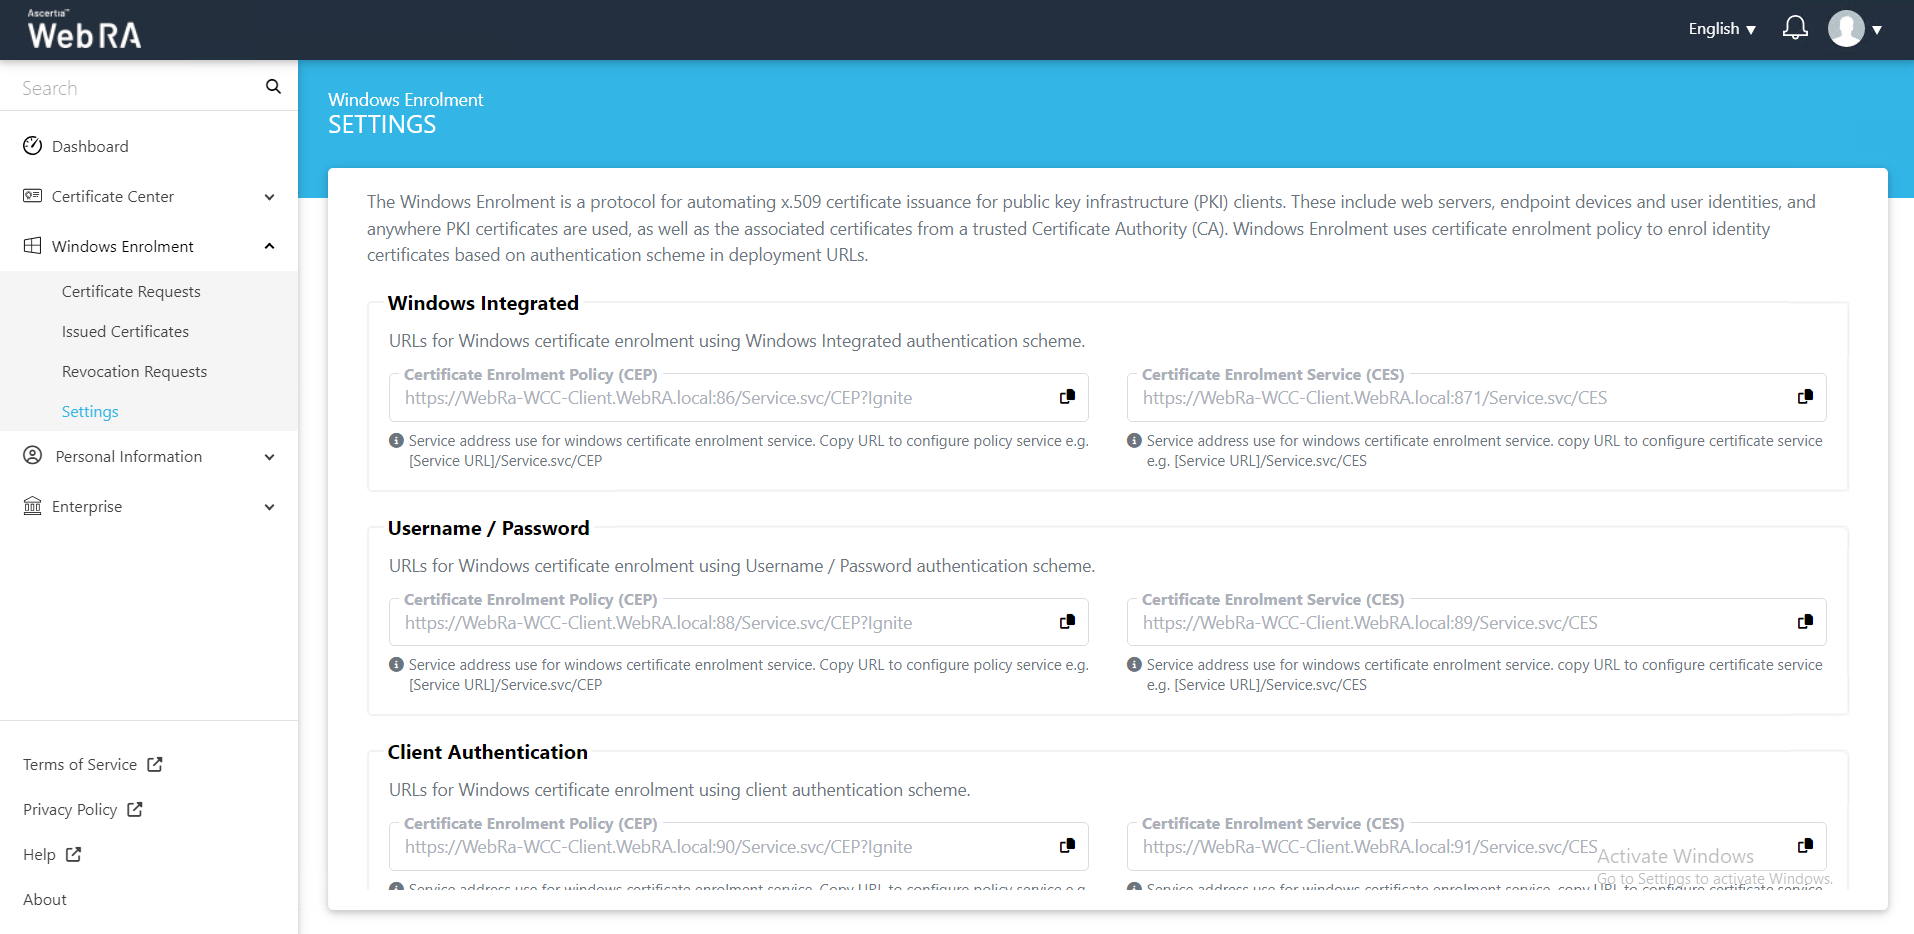
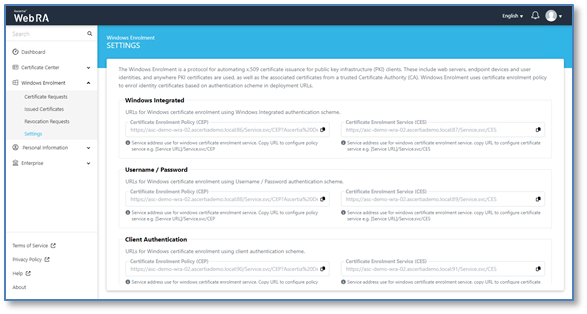
- Tick the check box to enable Windows Enrolment, click the upload button for the CA Certificate field to import the Root CA Certificate. Ensure all the URLs reflect the fully qualified DNS name for the Web RA server installation, then click Save.
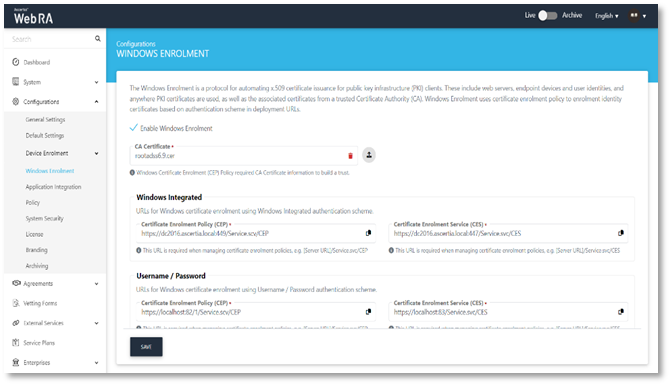
Windows Integrated Authentication mechanism: (As displayed in the image above).
|
Field |
Description |
|
Certificate Enrolment Policy (CEP) |
Enter URL to manage certificate enrolment policies, e.g. [Server URL]/Service.svc/CEP. For instance: https://dc2016.ascertia.local:449/Service.scv/CEP |
|
Certificate Enrolment Service (CES) |
Enter URL to manage certificate enrolment policies, e.g. [Server URL]/Service.svc/CES. For instance: https://dc2016.ascertia.local:447/Service.svc/CES |
Username / Password Authentication mechanism: (As displayed in the image above).
|
Field |
Description |
|
Certificate Enrolment Policy (CEP) |
Enter URL to manage certificate enrolment policies, e.g. [Server URL]/Service.svc/CEP. For instance: https://localhost:82/1/Service.scv/CEP |
|
Certificate Enrolment Service (CES) |
Enter URL to manage certificate enrolment policies, e.g. [Server URL]/Service.svc/CES. For instance: https://localhost:83/Service.svc/CES |
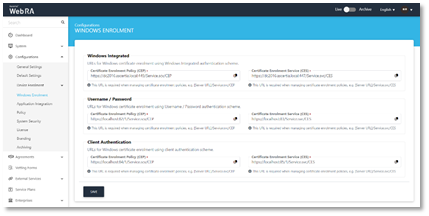
Client Authentication mechanism: (Scroll down to see the next image).
|
Field |
Description |
|
Certificate Enrolment Policy (CEP) |
Enter URL to manage certificate enrolment policies, e.g. [Server URL]/Service.svc/CEP. For instance:https://localhost:84/1/Service.scv/CEP |
|
Certificate Enrolment Service (CES) |
Enter URL to manage certificate enrolment policies, e.g. [Server URL]/Service.svc/CES. For instance: https://localhost:85/1/Service.svc/CES |
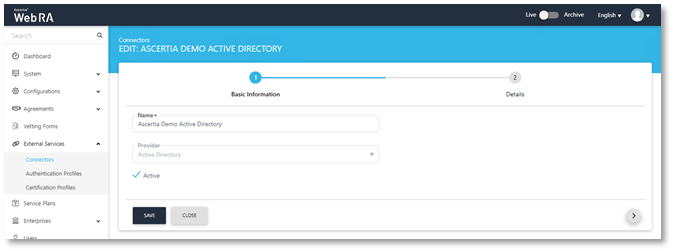
Create Active Directory Connector
In order to authenticate users and issue certificates using Kerberos to domain members, ADSS Web RA Server requires an Active Directory connector. This section provides the configuration steps to create this connector.
- Expand External Services > Connectors > click +
- The basic information page will display, Enter a name and select Active Directory from the provider drop-down, tick the Active check box, click >.
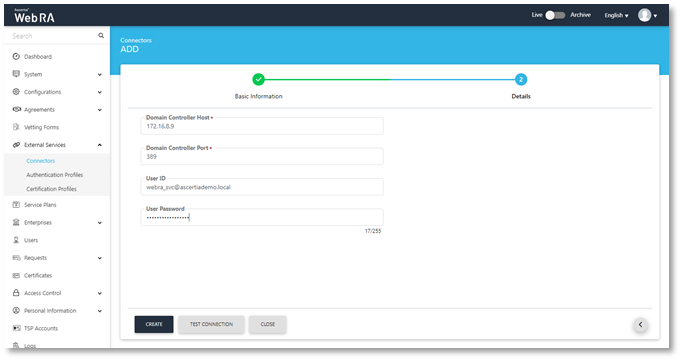
- The Details page will display, enter the Domain Controller Host, Domain Controller Port, Web RA Service Account User ID and Password. Click Create.
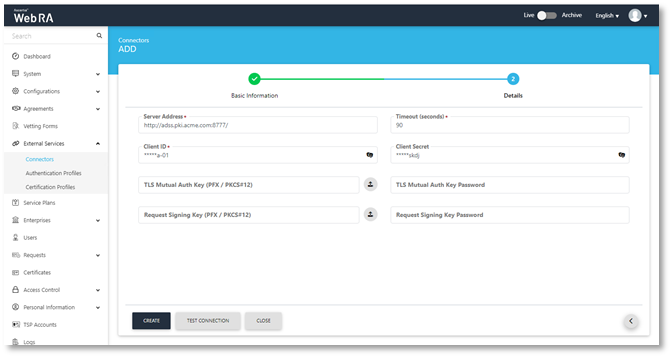
Create ADSS Server Connector
ADSS Web RA Server issues certificates from ADSS Server based Certification Authorities. This section provides steps to create the connector between Web RA Server and the ADSS Server Certification Service.
- Expand External Services > Connectors > click +.
- The Basic information page will display, enter a name and select ADSS Server as the provider, tick the Active check box, click >.
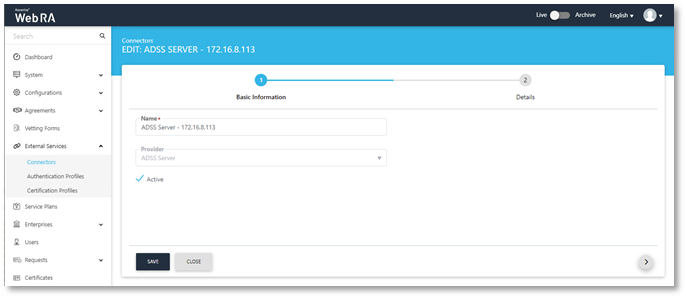
- The Details page will display, provide the following information, click create
- Server Address
Specify the address and port number of ADSS Server.
- Client ID
Specify the Client ID configured in the Client Manager module of the ADSS Server for this connector
- Client Secret
Specify the client secret generated in the ADSS Server against this Client ID.
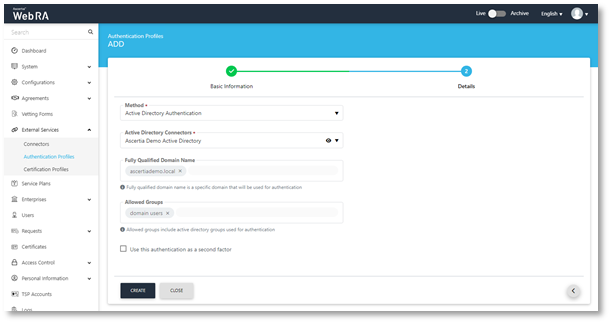
Create an Authentication Profile
Microsoft requires that ADSS Web RA Server authenticates to Active Directory in order to access the Microsoft Certificate Templates and information about users and computers that will be submitted to the CA as part of a certificate request. This section provides the steps to create an authentication profile that is used by Web RA Server to authenticate to Active Directory using a Windows Service Account.
- Expand External Services > Authentication Profiles > click +
- The Details page will display, enter a name, tick the Active check box, and click >.

- The Details page will display, set the following information, and click Create.
- Method - Active Directory.
- Active Directory Connectors – Select the Active Directory Connector created earlier.
- Fully Qualified Domain Name – Enter the Fully Qualified Domain Name.
- Allowed Groups – Domain Users.
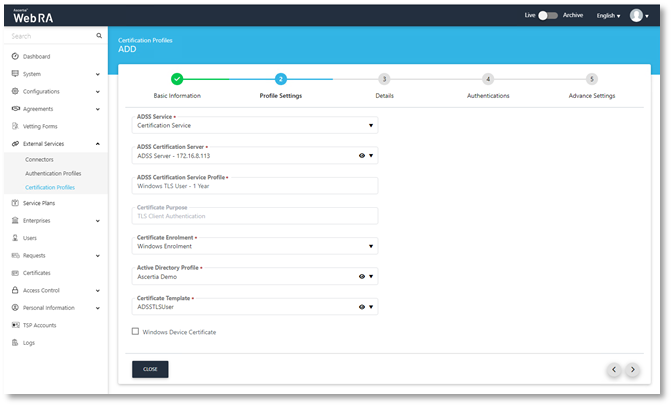
Create a Certification Profile
Active Directory and ADSS Server maintain certificate templates that are used to generate keys and certificates for people, devices and applications. ADSS Web RA Server requires a certification profile for each type of certificate. It will be issuing using the Windows Enrolment feature, the following section provides steps on how to create a certification profile that maps a Windows Certificate Template to an ADSS Server Certification profile and template to ensure that certificates are issued with the correct attributes, extensions, and validity periods.
The following is an example of creating a profile to support TLS User Authentication.
- Expand External Services > Certification Profiles > click +.
- The Basic information page will display, enter Windows TLS User - 1 Year the following information, tick the Active check box, click >.

- The Profile Settings page will display, set the following, click >:
|
ADSS Service |
Certification Service |
|
ADSS Certification Server |
Set the ADSS Server connector configured earlier |
|
ADSS Certification service Profile |
Set the ADSS Server Certification Service Profile Name e.g. Windows TLS User - 1 Year |
|
Certificate Purpose |
Is auto set by ADSS Server |
|
Certificate Enrolment |
Windows Enrolment |
|
Active Directory Profile |
Set to the Active Directory Connector created earlier |
|
Certificate Template |
Set to the Windows Certificate Template created earlier |
|
Windows Device Certificate |
Check this tick box if the certificate template if for a server, desktop or device. |
- The Details page will display, these values are only editable if the ADSS Server Certification Profile Allows, if editable set the following, click >:
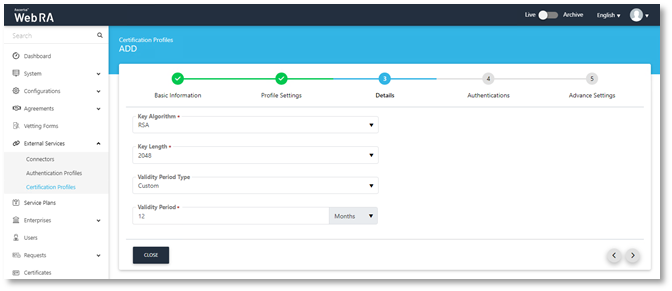
- Key Algorithm
Key Algorithm that will be used to generate the key pair in the smart card/token. This configuration is coming from the ADSS Server so it cannot be changed
- Key Length
Key Length that will be used to generate the key pair in the smart card/token. This configuration is coming from the ADSS Server so it cannot be changed.
- Validity Period Type
- Validity period type can be configured as a Fixed to restrict the enterprise user to change the certificate validity or it can be set as Custom if enterprise RAO allow an enterprise user to set validity period while creating a certificate request.
- These Fixed and Custom values can only be used on ADSS Web RA admin, if the selected ADSS Certification profile has set over ridable option in certification profile. It will be shown as fixed validity period type otherwise.
- Validity Period
Set the certificate validity period.
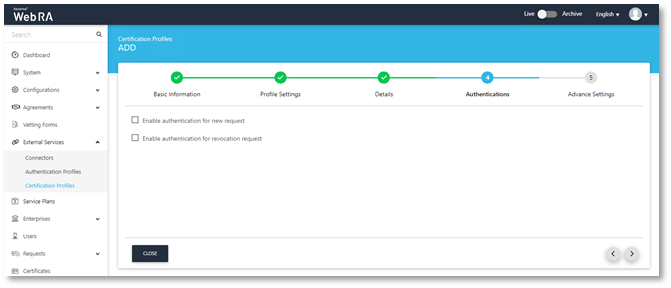
- The Authentications page will display. Accept the details, click >.
- The Advance Settings page will display, accept the default, click Create.

- Repeat this process for any other certificate templates that are required.
Configure a Service Plan
ADSS Web RA Server uses service plans to govern which services and features are available to a given enterprise. This section provides example steps on how to create a basic service plan that will enable the issuance of certificates to Windows domain members, for a detailed reference on service plan settings, please refer to the ADSS Web RA Server product documentation.
- Expand Service Plans click +
- The Basic Information page will display, enter a name, tick the Active check box, click >.

- The Profile Settings page will display.
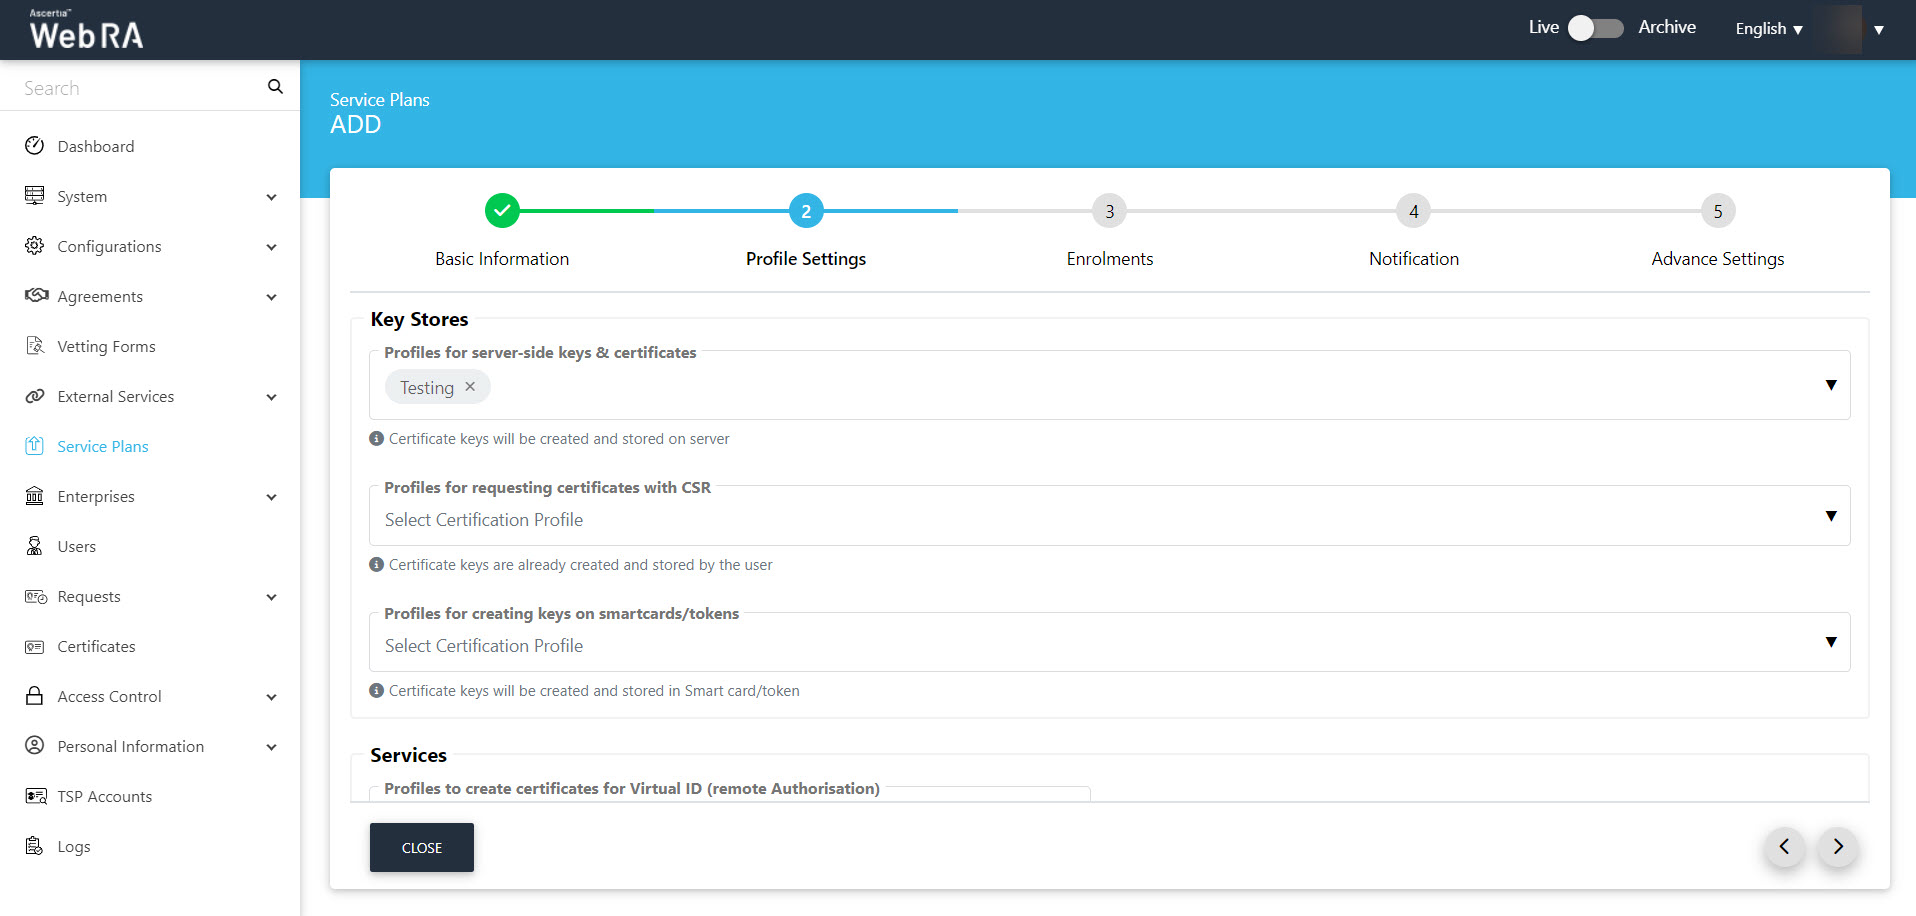
Under the Key Stores section, there are different types of profiles used to create certificates. Then click > to proceed.
- The Enrolments page will display.
Click the Profile to create certificates for Windows user enrolment drop down and select the profile created earlier, repeat for Profile to create certificates for Windows device enrolment, click >.
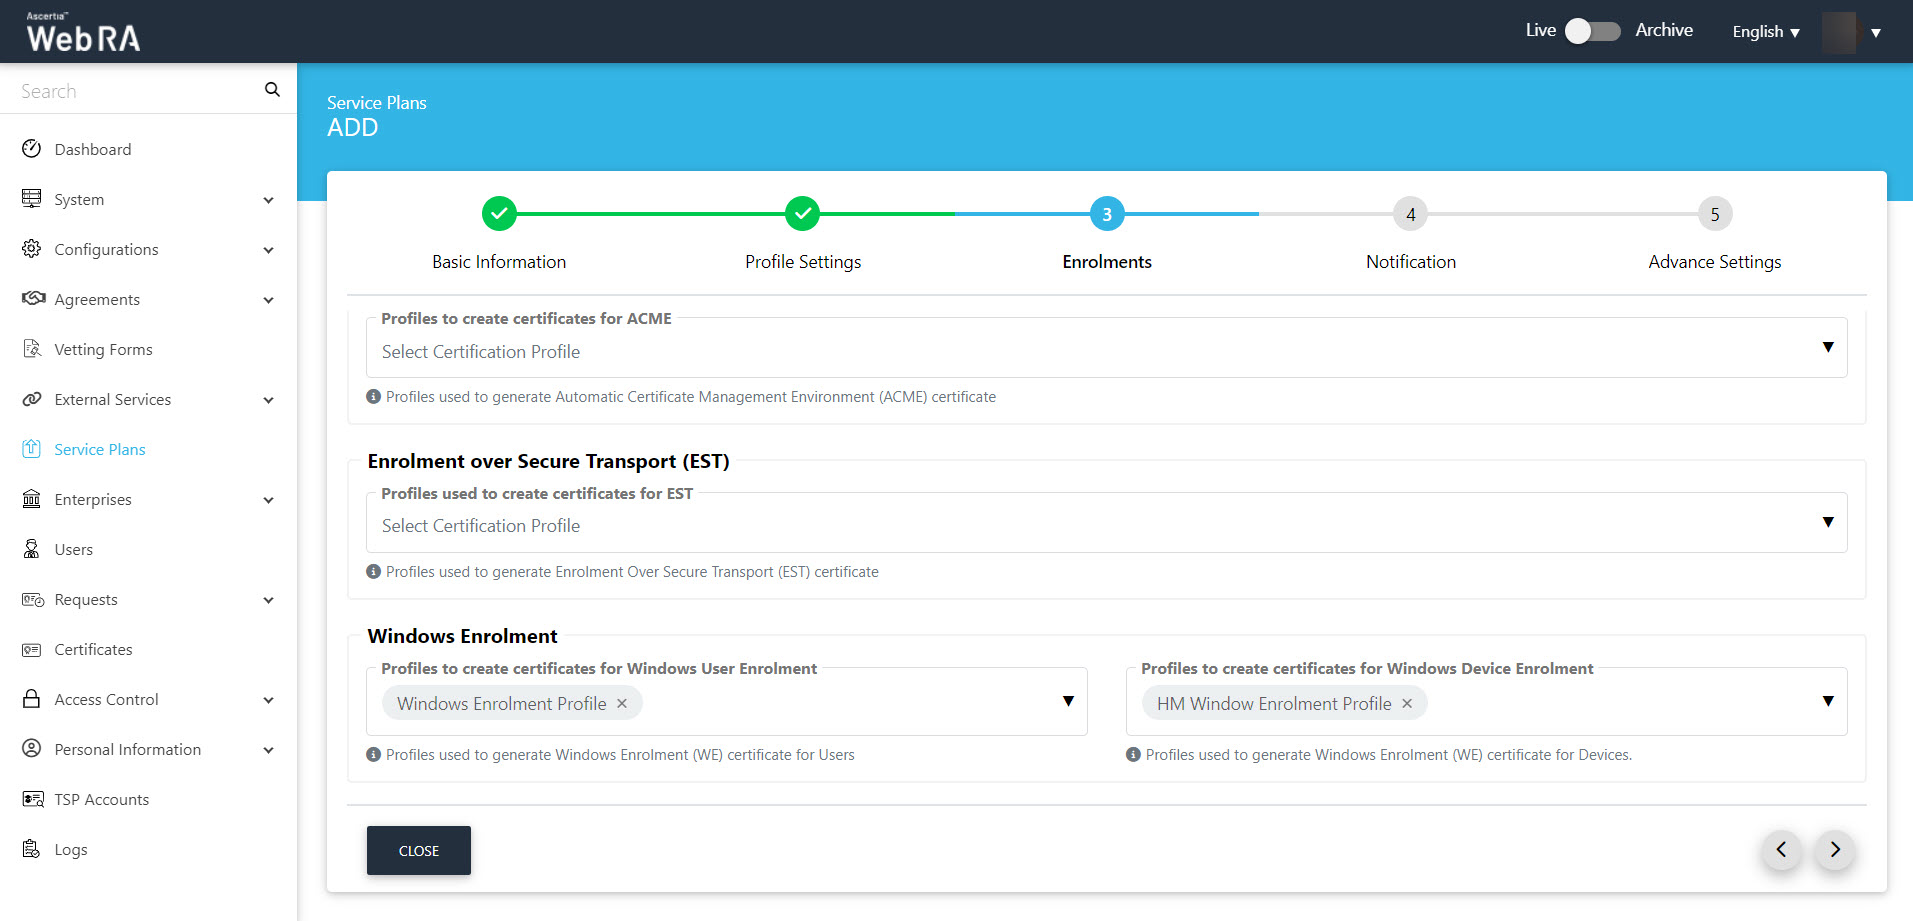
|
Profile to create certificates for Windows user enrolment |
Configure this profile for user-based certificates |
|
Profile to create certificates for Windows device enrolment |
Configure this profile for device-based certificates |
- The Notifications page will display, enable the notification providers you require for user notifications to be sent, click >.
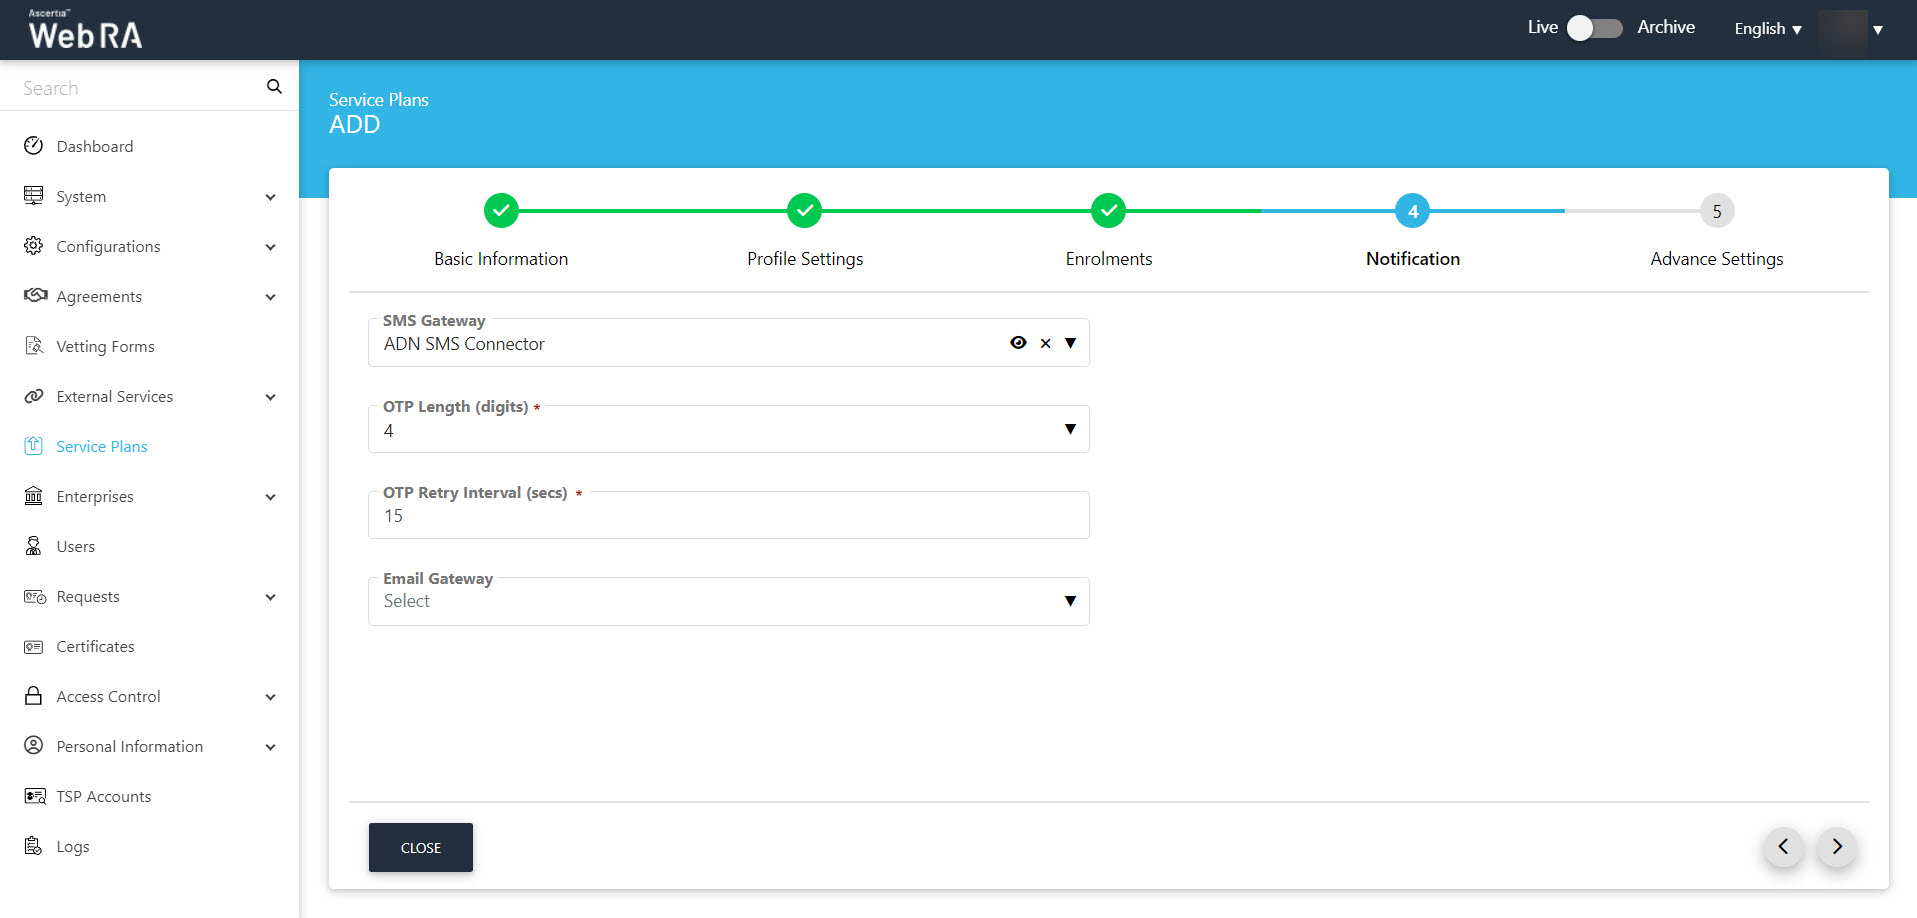
|
SMS Gateway |
SMS gateway connector to receive OTP via SMS. |
|
Email Gateway |
SMTP connector to receive email notifications. |
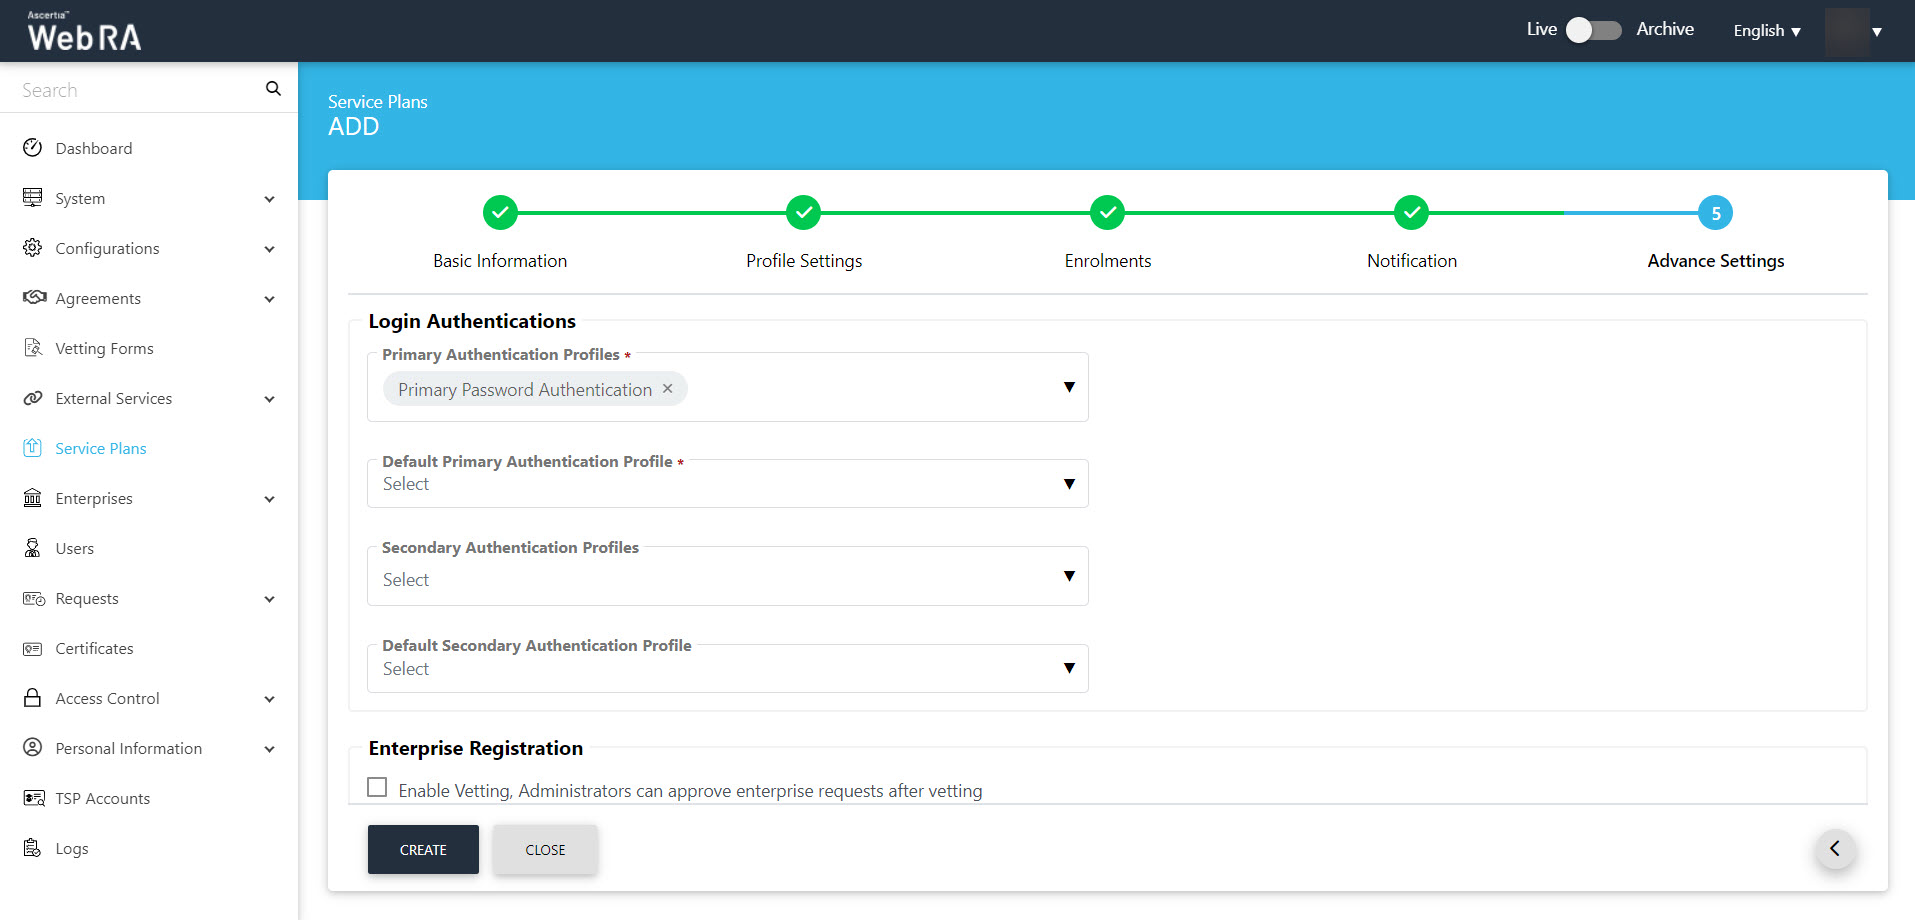
- The Advance Settings page will display, Web RA Server provides primary and secondary authentication profiles. “Primary Authentication Profiles” are used to control how a user authenticates to Web RA to access the user portal. “Secondary Authentication Profiles” are used when an enterprise wishes to use an additional separate authentication mechanism to authorise an action, such as certificate rekey or revocation.
- Set the Primary Authentication Profile to the authentication profile you created earlier.
- Set the Default Authentication Profile to the authentication profile you created earlier, click Create.
Create an Enterprise
ADSS Web RA Server is a multi-tenanted product that enables different organisations or different departments to be created, each have their own administrative users that can create and manage user invites, and user and device certificates. This section provides steps to create an enterprise that will be used to connect to Active Directory to issue and manager digital certificates for domain members.
- Access Web RA administration as an administrator with permissions to create enterprises, navigate to Enterprises > Requests click on +
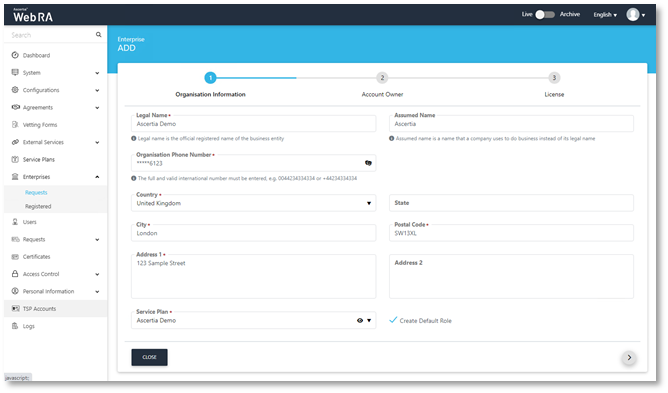
- The Organisation Information page will display, provide the following information, click >
- Legal Name
Legal Name is the official name of the organisation under which the organization is registered with the government and it is the name that is used when submitting tax to the government e.g. Ascertia Limited.
- Assumed Name
Assumed Name could be the short hand name of the organisation that is commonly used e.g. Ascertia
- Organisation Phone Number
Official phone number of the organisation that is registered in the government documents.
- Address
Complete address of the organisation as it was provided to government at the time of company registration.
The following fields should be filled as part of Address:
- Country
- State
- City
- Postal Code
- Address 1
- Address 2
- Service Plan
Select a service plan for this enterprise that you created for Windows enrolment.
- Create Default Role
Tick this checkbox to create a default role while creating a new enterprise.
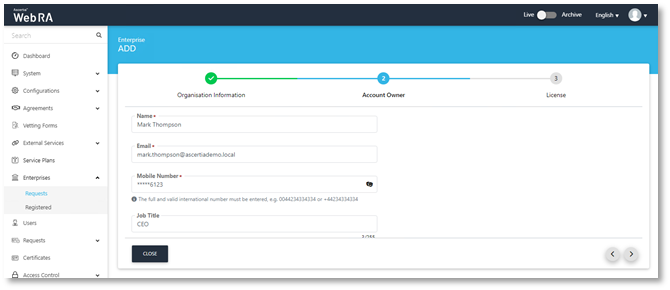
- The Account Owner page will display, enter the following information, click >.
- Name
Name of the enterprise owner. It could be any representative of the organisation but ideally, it should be the CEO. The enterprise owner should initiate any change requested in the enterprise.
Email address of the enterprise owner. An email will be sent to this email address to create an account on the ADSS Web RA Web.
- Mobile Number
Mobile number of the enterprise owner to send the OTP code if enabled in the profile.
- Job Title
The role of the enterprise owner in his organisation.
- The License page will display, enter the certificate quota and expiry for the Enterprise, click create.
- Name
Name of the certification profile for which an enterprise wants to use ADSS Web RA to create certificates.
- Unlimited
A check box can be used to allow a user to create unlimited certificates. This field will appear only if a user is allowed to create unlimited certificates.
- Certificates Quota
This defines the total number of certificates an enterprise is allowed to generate from ADSS Web RA against each certification profile.
- Expiry
This defines the duration for which these certificates are valid.
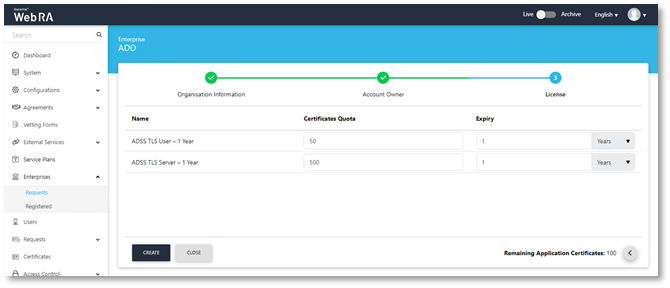
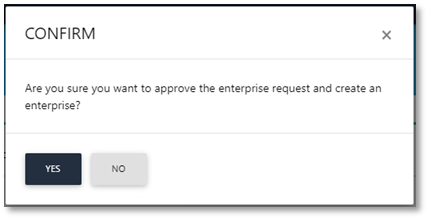
- A confirmation dialog will display, click Yes to create the enterprise.
Edit the Enterprise Default Role
Windows Users are automatically registered in the default enterprise role during the auto-enrolment of certificates, this section provides step to control which certificates will be displayed to a user I the Web RA Server User Portal
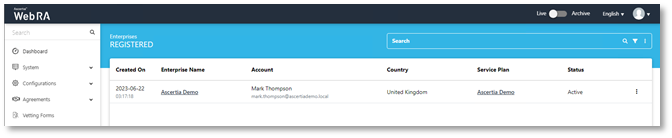
- Access Web RA administration as an administrator with permissions to edit roles, expand Enterprises > Registered > select the Enterprise Name > Roles > click the
 to edit the Default Role > Certificate Management.
 - Check the Windows Enrolment check box and select the certificate profiles from the Profile to create certificates for Windows User Enrolment or Profile to create certificates for Windows Device Enrolment.
Note: If the role is for end users who you only wish to see their certificates, do not enable the Profile to create certificates for Windows Device Enrolment check box.
If you are creating a role to manage device certificates, only then only check the Profile to create certificates for Windows Device Enrolment
- Click Save when complete.
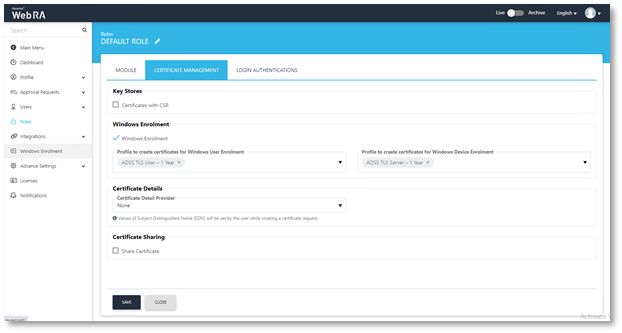
Users can access Web RA to manage certificates issued to them by the Windows Enrolment process. The Profile to create certificates for Windows User Enrolment drop-down enables Web RA Administrators to define which user profiles a user can access via the Web RA user portal. The Profile to create certificates for Windows User Enrolment drop-down enables Web RA Administrators to define which device profiles a user can access via the Web RA user portal.
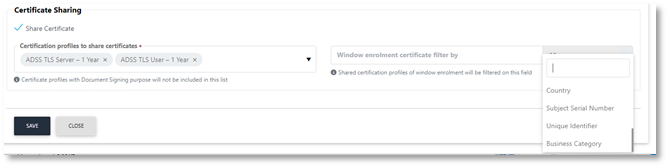
Certificate Sharing (and filter)
This setting allows you to configure profiles to share certificates. Once configured this profile will enable you to apply a filter based on elements of a certificates subject distinguished name, these include, All, common name, first name, country, etc. on basis of which certificate requests will appear on the ADSS Web RA web portal, and the user will only be able to manage according to the filters applied here. Once the required filters have been defined, click Save.
Certificate Sharing is a setting that is used to enable administrators to have a view on multiple certificates, for example, Certificate Sharing enables you to create a role that can see all device TLS Certificates with OU=TLS Devices in the SDN.
Create Web RA Service Account
ADSS Web RA Server uses a windows service account to access Active Directory Certificate Templates and domain member information. This account must be activated in Web RA, the following provides steps to create and enable the service account.
- Access the ADSS Web RA Server as the Enterprise RAO where you have enabled Windows Enrolment.
- Expand Enterprises. Click Registered from the left menu and click on the Enterprise Name from the centre panel.
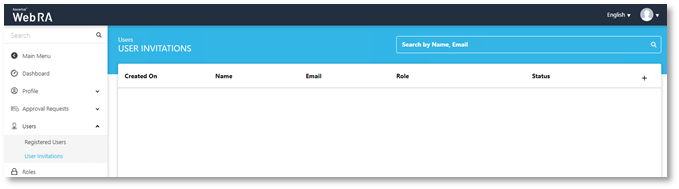
- Click Users > User Invitations from the left menu. The User Invitations page will display. Click on the + to create a new invitation.
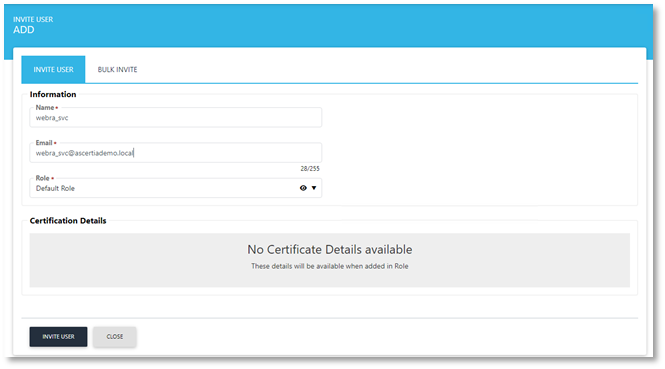
- The Invite User page will display. Enter the following information to invite the Windows Web RA Service account that was created earlier. Click Invite User.
- Name: webra_svc
- Email: webra_svc@ascertiademo.local
- Role: Default Role
- The user invitation will be generated and sent. The service account will need to be activated using the email sent to the service accounts email address.
Subject Distinguished Name Controls
Digital Certificates contain information about people, devices, and applications, to identify a certificate holder their identity information is first verified and then it is sent to a certification authority in a certificate request, the identity information is contained in the subject field in a digital certificate.
ADSS Web RA Server CEP and CES services work together to authenticate users and computers, and then collects information about them to place into the subject field in certificates. This section will cover Web RA Server’s default behaviours for constructing the subject field in the certificates issued during Enrolment.
ADSS Web RA Server will enforce the following Subject Distinguished Name elements:
- Country Code
- Organisation
These will appear in a digital certificate in the following format:
C=GB
O=Ascertia Demo
Both, Country code and organisation name are defined by the Enterprise Legal Name and the Enterprise Country.
Users and Devices can exist in Active Directory in different locations, administrators group users and devices by department, by user or device type, or other groupings, this information also needs to be added to a user or devices digital Certificate. When the Web RA CES service receives a certificate request, it will query Active Directory and search for the user or the device that is enrolling, it will retrieve the following information:
- Common Name
- Organisation Unit
The Web RA CES service will also query active directory to populate the Subject Alternative Name in a digital certificate, these are created as follows:
User Subject Alternative Name
- Email Address
- User Principal Name
Device Subject Alternative Name
- DNS name
Activate ADSS Web RA Server enterprise service account
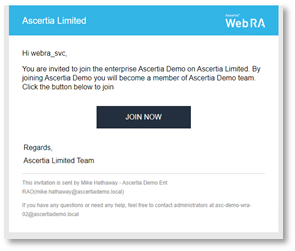
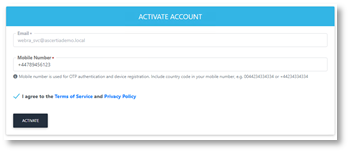
- Access the Web RA invitation email that has been sent to the inbox for the webra_svc service account and click on the Join Now button.
- The Account Activation page will display, provide a mobile account number for the account and check the I agree to the Terms of Service and Privacy Policy check box on the activation form, and click Activate.
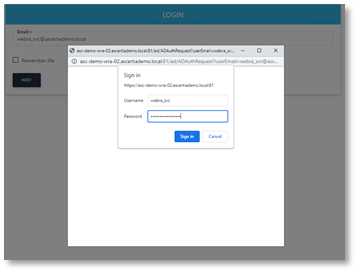
- You will be returned to the login page, enter the Web RA service account email address, click Next.

- The Windows authentication dialog will display, enter the Windows user id and password for the Web RA service account, and click Sign in.
- The ADSS Web RA Server User Dashboard will display.
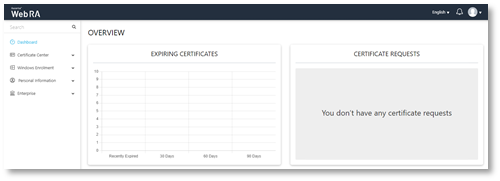
- You have successfully created the Web RA Service Account.
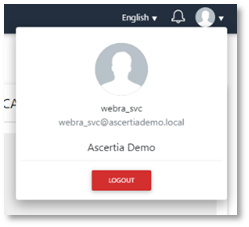
- Select the down arrow next to the user’s silhouette and select Logout.
Active Directory Configuration
Create an enrolment service in Active Directory
Microsoft requires an enrolment service for each CA that will issue certificates via ADSS Web RA Server to users and devices.
For the following process, you will need a copy of the Root CA certificate that will be copied to the domain controller.
- Log in to the server hosting Active Directory as a member of the Domain Admins and Enterprise Admins groups.
- Right-click Start > Run, type cmd and click OK.
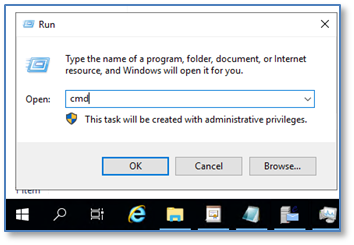
- At the command prompt run the following command where the CA certificate is located at c:\certs
- certutil -f -dspublish C:\certs\RootCA.cer RootCA
- Expected output
- C:\Users\Administrator>certutil -f -dspublish C:\certs\RootCA.cer RootCA
- ldap:///CN=ACME Root CA,CN=Certification Authorities,CN=Public Key Services,CN=Services,CN=Configuration,DC=ascertiademo,DC=local?cACertificate
- Certificate added to DS store.
- ldap:///CN=ACME Root CA,CN=AIA,CN=Public Key Services,CN=Services,CN=Configuration,DC=ascertiademo,DC=local?cACertificate
- Certificate added to DS store.
- CertUtil: -dsPublish command completed successfully.
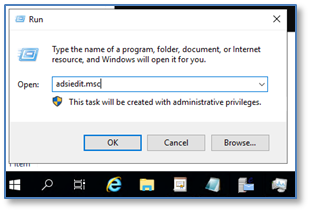
- Right-click Start > Run, type adsiedit.msc and click OK.
- ADSI Edit will launch. Right-click ADSI Edit and click Connect To.
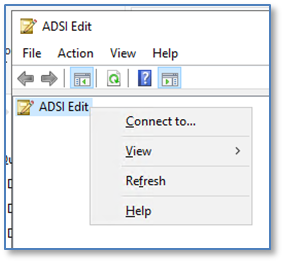
- A Connection Settings dialog will display. Click the Select a well known Naming Context dropdown and select Configuration. Click OK.

- ADSI Edit will connect to the Configuration instance of Active Directory. From the left panel, expand Configuration > CN=Configuration, DC=ascertiademo, DC=local > CN=Services > CN=Public Key Services > CN=Certificate Authorities, the Root CA will display in the centre panel.
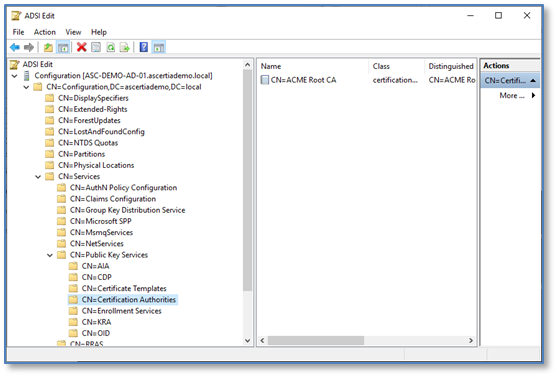
- In ADSI Edit right-click CN=Enrollment Services > New > Object.
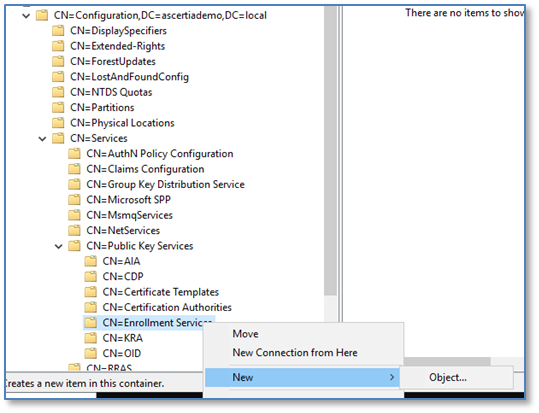
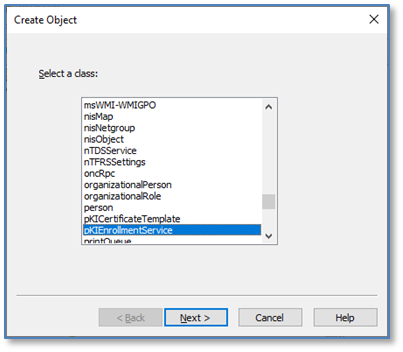
- The Create Object dialog will prompt you to Select a class list, highlight pkIEnrolmentService, click Next.
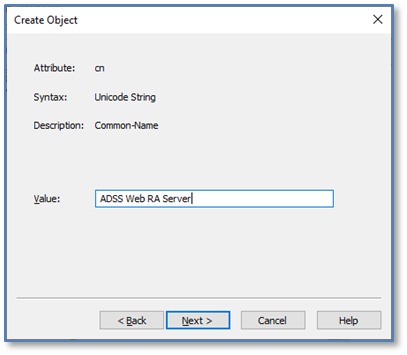
- The Create Object dialog will prompt you to provide a Common-Name, enter ADSS Web RA Server, click Next.
- The Create Object dialog will prompt you to complete the process, and then click More Attributes.
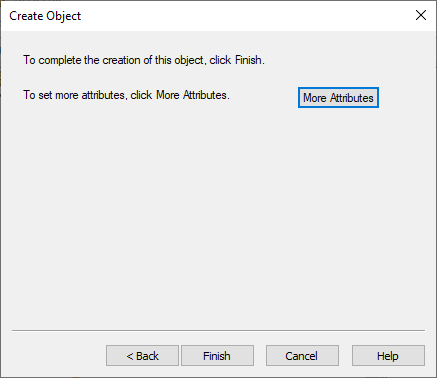
- The Attributes dialog will display. Set the Select a property to view drop down to Certificate Templates and enter ADSSTLSUser in the Edit Attribute field. Click Add.
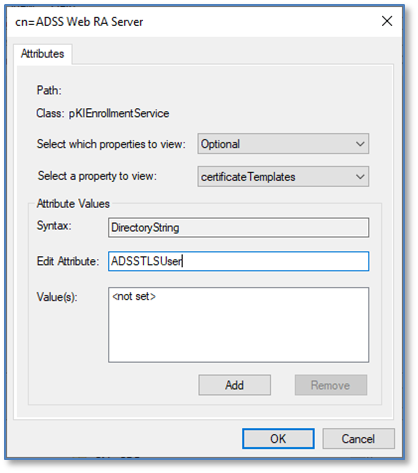
- Repeat this for ADSSTLSServer.
- Note: These names must match the Template Name field from the Microsoft Certificate Templates created earlier.
- Click OK when complete, you will be returned to the Create Object dialog, click Finish.
Configure Certificate Enrolment
Microsoft clients support two types of certificate enrolment:
- Manual certificate enrolment.
- Certificate auto-enrolment.
Manual Certificate Enrolment
When using this method, users can manually enrol certificates for clients by performing using Microsoft Management Console (MMC) for personal certificates.
Define an Enrolment Policy for Domain Computer
- Access ADSS Web RA Server as the Web RA Service Account.
- Navigate to Windows Enrolment > Settings copy the Windows Integrated Certificate Enrolment Policy URL.

- Access the domain controller as an administrator and access the Group Policy Management console by executing gpmc.msc in Run.

- Group Policy Management Console will open.
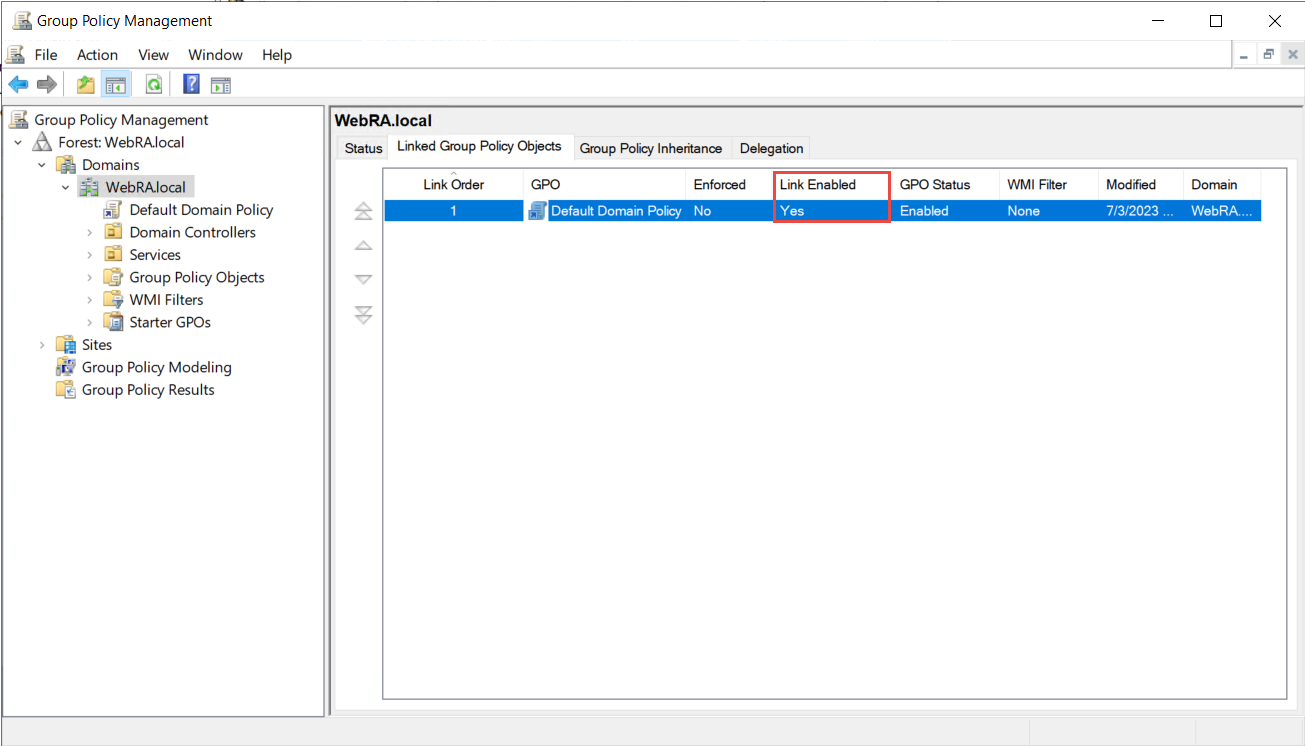
- Navigate to Linked Group Policy Objects.

- Make it sure that the link is enabled against the group policy object in which you are going to configure ADSS Web RA enrolment policy.
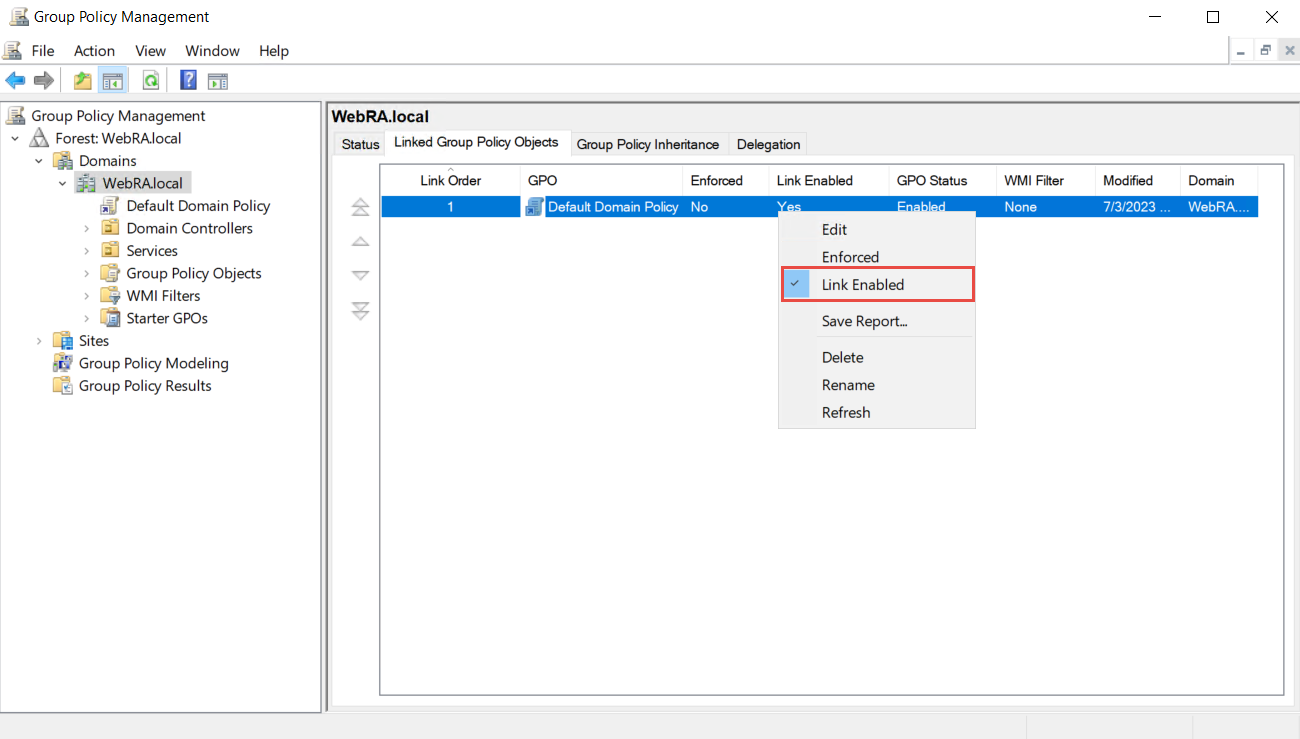
- If link is not enabled then right click on the Policy object and click on Link Enabled.

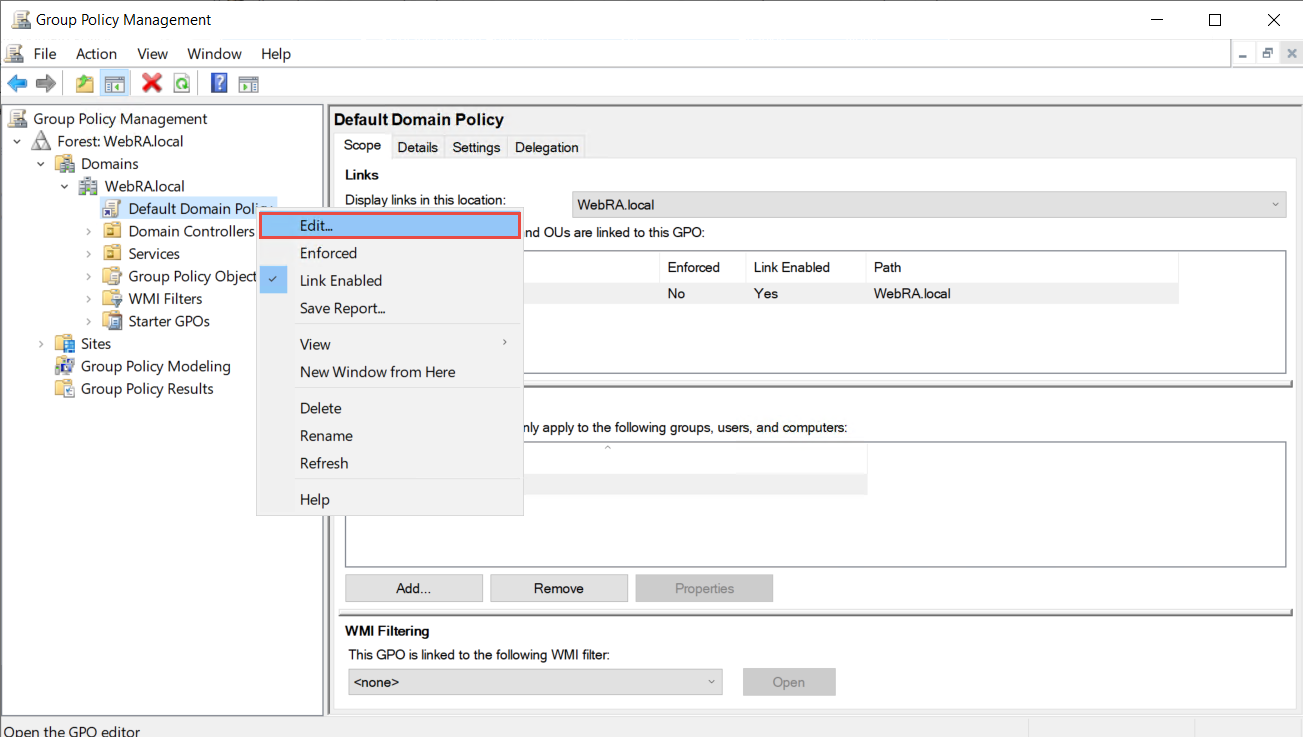
- Right click on the Policy in which you are going to configure the ADSS Web RA Enrolment Policy and click Edit. Group Policy Editor will open.

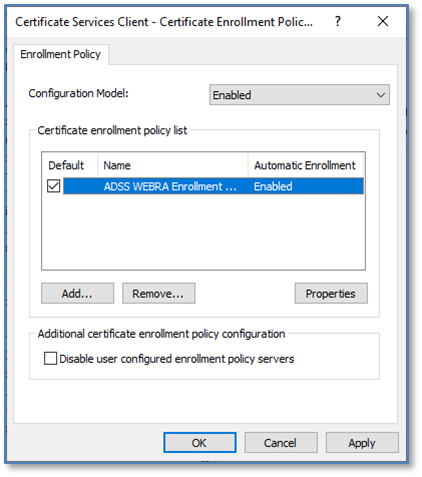
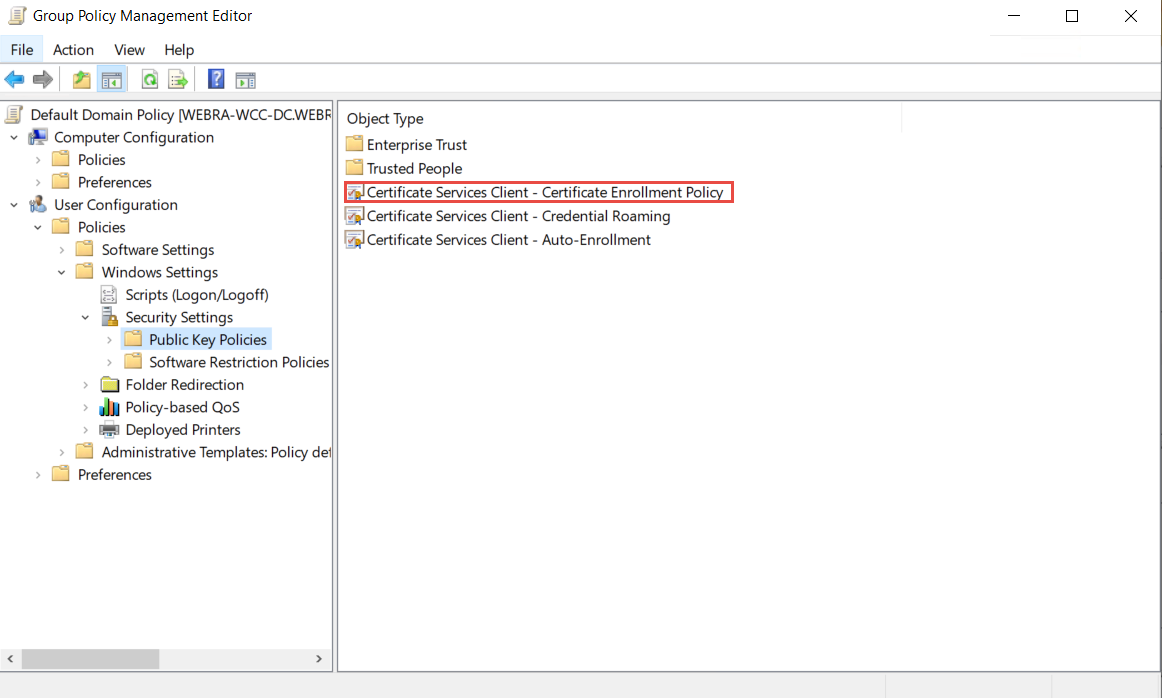
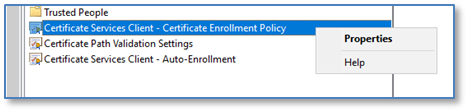
- In the Group Policy Management Editor expand Computer Configuration > Policies > Windows Settings > Security Policies > Public Key Policies, double click on Certificate Services Client – Certificate Enrolment Policy.

- The “Certificate Services Client – Certificate Enrolment Policy” will display, click Add.
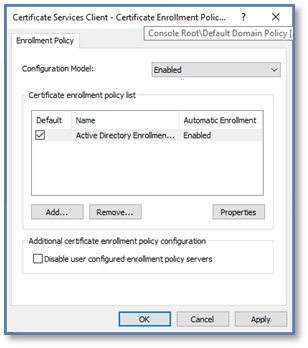
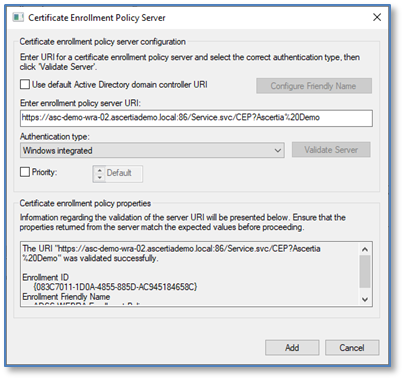
- The Certificate Enrolment Policy Server properties dialog will display. Paste the ADSS Web RA Server Windows Integrated Certificate Enrolment Policy URL into the Enter enrolment policy server URI field and click Validate Server, the connection test will take place, click Add.

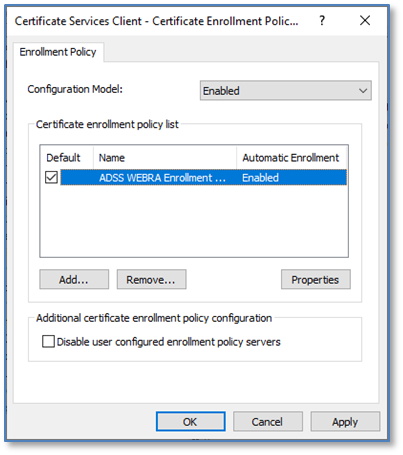
- You will be returned to the Certificate Enrolment Policy Server properties, tick the check box to mark this policy server as the default, OK.
Define Enrolment Policy for Domain User
- Access ADSS Web RA Server as the Web RA Service Account.
- Navigate to Windows Enrolment > Settings copy the Windows Integrated Certificate Enrolment Policy URL.
- Access the domain controller as an administrator and access the Group Policy Management console by executing gpmc.msc in Run

- Group Policy Management Console will be open.
- Navigate to Linked Group Policy Objects
- Make it sure that the link is enabled against the group policy object in which you are going to configure ADSS Web RA enrolment policy.
- If link is not enabled then right click on the Policy object and click on Link Enabled.
- Right-click on the Policy in which you are going to configure the ADSS Web RA Enrolment Policy and click Edit. Group Policy Editor will open/.
- In the Group Policy Management Editor expand User Configuration > Policies > Windows Settings > Security Policies > Public Key Policies, double click on Certificate Services Client – Certificate Enrolment Policy.
- The Certificate Enrolment Policy Server properties dialog will display. Paste the ADSS Web RA Server Windows Integrated Certificate Enrolment Policy URL into the Enter enrollment policy server URI field and click Validate Server, the connection test will take place, click Add.
- You will be returned to the Certificate Enrolment Policy Server properties, check the tick box to mark this policy server as the default, OK.
Test Computer-based Certificate Enrolment
Computer certificates are enrolled for using the local system security context. For manual enrolment, the certificate enrolment will need to be initiated by the Windows Local System account. The following steps include the use of a Microsoft tool to initiate and test this process.
- Download PsExec from Microsoft.
- Extract PSExec to a suitable disk location.
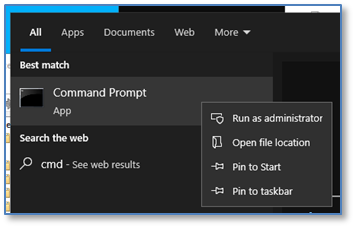
- Click Start, type cmd, right click Command Prompt and select Run as administrator, enter the administrator credentials at the User Account Control dialog if prompted.
- Change directory to the disk location where PsExec was extracted and run the following command.
C:\sw\PSTools>PsExec.exe -sid mmc
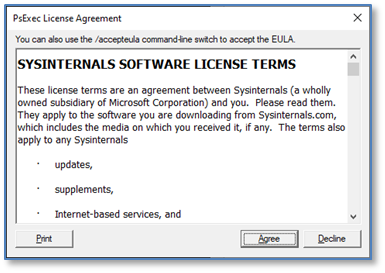
- The PsExec license agreement dialog will display, click Agree.
- The Microsoft Management Console will display, press ctrl+m.
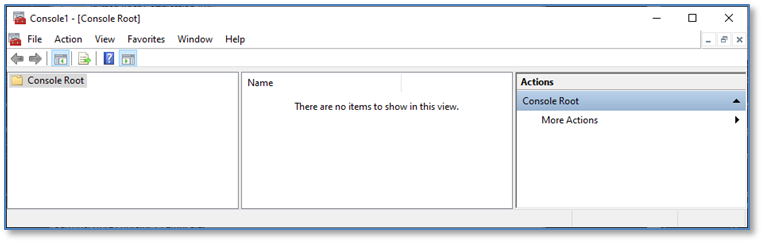
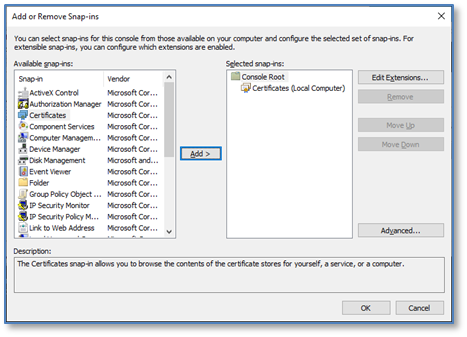
- The Add or Remove Snap-ins dialog will display, select Certificates.
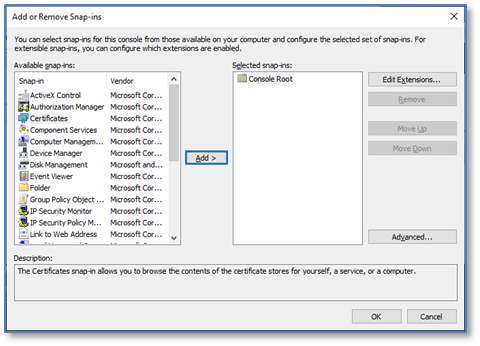
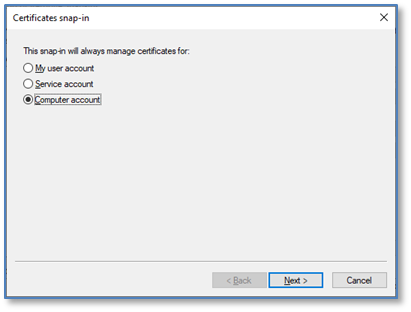
- Click Add, select the Computer account radio button, click Next.
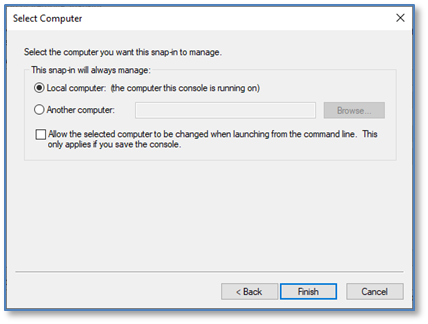
- The Select Computer dialog will display, accept the default, click Finish.
- You will be returned to the Add or Remove Snap-ins dialog, click OK.
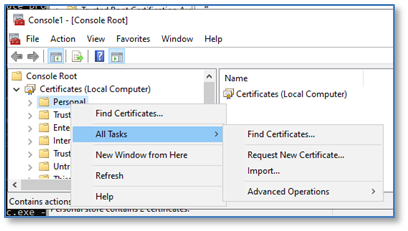
- You will be returned to the Microsoft Management Console with the Local Computer certificate snap-in added. In the left panel, expand Certificates (Local Computer), right click Personal, select Request New Certificate.
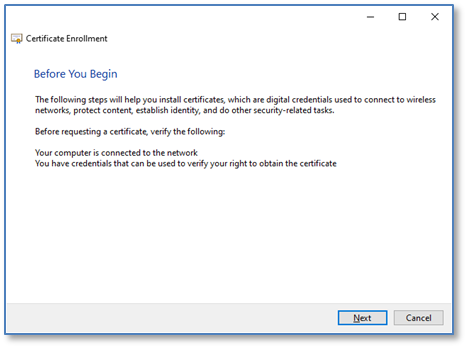
- The Certificate Enrolment wizard will launch, click Next.
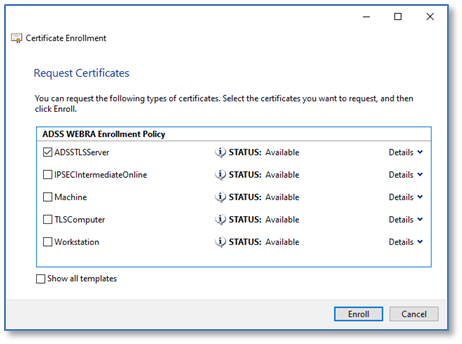
- The Select Certificate Enrolment Policy dialog will display, accept the default of ADSS WEBRA Enrollment Policy, click Next.

- The Request Certificates dialog will display, this will list all certificate templates in Active Directory that the computer has the enrol permission set for, check the tick box next to the certificate template for which you are enrolling, click Enrol.
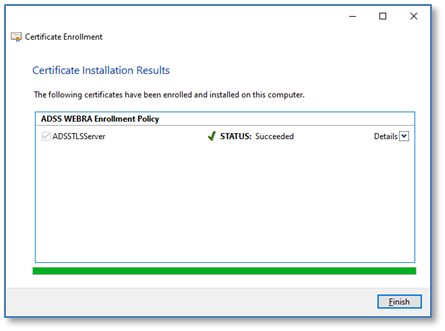
- The Certificate Installation Results dialog will display, the certificate enrolment will display a status Succeeded, click Finish.
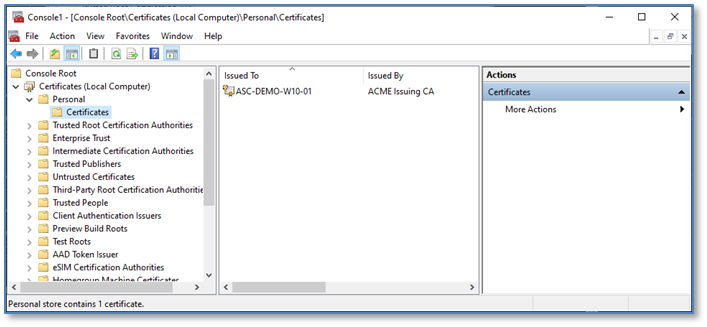
- You will be returned to the Certificates – (Local Computer) management console, expand Personal and click on Certificates, from the right-hand panel, you will see listed the new certificate that was installed as part of the enrolment process.
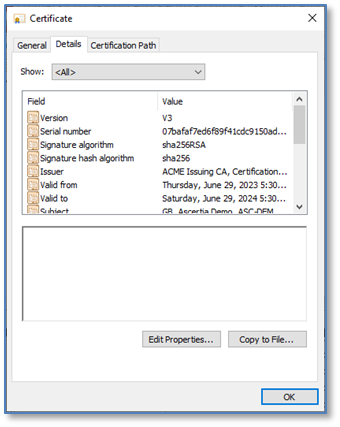
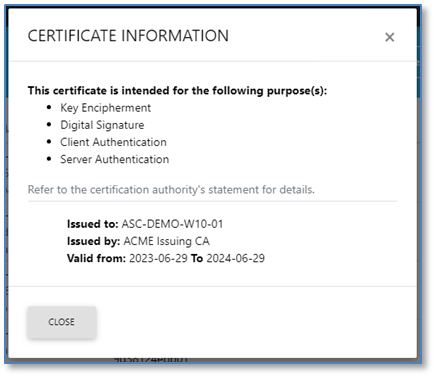
- Double-click on the certificate to view its contents, select the details tab to view the detailed properties, click ok to close the certificate viewer.

- During this process, the computer certificate details will be automatically added to the ADSS Web RA Server Enterprise.
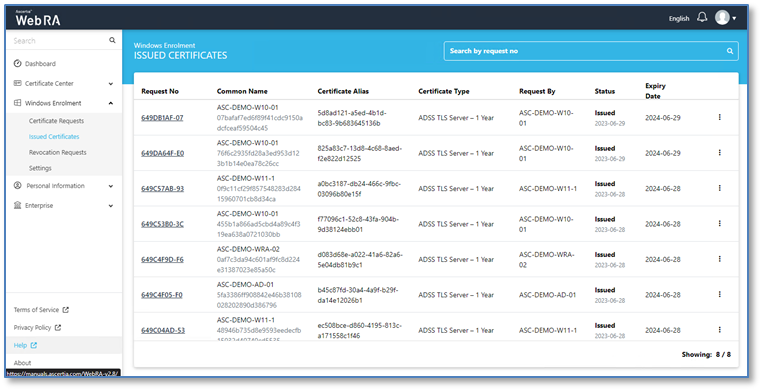
- Access the Web RA User Certificate Portal, as a user who is in a role with the permissions to see device certificates, in the left hand menu, expand Windows Enrolment, select Issued Certificates, Web RA will display the certificate that was just issued to the user.
- Select
 and click View Certificate to see the certificate contents in Web RA, click Close.
Test User-based Certificate Enrolment
The following steps explain manual certificate enrolment for user-based certificates:
- Access a windows desktop or server as a user who has been granted enrol permission on a certificate template in Active Directory.
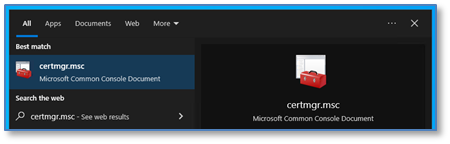
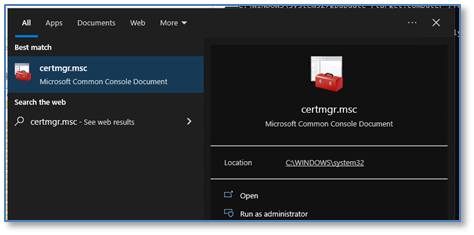
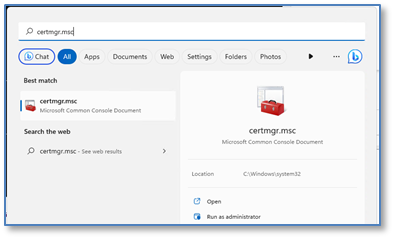
- Click Start and type certmgr.msc, press Enter.
|
Windows 10 |
Windows 11 |
|
|
|
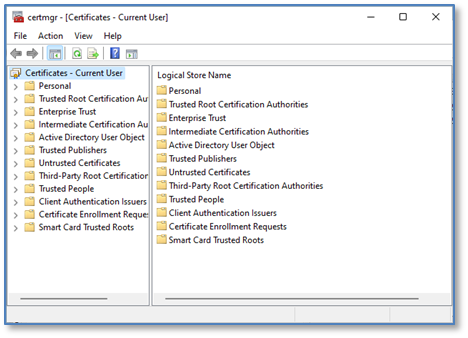
- The Certificates – Current User management console will launch.
- From the left panel, right click Personal > All Tasks > Request New Certificate.
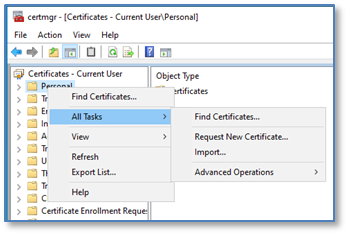
- The Certificate Enrolment Wizard will launch, click Next.

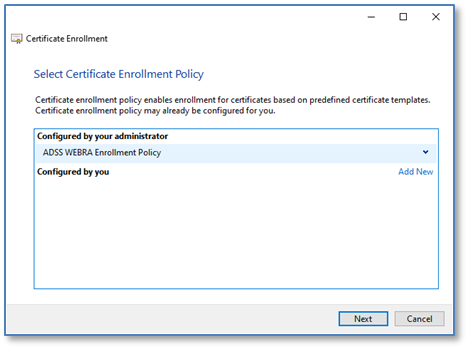
- The Select Certificate Enrolment Policy dialog will display, accept the default of ADSS WEBRA Enrolment Policy, click Next.
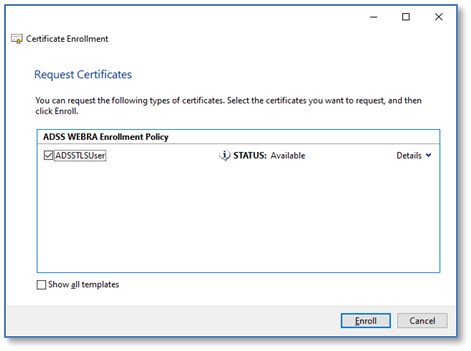
- The Request Certificates dialog will display, this will list all certificate templates in Active Directory that your user has the enrol permission set for, check the tick box next to the certificate template for which you are enrolling, click Enrol.
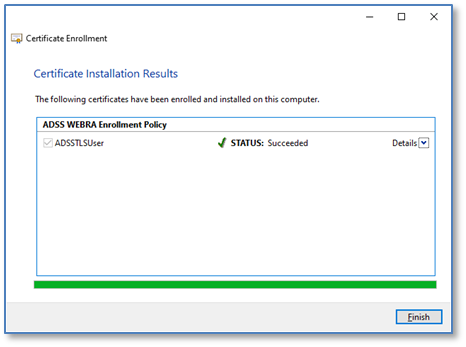
- The Certificate Installation Results dialog will display, the certificate enrolment will display a status of Succeeded, click Finish.
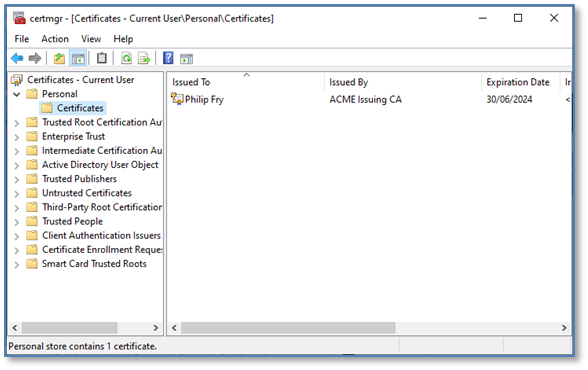
You will be returned to the Certificates – Current User management console, expand Personal and click on Certificates, in the right-hand panel, you will see listed the new certificate that was installed as part of the enrolment process.
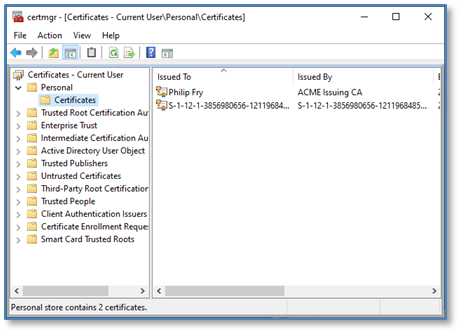
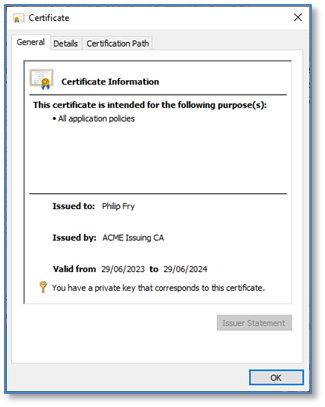
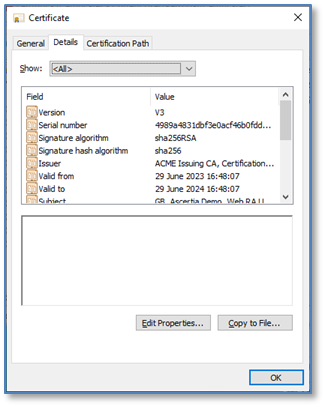
- Double-click on the certificate to view its contents, select the Details tab to view the detailed Properties, click OK to close the certificate viewer.
During this process, the user will be automatically added to the ADSS Web RA Server Enterprise, access the user’s inbox and follow the instructions in the email to activate their account.
- Access the Web RA User Certificate Portal, in the left hand menu, expand Windows Enrolment, select Issued Certificates, Web RA will display the certificate that was just issued to the user.
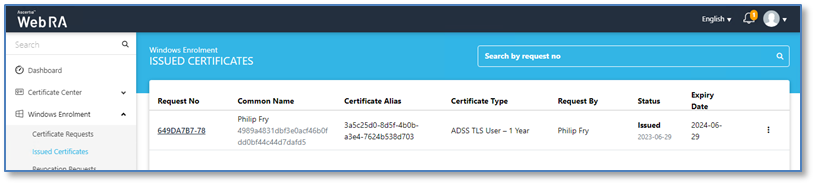
- Select
 and click View Certificate to see the certificate contents in Web RA, click Close.

Certificate Auto-Enrolment
Certificate auto-enrolment is a function of Active Director Certificate Services (ADCS) enabled by Group Policy that allows users and devices to enol for certificates. No user interaction is required.
Microsoft auto-enrolment uses the settings configured in Active Directory Group Policy. Group Policy is automatically refreshed when you restart the domain member computer, or when a user logs on to a domain member computer. In addition, Group Policy is periodically refreshed. By default, Group Policy is refreshed every 90 minutes.
Certificate auto-enrolment using Microsoft Group Policy requires the following:
- Windows Certificate templates should be configured with the Auto-enrol permission set for users\computers or a Windows active directory group.
- Windows users\computers to be domain members, and have an email address configured in the Active Directory account.
- Active Directory Group Policy needs the URL for the ADSS Web RA Server Certificate Enrolment Policy Service.
- Microsoft Certificate Services Client Auto-Enrolment needs to be enabled in Active Directory Group Policy.
Configure certificate auto-enrolment for computers
- Access Web RA as a user with permissions to access Windows Enrolment settings for your enterprise
- From the dashboard, expand Windows Enrolment > Settings and copy the URL from the Certificate Enrolment Policy (CEP) field in the Windows Integrated section.
- Access the domain controller as a member of the domain administrators group.
- Click Start > Windows Administrative Tools, double click Group Policy Management.
- The Group Policy Management tool will display, right-click the Default Domain Policy from the left panel, and click Edit.
- The Group Policy Management Editor will display.
- Expand Computer Configuration > Policies > Windows Settings > Security Settings, select Public Key Policies.

- In the right hand panel, right-click on Certificate Server Client - Auto-Enrolment Properties:
- The Enrolment Policy dialog will display, set the Configuration Model drop down to Enabled, and click the Add button.
- The Certificate Enrolment Server properties dialog will display, paste the CEP URL into the Enter enrollment policy server URI field and click Validate Server, the connection will be validated and the results displayed, click Add.
- You will be returned to the Enrollment Policy properties dialog, check the Default check box, click OK.
- You will be returned to the Group Policy Management Editor, right-click Certificate Services Client – Auto-Enrollment, select Properties.
- The Enrolment Policy Configuration properties will display. Set the configuration model to Enabled and select the checkboxes for both of the following settings, click OK:
- Renew expired certificates, update pending certificates, and remove revoked certificates.
- Update certificates that use certificate templates.
- Test auto-enrolment for user certificates
- Log into the windows machine where you wish to test auto-enrolment.
- Click Start, type certmgr.msc, and then press Enter.
|
Windows 10 |
Windows 11 |
|
|
|
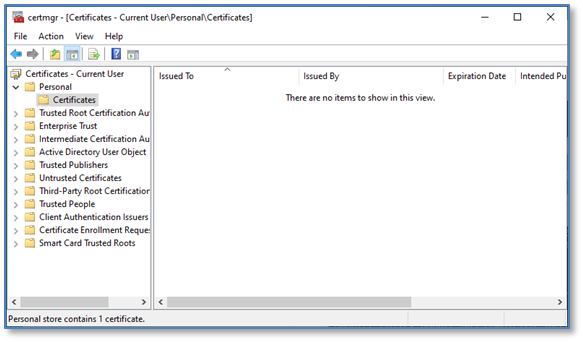
- The Certificates – Current User management console will display, select Personal, the certificate store is currently empty.
- To trigger an update to Group Policy, perform one of the following actions.
- Restart the machine
- Rebooting a domain member login to the system will trigger a refresh of group policy.
- Updating the group policy using the command
- Users can force an updated to Group Policy via the command line.
- Click Start, type run, type cmd, and then press Enter.
Run the following command:
C:\Users\philip.fry>gpupdate /target:user /force
Example Output
C:\Users\philip.fry>gpupdate /target:user /force
Updating policy...
User Policy update has completed successfully.
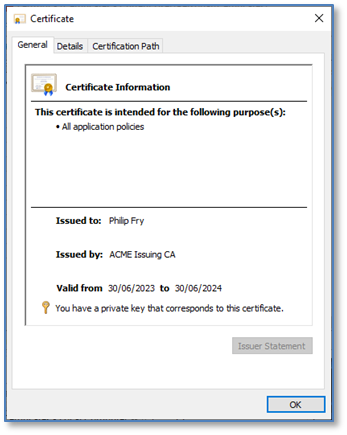
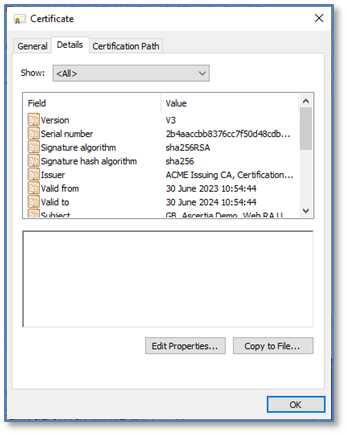
- Return to Certificates – Current User management console, select Personal and press refresh, now expand Personal and click on Certificates, the user certificate will display.
- Double-click on the certificate to view its General Properties, select the Details tab to view all of the certificate contents.