Load Balancing
To install ADSS Web RA in a load-balancing environment, see the following steps:
Before load balance installation, kindly turn off data security.
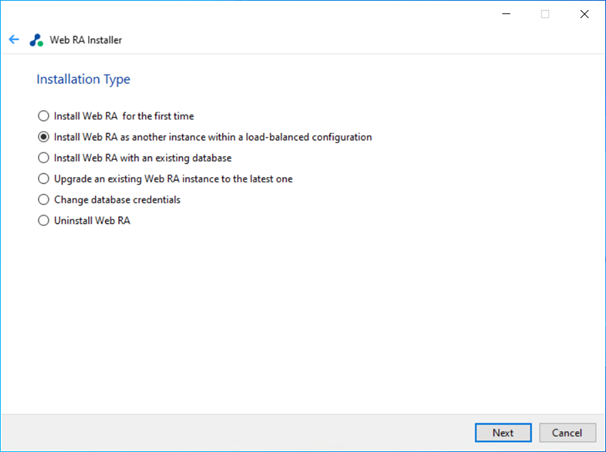
Launch the installer by right-click on the file name [ADSS Web RA Installation Directory]/setup/install.bat and select Run as administrator. Follow the installation wizard as described under new installation, until the Installation Type screen appears.
Select Install Web RA as another instance within a load-balanced configuration option.
Click the Next button to show the License Agreement:
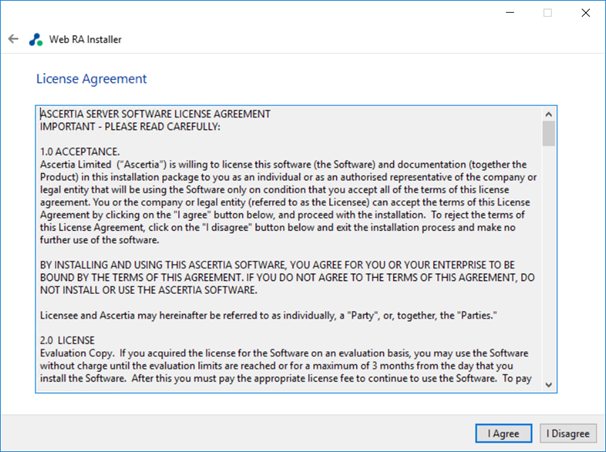
Click the I Agree button to continue.
Readme screen will be displayed with new features list. Click Next to proceed.
The following screen for database details will be displayed:
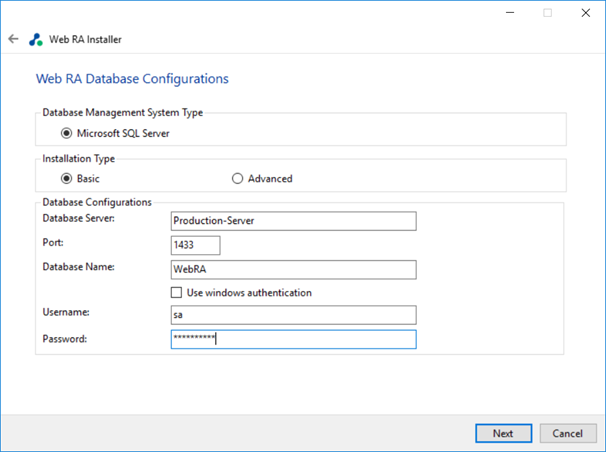
The information displayed above is an example and you should configure the relevant settings for your own environment.
The ADSS Web RA database schema and the version required by the installer must be the same.
If the current ADSS Web RA database schema is older than the version required by the installer, and you click Next, the installer will prompt you that ADSS Web RA database schema will be upgraded to the latest version. Click OK to authorise the schema update.
Furthermore, you can either choose to do a basic installation or use an advanced one. If this is a basic installation, then use the first option Basic and provide the appropriate ADSS Web RA database credentials. The information displayed above is an example and you should configure the relevant settings for your own environment.
Note that once you enter the database credentials and select Next, the installer uses the information to test the connectivity to the database. If the installer can establish the connection with the database, then it will proceed with the installation.
The following table details the configuration options:
|
Item |
Description |
|
Database Server / |
Database server IP or DNS name. |
|
Port |
Database listening port. For SQL Server the default port is 1433. |
|
Database Name |
Name of the database instance. Note this must exist prior to the installation. |
|
Use Windows Authentication
|
If enabled, installer will use the Windows logged in user to communicate with database. You are required to enter password because it will be used in Application Pool to set the Identity against this user for all websites. By default, the current logged in user will be configured in the Application Pool Identity. If you wish to run ADSS Web RA under a different windows user, then you need to change it manually. If your requirement is to use SQL Server authentication, then type SQL Server Username and Password in the underneath fields without enabling this option. |
|
Username |
Name of the database user. Note this must exist prior to the installation. It is not required in the case of Windows Authentication. |
|
Password |
Password credential of the database user. Note this must exist prior to the installation. In case of Windows Authentication, type the password of domain user shown in the Username field to configure the Application Pool Identity in IIS Server for successful communication with SQL Server. |
If you have chosen Advanced for database configurations, then the following screen will be shown.
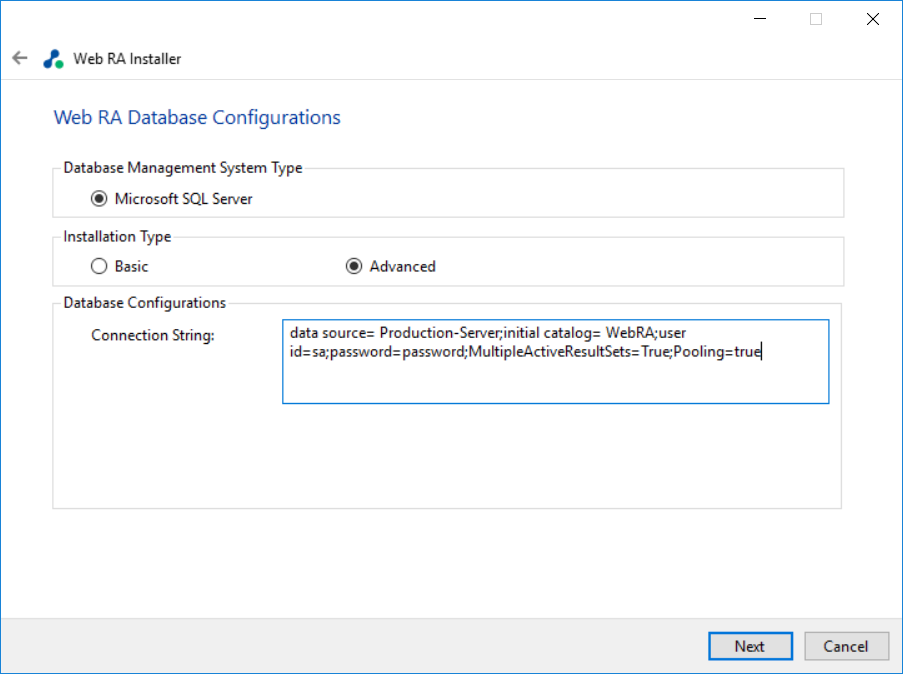
The information displayed above is an example and you should configure the relevant settings for your own environment.
Once you complete the options and select Next, the installer uses the information provided to test the connectivity to the database. If the installer can establish the connection with the database, then it will proceed with the installation.
The following table explains details of the configuration options:
|
Item |
Description |
|
ADSS Web RA Connection String |
The following are sample connection strings for SQL Server:
|
|
Username |
Field will only be shown in case of Windows Authentication while for SQL Server Authentication, username will be provided in the connection string. |
|
Password |
In case of Windows Authentication, type the password of domain user shown in the Username field to configure the Application Pool Identity in IIS Server for successful communication with SQL Server. In case of SQL Server authentication, password will be provided in the connection string. |
|
|
If windows authentication is enabled in connection string, installer will use the Windows logged in user to communicate with database upon clicking the Next button. You are required to enter password because it will be used in Application Pool to set the Identity against this user for all websites. By default, the current logged in user will be configured in the Application Pool Identity. If you wish to run ADSS Web RA under a different Windows user, then you need to change it manually. As shown in the following Screen: |

Click Next to select specific modules. Select the modules that you want to install in load balancing environment.
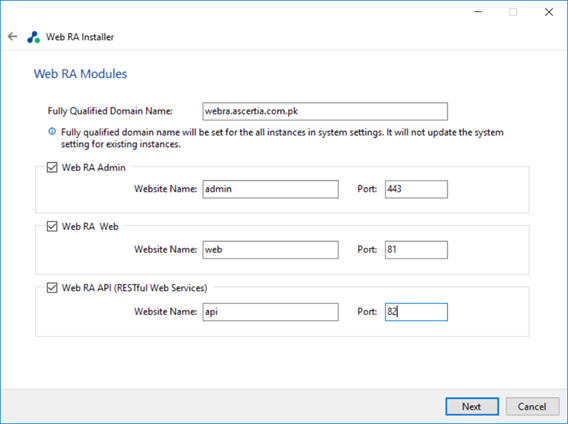
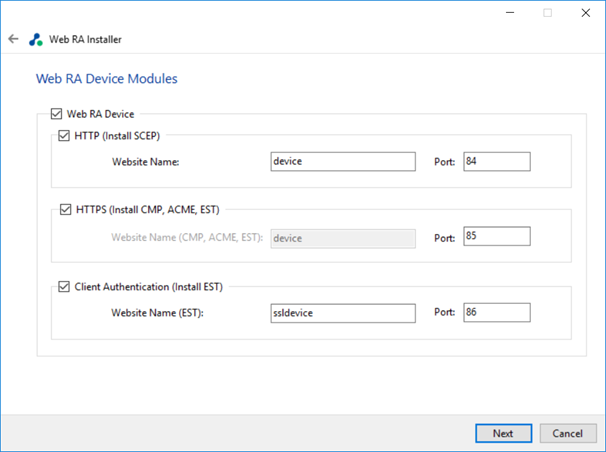
Select device modules to install the required features.The fully qualified domain name field will be auto-filled with complete computer name. For each selected application, provide the web application name and port. A typical in-house installation of ADSS Web RA should only include Admin, Desktop Web, and the API. However, the device will be added at the end. Click Next to proceed.
Select Windows Enrolment. For each selected application, provide the web application name and port. Then click Next.
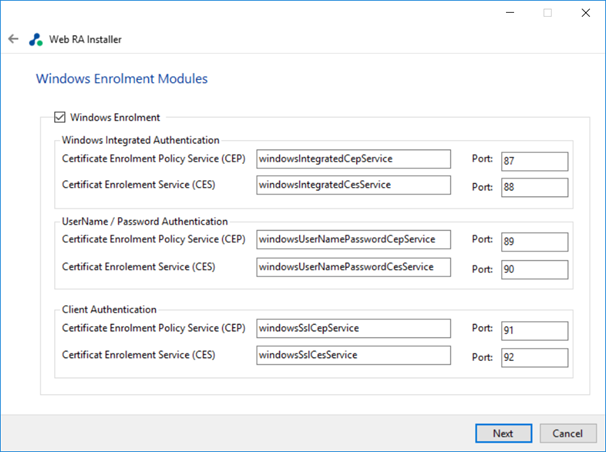
The information displayed above is an example, which you may change to suit your environment and organisation preferences. However, the example shown is sufficient. The names will appear as websites under IIS.
The following table explains details of the modules options:

|
Item |
Description |
|
ADSS Web RA Admin |
ADSS Web RA Admin is used by the administrators to manage the system wide configurations, service plans, user accounts and access control etc. |
|
ADSS Web RA Web |
ADSS Web RA Web is used to manage certificates for creation, renewal and revocation. |
|
ADSS Web RA API |
REST API is used to integrate ADSS Web RA functionality within your own portal. |
|
ADSS Web RA Device |
ADSS Web RA device is used to manage device enrolment for certificate creation, renewal and revocation. This site will be deployed with http and https bindings. |
|
ADSS Web RA SSL Device |
ADSS Web RA SSL device is used to manage device enrolment over SSL for certificate creation, renewal and revocation e.g. EST Protocol. This site will be deployed with https SSL. |
|
Windows Enrolment |
Windows Enrolment is used to manage certificate renewal or auto-enrolment on a windows machine. |
Click Next button to see installation summary screen, the following modules will be installed.

If you think any listed item is incorrect then use the back navigation (arrow at the top-left of dialog box) to correct your choices before proceeding.
Once you are sure all the modules shown are correct, click Next button to continue with the installation.
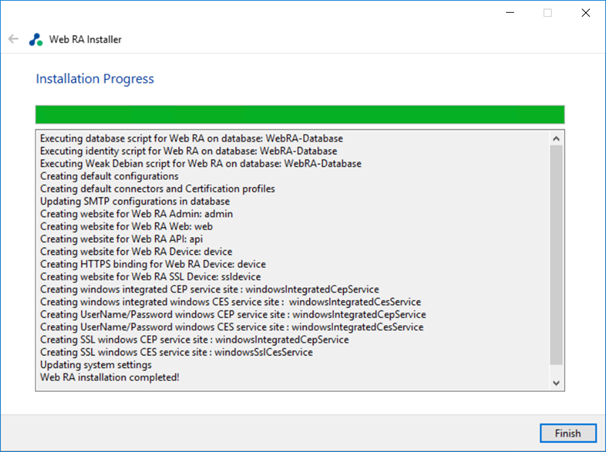
Click Finish to complete the installation process.