New Installation
Once all the required pre requisites are installed, you can start installation of Web RA.
Create two empty databases as a first step on the DBMS (Microsoft SQL Server is supported for the Web RA application for now), with privileges for Web RA and ADSS Server.
The Web RA package MUST be unzipped on to a disk that has sufficient space – a minimum of 100GB is recommended. This is because the product is installed and runs from where the installation package is extracted to. Hence please choose a suitable location and naming structure.
If you extract the installer on Desktop then it will not work so choose a proper drive to extract it.
|
|
1) DO NOT include blanks spaces in the installation folder name and path - use hyphen or underscore instead if required. |

Web RA installer generates all the required database tables and populates the default data required to run the system. Therefore, there is no requirement for separate SQL scripts or equivalent for non-SQL databases.
Once all above conditions are satisfied, launch the installer by right-click on the file [WEBRA-Installation-Dir]/setup/install.bat and select Run as administrator from the menu to start installation. You will be shown Welcome page.
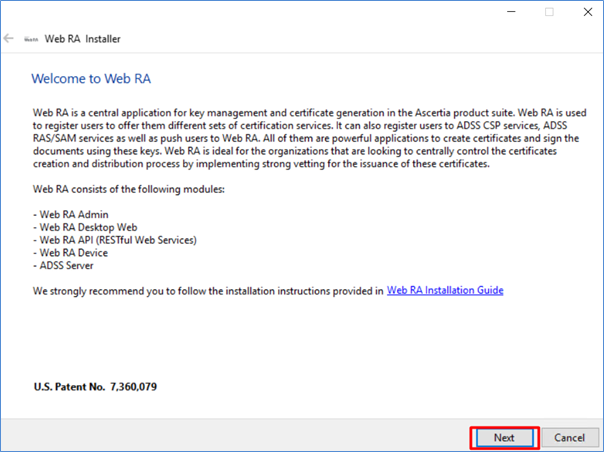
Click Next button to continue.
System requirements screens will appear next to validate if all the required prerequisites are installed or not. If any of the Web RA system dependencies is not found, or not functioning, then Failed status will be shown corresponding to that component on the screen.
|
|
You can only proceed with the installation once all related systems requirements show Success status on System Requirements screen. |
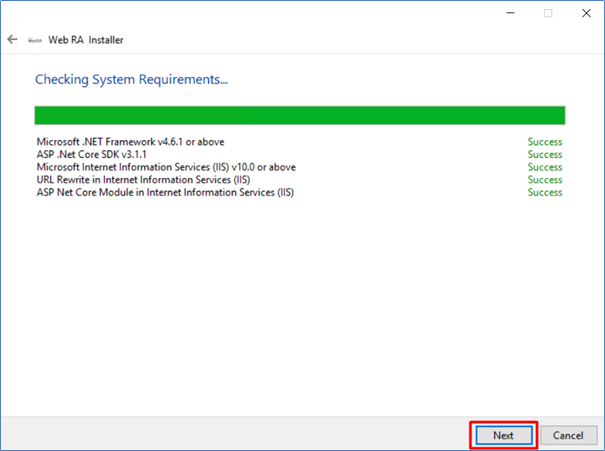
Click Next button to select an installation type.
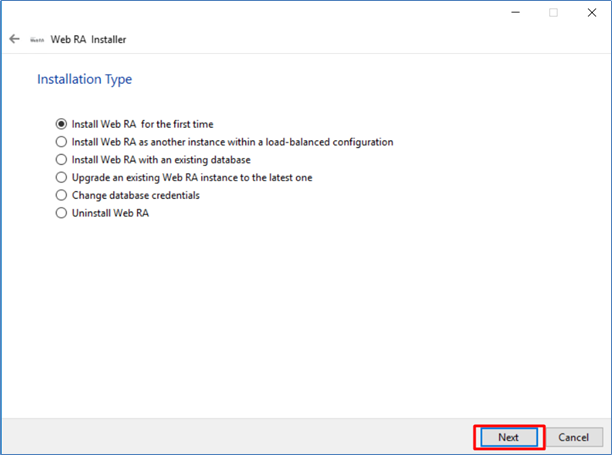
Select the installation type as per your requirement, see following options and select which one best suits you:
- If you are installing Web RA for the first time or you wish to deploy a fresh installation with a new database, then select “Install Web RA for the first time”.
- The “Install Web RA as another instance within a load-balanced configuration” option will install the Web RA instance in a load-balanced environment to distribute traffic.
- The Install Web RA with an existing database option will install Web RA against an existing Web RA database. For example, this option can be used to recover a system from a database back-up.
- If you wish to upgrade an older system to the latest version, then select “Upgrade an existing Web RA instance to the latest one”. Installer supports the upgrade when the base (current) installation is v6.2 or higher.
- The Change database credentials option is used if the database password, user, database name and/or server is changed, and it needs to be updated in Web RA installation.
- Select the last option Uninstall Web RA if you wish to uninstall Web RA from the system.
Select the first option Install Web RA for the first time. Click Next button to view and accept the license agreement.
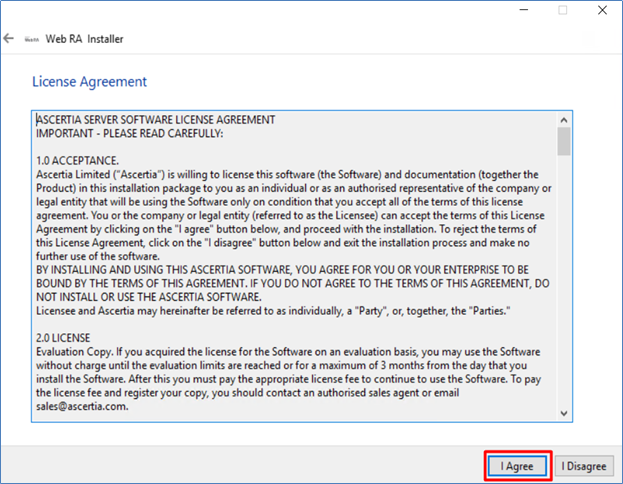
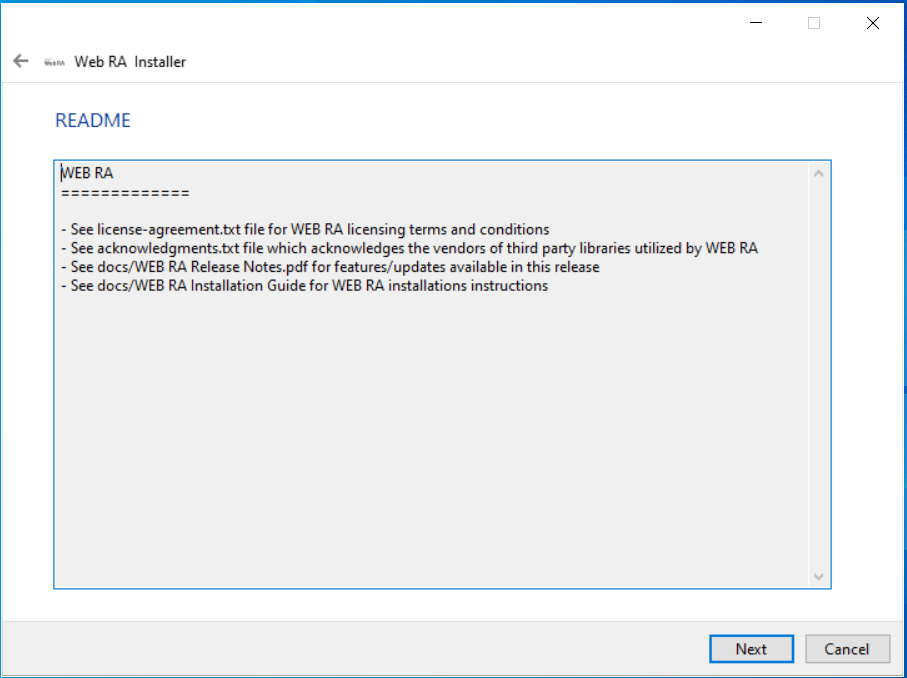
Click on I Agree button to proceed. The next appearing screen will be for ReadMe text.
Click Next, the next appearing screen will be for setting up database configurations.
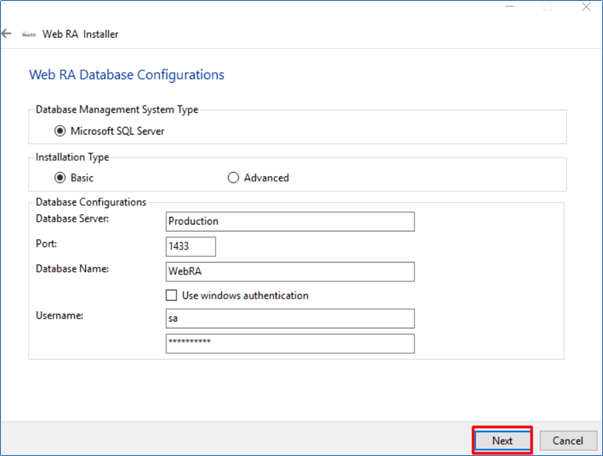
Furthermore, you can either choose to do a basic installation or choose advanced. If this is a basic installation, then use the first option Basic and provide the appropriate Web RA database credentials. The information displayed above is an example and you should configure the relevant settings for your own environment.
|
|
Once you enter the database credentials and select Next, the installer uses the information to test the database connectivity. If the installer can establish the connection with the database, then it will proceed with the installation. A message will appear in case of any connectivity issue. |
The following table details the configuration options:
|
Field |
Description |
|
Database Server |
Database server IP or DNS name. |
|
Port |
Database listening port. For SQL Server the default port is 1433. |
|
Database Name |
Name of the database instance. Note this must exist prior to the installation. |
|
Use Windows Authentication |
If enabled, installer will use the Windows logged in user to communicate with database. You are required to enter password since it will be used in Application Pool to set the Identity against this user for all web instances. By default, the current logged in user will be configured in the Application Pool Identity. If you wish to run Web RA under a different Windows user, then you need to change it manually. If your requirement is to use SQL Server authentication, then type SQL Server Username and Password in the underneath fields without selecting Windows Authentication. |
|
UserName |
Name of the database user. Note this must exist prior to the installation. It is not required in the case of Windows Authentication. |
|
Password |
Password for the database user. Note this must exist prior to the installation. In case of Windows Authentication, type the password of domain user shown in the Username field to configure the Application Pool Identity in IIS Server for successful communication with SQL Server. |
If you have chosen Advanced for database configurations, then the following screen will be shown.
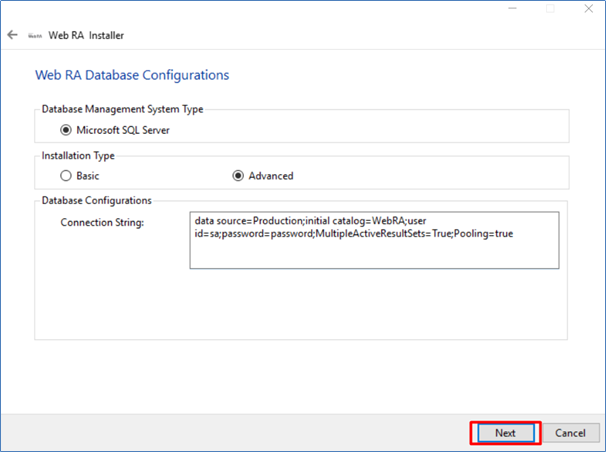
The information displayed above is an example and you should configure the relevant settings for your own environment.
|
|
Once you enter the database credentials and select Next, the installer uses the information to test the database connectivity. If the installer can establish the connection with the database, then it will proceed with the installation. A message will appear in case of any connectivity issue. |
The following table details the configuration options:
|
Field |
Description |
|
Connection String |
The following are sample connection strings for SQL Server:
|
|
|
1) Database User Name must exists prior to the installation. It is not required in case of Windows Authentication. |
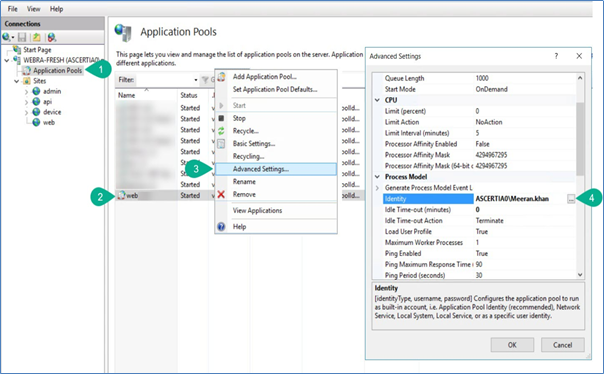
In case of Windows authentication, by default the current logged in user will be configured in the Application Pool Identity. If you wish to run Web RA under a different Windows user, you need to change it manually as shown under below screenshot.
|
|
Click Next button to select specific modules.
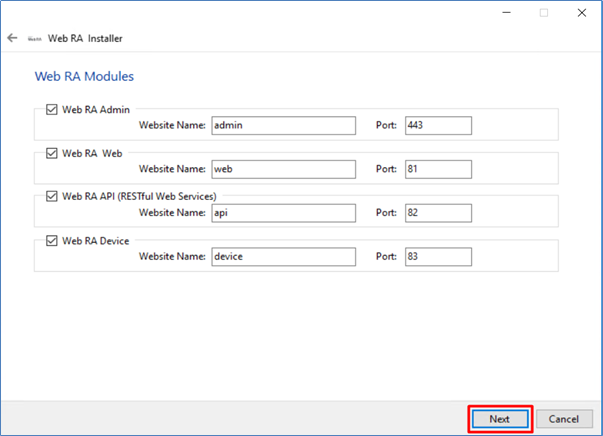
Select the appropriate modules to install the required features. For each selected application, provide the web application name and port. A typical in-house installation of Web RA should include Admin, Web, API and Device.
The information displayed above is an example, which you may change to suit your environment and organisation preferences. The names will appear as websites under IIS.
The following table details the modules options:
|
Field |
Description |
|
Web RA Admin |
Used by the Administrators to manage the system wide configurations, service plans, user accounts and access control etc. |
|
Web RA Web |
Used to manage certificates issuance, renewal and revocation. |
|
Web RA API |
RESTful APIs used to integrate Web RA application with your own business application. |
|
Web RA Device |
Used to manage device enrolment for certificate issuance, renewal and revocation. |
Click Next button to configure the SMTP server and email settings.
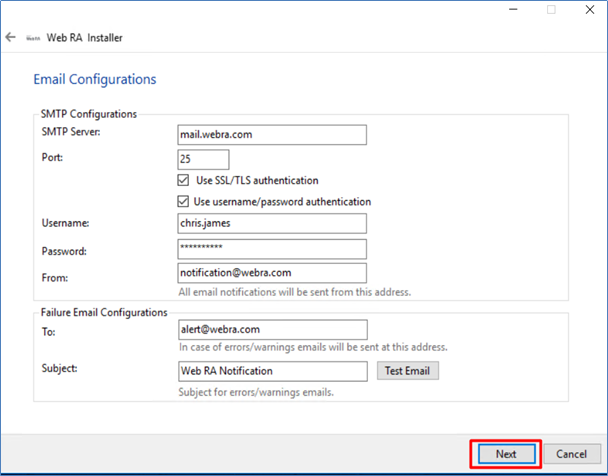
Configure SMTP Server and email settings for your environment. Web RA must have access to a suitable SMTP server without which users will not be able to receive registration emails that are required to complete the user registration process.
In addition to this, system generated email notifications will not received too. Although the latter will not prevent functionality, but it is not a recommended approach. The information displayed above is an example and you should setup configurations for your own environment.
The configuration items are explained in the following table:
|
Field |
Description |
|
Database Server |
Database server IP or DNS |
|
Port |
Define the service port for the SMTP mail server. |
|
Use SSL/TLS Authentication |
Select this option if the SMTP mail server requires SSL/TLS. |
|
UserName |
Configure the SMTP mail server username that is used to send Web RA generated emails. |
|
Password |
Define the password to authenticate the SMTP server. |
|
From |
Configure theFromemail address that should be used to send notification emails to users and administrators. |
|
To |
Configure the email address where error notifications should be sent. |
|
Subject |
Define a subject line for the notification emails that are sent to the administrator, e.g. Web RA Alert. |
After configuring these SMTP settings, click Test Email button to verify that SMTP configurations are valid.
Click Next button to proceed. You need to provide database configurations (if you're also installing ADSS for the first time).
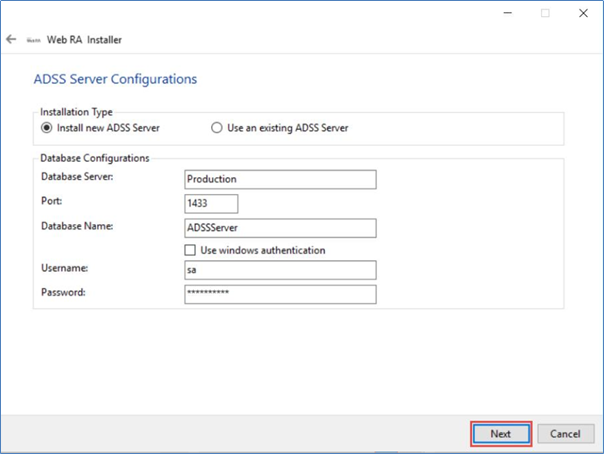
On the ADSS Server Configurations screen you can either choose fresh installation of the ADSS Server along with Web RA installation or use an existing ADSS Server installation.
If this is a fresh installation of Web RA, then use the first option Install New ADSS Server and provide the appropriate ADSS Server database credentials. The information displayed above is an example and you should configure the relevant settings for your own environment.
This table details the configuration options:
|
Field |
Description |
|
Database Server |
Database server IP address or DNS name. |
|
Port |
Database listening port. For SQL Server the default port is 1433. |
|
Database Name |
Name of the database instance. Note this must exist prior to the installation. |
|
Use Windows Authentication |
If enabled, the installer will use the Windows logged in user to communicate with database. |
|
UserName |
Name of the database user. Note this must exists prior to installation. |
|
Password |
Password for the database user. Note this must exist prior to the installation |
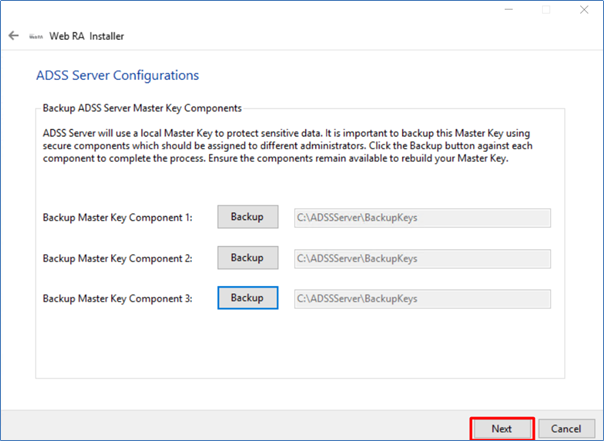
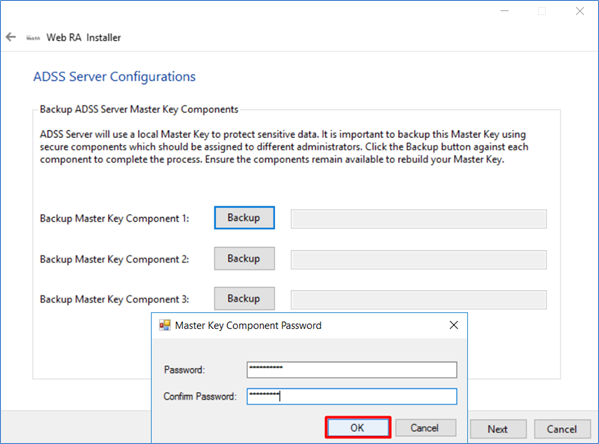
When you select the Install New ADSS Server option, you need to take a backup of the Master Key in the form of three components. Use the Backup buttons one by one to take the backup of Master key for each component. The installer will prompt to provide a password for each Master Key component and encrypt it with the provided password before saving on the disk.
The following dialog will appear to input password and confirm password for backup keys.
|
|
Keep all the Master Keys backup secure and remember their passwords. For any reason, if you lose these keys/passwords then you cannot upgrade ADSS Server to the next versions and even Ascertia cannot help you to recover these keys. |
If you are not installing ADSS for the first time and you choose the second option to Use an existing ADSS Server, then following parameters need to be provided as shown in the screenshot:
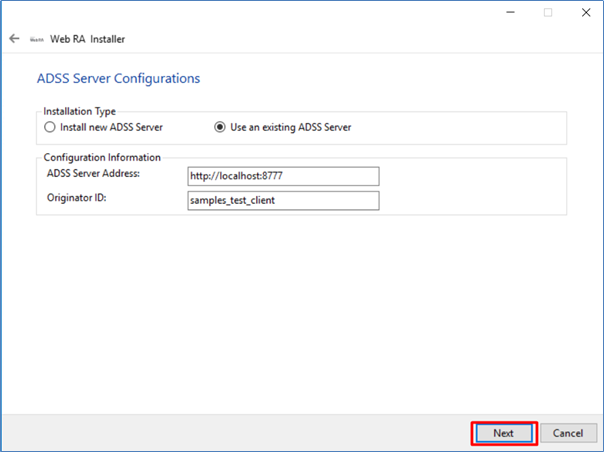
Provide ADSS Server Address and Originator ID. The ADSS Server Administrator will be able to provide this information. The Originator ID shown above is the default when installing ADSS Server with sample data. Ascertia recommends configuring a dedicated Originator ID for the use of Web RA.
Every client of ADSS Server requires an Originator ID to identify itself, click here to see the details as how to obtain it from ADSS Web RA Server. The Originator ID will be created automatically if you chose to install a fresh ADSS Server via the installer.
Click Next button to see installation summary screen, listing the different modules that will be installed.
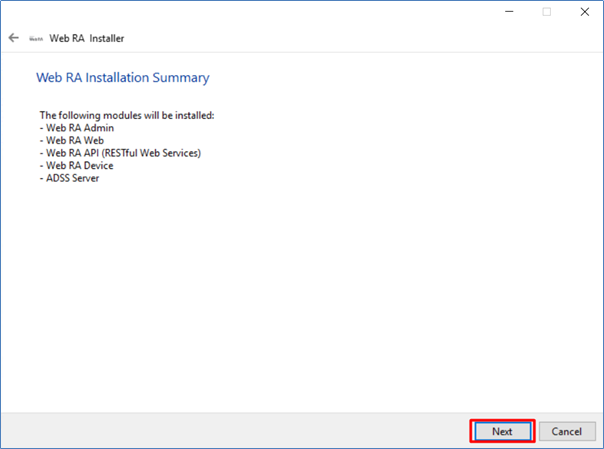
If you think any listed item is incorrect then use the back navigation (arrow towards the top-left of the dialogue box) to correct your choices before proceeding.
Once you are sure all the modules shown are correct, click Next button to continue with the installation.
The following screen may also appear, to show ADSS Server installation progress if it’s a fresh installation:
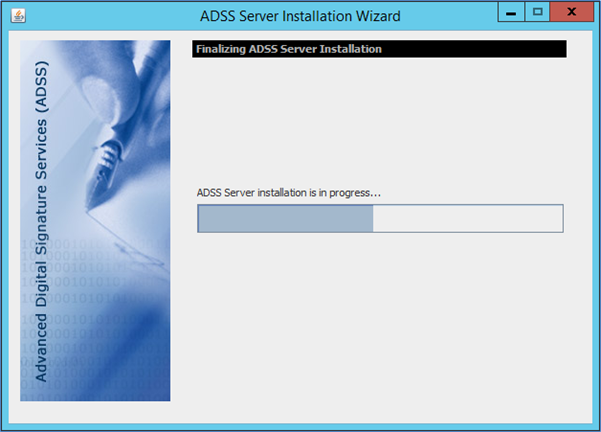
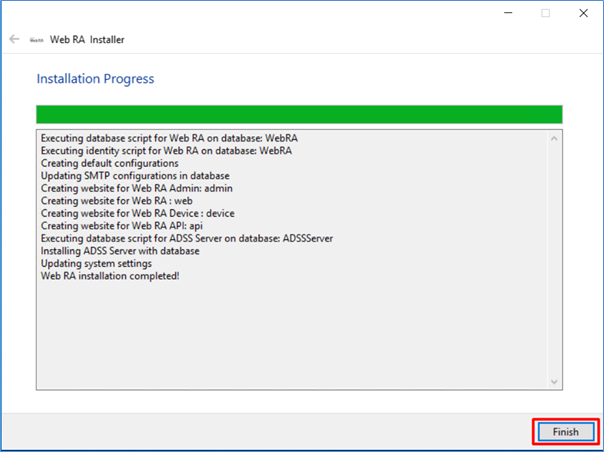
Installation progress will be shown on installer screen. Once a green bar is completed, click Finish to complete the installation process.
After successful installation for Web RA application, see following URLs to access the Web RA web sites:
|
Module |
URL Format |
URL Format |
|
Web RA Admin |
https://<deployment-server>:PORT |
|
|
Web RA Web |
https://<deployment-server>:PORT |
|
|
Web RA API |
https://<deployment-server>:PORT |
|
|
Web RA Device |
https://<deployment-server>:PORT |
|
|
ADSS Server |
https://<deployment-server>:8774/adss/console |
While browsing Web RA Admin or ADSS Server Console your web browser will prompt you to select the appropriate certificate for authentication purposes. Note the installation process places the necessary certificates into the Windows Security Store, Internet Explorer, Edge, Chrome and related browsers that rely on the security store, can use them as such.
|
|
If you wish to use Firefox or similar web browsers that utilize their own respective key stores, you will need to import adss-default-admin.pfx and WebRA-default-admin.cer from [WebRAInstallationDirectory]/setup/certs directory. |
There are two options to set secure binding against each Web RA site, however the first option is recommended:
- Using standard IIS web server HTTP redirects. This means the basic installation is done with various Web RA sites, where each site has it's respective default port/binding but no host name. You can then add new sites for each web site and bind this to the desired external public facing host name and secure port, likely to be 443. Each site can be configured in similar way. Each default Web RA site can be permanently redirected to the secure version.
- Once the deployment of Web RA is completed, the bindings of each site can be changed to use a secure (443) port. The new binding will include the appropriate public facing host name.
Once the bindings of IIS web sites have been put in place, access the Web RA administration console and make changes to the general configuration settings. This means changing the public and private URLs for the Web and API sites accordingly. Once done save the changes and publish them.
|
|
Post Installation Steps |