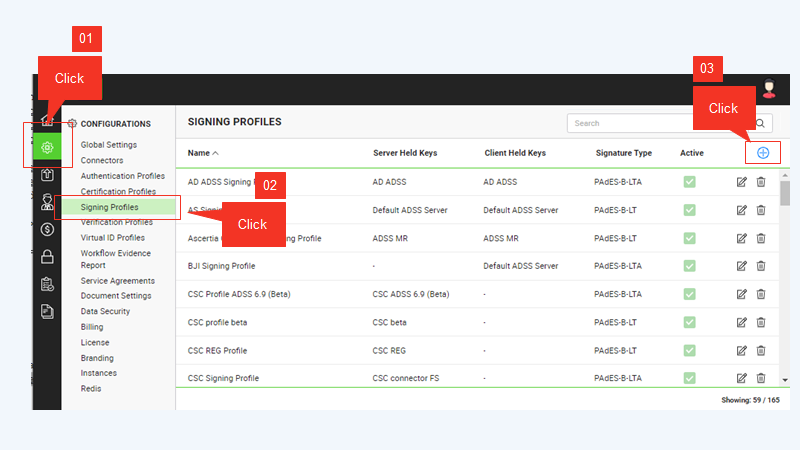
Create a New Signing Profile
Signing profile identifies the ADSS Signing Server profile that has been configured for the SigningHub Desktop Web, to create the document signatures. Based on the business requirements, you can manage (Add, Edit, and Delete) multiple signing profiles to offer different formats of signatures to your end users including PAdES-B-LT or PAdES-B-LTA signatures, signing method, hashing algorithm, etc.
Create a new signing profile
- Create a new signing connector.
- Choose the "Configurations" option from the left menu.
- Choose the "Signing Profiles" option. The "Signing Profiles" screen will appear.
- Click on the add icon
 in the grid header.

- A dialog appears where you can configure the signing profile details. The signing dialog is comprised of three screens including Basic Information, Signing Method and Settings. Specify the basic information and click the "Next" button to provide the details accordingly, to the respective screens. Click the "Finish" button to save your changes. A new signing profile will be created and displayed in the list. See the following table for the description of the fields.
- Repeat the steps 1-5 to configure other signing profiles.
|
Signing Profile |
|||
|
Fields |
Description |
||
|
Name |
Specify a unique name for this signing profile, e.g. My SigningHub Signing. This name will be used in the Service plan configuration. |
||
|
Description |
Add any description related to this signing profile for your record. |
||
|
Active |
Select this check box to enable this signing profile for service plans configuration. Inactive profiles cannot be configured in the service plans. |
||
|
Server-side Signing |
Select this check box to enable server-side signing for this profile. Specify the signing server and profile ID information in the relevant fields. It will also provide the options to enable Remote Authorisation and Office signatures. If you do not want to allow server-side signing for your end users, deselect this check box.
|
||
|
Enable Remote Authorisation |
Select this check box to enable Remote Authorised Signing (RAS). RAS allows a user to authorise a remote signature (done on server) using their registered mobile device. The mobile device will have its own built-in (touchID or PIN) user authentication, so in a way mobile users also getting two-factor authentication. |
||
|
Enable Office Signatures |
Office signatures are the ones that are added in native Word documents. After signing, the Word document is preserved in its native format and don't necessarily need to be converted into a PDF. |
||
|
Client-side (Local) Signing |
Select this check box to enable client-side signing for this profile. Specify the signing server and other preferences in the fields. If you do not want to allow client-side signing for your end users, keep this check box deselected. |
||
|
Hashing Algorithm |
Specify the hashing algorithm (i.e., SHA1, SHA256, SHA384 or SHA512) to create the signature. |
||
|
Signature Type |
Select whether PAdES-B-LT or PAdES-B-LTA signatures are required for your end users. Signature type must be the same as configured under ADSS signing profile. |
||
|
Dictionary Size (KB) |
Specify the signature dictionary size. When signing PDF documents, space is reserved within the document to embed the signature, called the signature dictionary. The size of the signature dictionary is directly proportional to the certificate chain to be used in the signature. The default value is set to 100 KB, however, there is a possibility that the computed signature can exceed the default dictionary size. In such a case, users may view the system message “signature dictionary size “100” KB is smaller than expected size e.g. “200” KB. Therefore, it is recommended to reserve an appropriate space for the signature dictionary to accommodate your certificate chain.
|
||
|
Signature Enhancement Connector |
Signature enhancement connector facilitates a System Admin to configure a separate timestamp server (i.e. Ascertia ADSS Server), which can be independent of signing server being used for signing. |
||
|
Signature TimeStamp Policy ID |
Specify the Signature TimeStamp Policy ID that must be same as configured under Ascertia ADSS Server for TimeStamp Authority Profile. The Signature TimeStamp will be performed using configured TimeStamp Authority Profile matching the TSA Policy ID at signing time. TSA profile information will be embedded within document to identify TimeStamp Profile used by the signatory.
|
||
|
Document TimeStamp Policy ID |
Specify the Document TimeStamp Policy ID that must be same as configured under Ascertia ADSS Server for TimeStamp Authority Profile. The Document TimeStamp will be performed using configured TimeStamp Authority Profile matching the TSA Policy ID at signing time. TSA profile information will be embedded within document to identify TimeStamp Profile used by the signatory.
|
||
See Also


