Step 5 - Using Service Manager
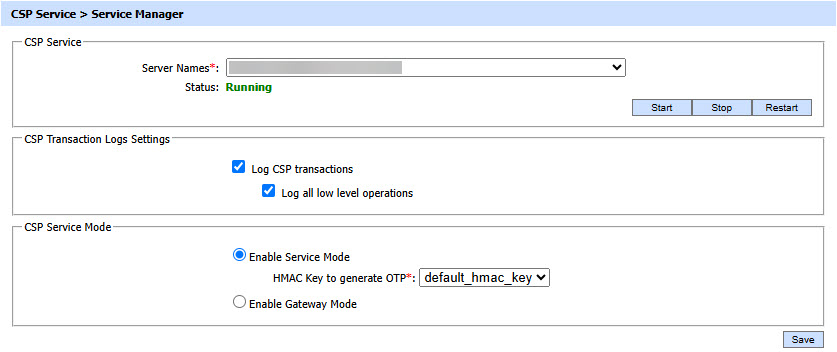
After making configuration changes within the ADSS CSP Service the service must be restarted for the changes to take effect. The service manager module allows operators to start, stop or restart the CSP Service and also make changes to service related configurations. Click on the "Service Manager" button and this screen is shown:

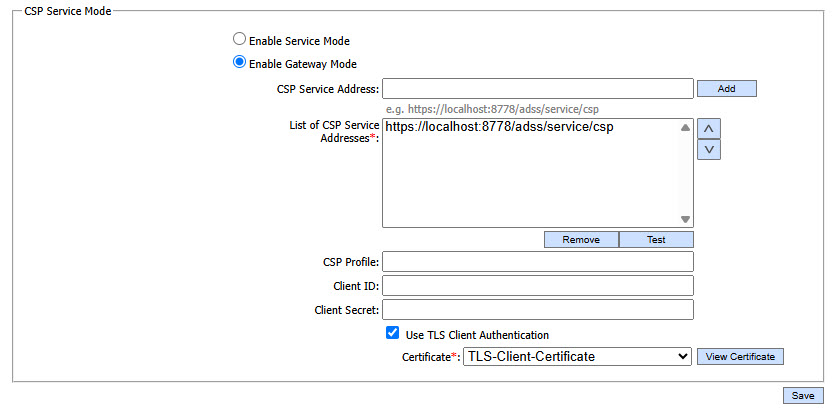
If operator selects the Enable Gateway Mode option then following screen is show:

The configuration items are as follows:
|
Items |
Description |
|
Service Address |
The address of the CSP service being controlled from this Service Manager. Ensure the address points to the correct service URL, i.e. if you are running the service on multiple machines in a load-balanced configuration then check that the name is correct for the particular instance that needs to be started/stopped/restarted. By default it will be that of the local machine. |
|
Start |
Start the service. Status will change to “Running” after a successful start |
|
Stop |
Stop the service. Status will change to “Stopped” after the service is stopped. |
|
Restart |
Stop and then start the service in one go, Status will change to “Running” after a successful restart. |
|
CSP Transaction Log Settings |
This section defines the configuration required for the CSP Service Transaction Logs settings. |
|
Log CSP Transactions |
When this option is enabled then all ADSS CSP transactions except low level operations e.g. Get User Information, User Certificates information etc are recorded in the ADSS CSP database. If this option is disabled then no transaction will be recorded in the database. This feature is useful when much higher throughput is required and logging is seen as an overhead. |
|
Log all Low Level Operations |
When this option is enabled then all low level operation e.g. Get User Information, User Certificates information etc are also get recorded in the ADSS CSP database. If this option is disabled then all CSP transactions other than low level operations will be recorded in the database. |
|
CSP Service Mode |
This section defines the configuration required for the CSP Service to entertain requests directly or behaving as proxy server for back-end CSP Service. |
|
Enable Service Mode |
When this option is enabled then CSP Service handles all the requests and responds accordingly. Note: Service Mode is enabled by default. |
|
HMAC Key to Generate OTP |
Select a HMAC key that, which pre-exists in the Key Manager, will be used by ADSS CSP Service to generate the OTPs using HOTP algorithm to be sent on user’s email. Note: A default HMAC key comes pre-bundled with the ADSS Server installation. This can be replaced with operator generated HMAC keys that may either exist in software (database) or on a PKCS#11 device e.g. an HSM. |
|
Enable Gateway Mode |
If enabled, this CSP Service instance will behave as Gateway instance for back-end CSP Server. CSP gateway verifies the request structure & validates the Client. Upon success, it relays the received request to the back-end CSP Server using the provided configurations defined below. On failure, it returns error to the calling application i.e. Virtual CSP. |
|
CSP Service Address |
Use this field to add CSP Service address(es). |
|
List of CSP Service Addresses |
This field shows the CSP Service addresses that can be used to forward requests to the back-end CSP Server. Multiple service addresses can be added. The Test button checks that the service is available. The Remove button deletes a configured service address. |
|
CSP Profile |
Optionally specifies the CSP profile to be used for back-end CSP Service request. Note: If not configured then request will be forwarded to back-end CSP service without CSP profile and the back-end CSP Server will use the default CSP profile configured against the Client in Client Manager. |
|
Client ID |
Define the Client ID registered in back-end CSP Service. CSP Service will use this Client ID while communicating with back-end CSP Service. The back-end CSP service verifies that this is a registered Client ID within the Client Manager module before granting access to the service. |
|
Client Secret |
Provide the Client Secret generated against above configured Client when it was registered in back-end CSP Service. Note: Don’t share the Client Secret with anyone. Once the client secret is configured then operator cannot see it because once operator leave this page the client secret will be masked with asterisks for security reason and cannot be seen again. |
|
Use TLS Client Authentication |
If this option is enabled then CSP Service will communicate with back-end CSP Service using TLS client authentication. Note: By default it is disabled. |
|
Certificate |
Select the client TLS certificate which pre-exists in the Key Manager. |
|
|
Ensure all the changes are saved by clicking the Save button and restart the service to take changes effect.. |
See also
Step 1 - Configuring Hardware Crypto Source
Step 2 - Configuring Notification Settings
Step 3 - Configuring CSP Profile
Step 4 - Registering Business Application

