Step 2 - Configuring SAM Profile
To make it easier for business applications to request management of users, keys and devices along with signing operations, the ADSS SAM Service uses SAM Profiles. A SAM profile defines the format and characteristics of the keys (e.g. which public key algorithm and key length to be used) and define characteristics of user devices (e.g. which public key algorithm and key length to be used, device has bio-metric support) that will be used when this profile is referenced in a user keys generation, device registration and signing request from a client application.
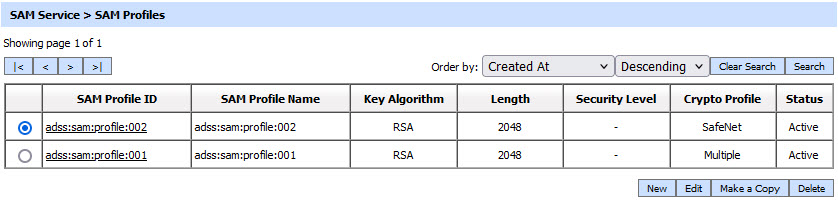
To create or edit a SAM Profile click on SAM Profiles and the following screen is shown:
A new profile can be created by clicking the New button. An existing profile can be edited by clicking the Edit button. If you want to create a new profile by copying large part of an existing profile then click Make a Copy. The following screen is shown:
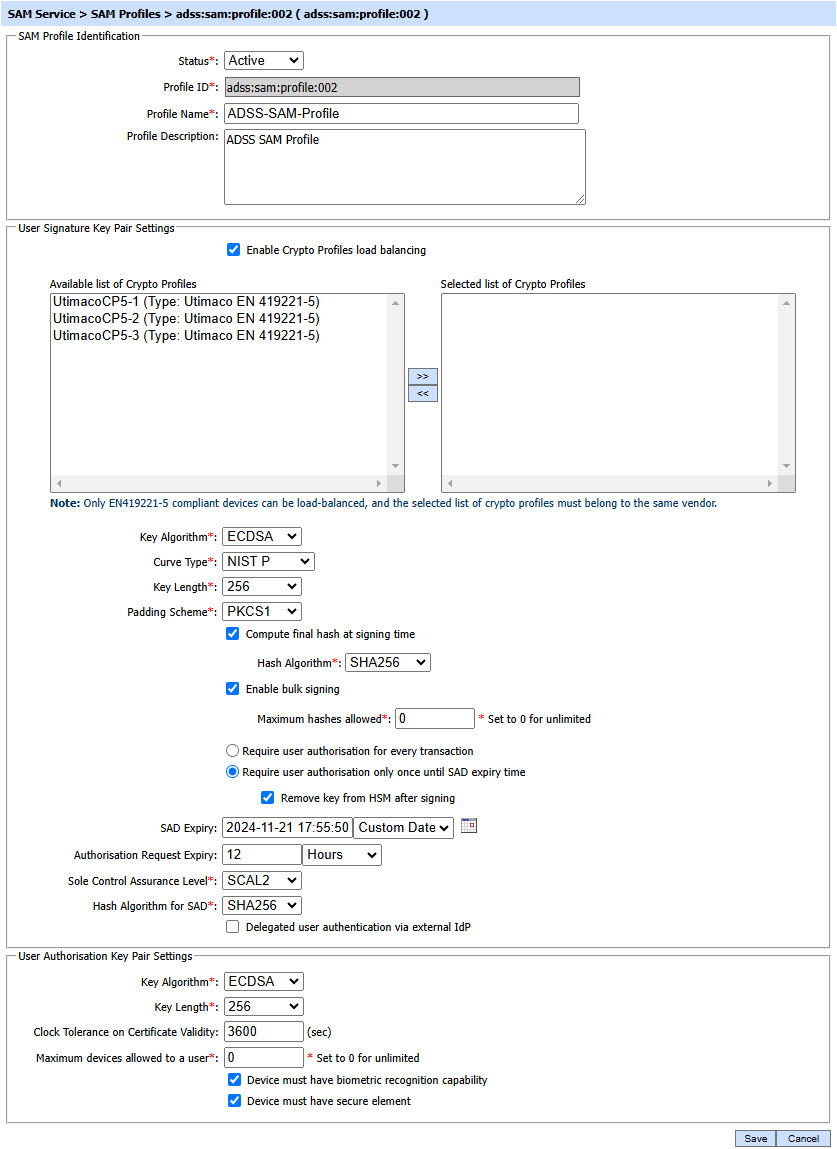
The configuration items are as follows:
|
Items |
Description |
||
|
Status |
A SAM profile may be marked Active or Inactive. Note: An inactive profile will not be used to process requests generated by client application. |
||
|
Profile ID |
A mandatory field which provides a system-defined unique identifier for this profile. |
||
|
Profile Name |
A mandatory unique name defined by the ADSS Server Administrator for easier recognition of the profile within the ADSS Operator Console. |
||
|
Profile Description |
This can be used to describe the profile in more detail (e.g. in which circumstances will this SAM profile be used). This is for information purposes only. |
||
|
User Signature Key Pair Settings |
This section defines the configurations that control User key pair generation and signature generation mechanism. |
||
|
Enable Crypto Profiles Load Balancing |
This checkbox will enable the users to configure multiple crypto sources within a single SAM profile, enabling load balancing for user key generation and signing operations. By default, this checkbox will be unchecked for both new profiles and existing profiles during an upgrade. When enabled, a multiple-selection list of available and selected crypto profiles will appear. This list will display only Common Criteria (CC) enabled HSM crypto sources, excluding software and cloud HSMs. Additionally, all selected crypto profiles must be of the same type and share the same Master Backup Key (MBK).
|
||
|
Crypto Profile |
Select whether to generate and store the user key/certificate within the ADSS Server database (software mode), Azure Key Vault or to store the key/certificate on a hardware security module (HSM) pre-configured within ADSS Server Key Manager.
|
||
|
Key Algorithm |
Defines the key algorithm to be used for generating User Key Pairs. These algorithms are supported:
Note: The default value is RSA. |
||
|
Curve Type |
Select the Curve Type that should be applied while generating User Key Pairs. ADSS Server supports the following curve types:
Note:
|
||
|
Key Length |
Defines the key length to be used for generating User Key Pairs. These key lengths are supported:
Note: The default value is 2048 for RSA and 256 for ECDSA.
|
||
|
Security Level |
The Security Level drop-down will be available when Dilithium is selected in the 'Algorithm' field. This drop-down allows the user to choose the security level for the selected key algorithm. The security levels for Dilithium is defined below:
|
||
|
KAK Algorithm |
Defines the key algorithm to be used for generating User Key Authorisation Key (KAK). If user keys are being generated in a Utimaco CryptoServer CP5 HSM then a KAK is required to authorise/activate the user key inside the HSM. The KAK itself is generated in a software crypto source. The KAK is not required if user keys are being generated in a Software crypto source or any other HSM. Note: Only RSA algorithm is supported for KAK. |
||
|
KAK Length |
Defines the key length to be used for generating User Key Authorisation Key (KAK). These key lengths (bits) are supported:
Note: The default value is 2048. |
||
|
Padding Scheme |
Defines which signature padding scheme to be used for generating user's signature. These padding schemes are supported:
Note: The default value is PKCS1. |
||
|
Compute hash at signing time |
Enable this option if the Business Application is sending the data for signing instead of a hash. In this case, SAM Service will compute the hash using the algorithm selected in Hash Algorithm drop-down. Keep this option unchecked if Business Application is sending the hash instead of data. In this case, SAM Service does not need to compute any hash. Note: Keep the following points under consideration while operating with this checkbox:
|
||
|
Hashing Algorithm |
Sets the hash algorithm to use if the input data is to be hashed. These algorithms are supported:
Note:
|
||
|
Enable bulk signing |
If selected then bulk signing is allowed. The input data may contain one or more hash values up to the limit specified below. Note: The default is not to allow bulk signing. Set value 0 for unlimited. |
||
|
Number of hashes allowed to sign |
Define the maximum number of hash values allowed in a single input data message. This option is only available if bulk signing is enabled. Note: The default value is 0 and this allows an unlimited number of hash values. |
||
|
Require user authorisation for every transaction |
If this radio button is enabled, the user will have to provide authorisation for each signing request on Go>Sign mobile app or using any other mechanisms according to the SCAL e.g. PIN/OTP etc.
|
||
|
Require user authorisation only once until SAD expiry time |
If this radio button is enabled, the user will have to provide authorisation only once.
|
||
|
Remove key from HSM after signing |
If this checkbox is enabled, the signing key will be deleted from the HSM after each eSeal signing operation. Once the key is removed, the respective key handles of the eSeal signing key are also deleted from the cache.
|
||
|
S.AD Expiry |
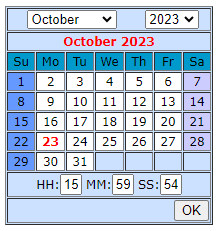
It defines the time period after which the SAD will be expired automatically. If SAD Expiry is not provided here, then, the system will use the SAD expiry provided in the SAM_REQUEST_EXPIRY_PERIOD property in Global Settings > Advanced Settings. The operator can define the SAD expiry according to the selected unit form the drop-down, or, by defining a customized date of expiry using the Custom Date option. See the image below:
Clicking on the calendar icon displays the following sceen:
From the above calendar, the operator can select the required date and time of SAD expiry. Note: Keep the following points under consideration:
|
||
|
Authorisation Request Expiry |
It defines the time period after which the authorization request received either by the Go-Sign mobile application or by an external IDP will expire automatically. If Authorisation Request Expiry is not provided here, then, the system will use the Authorisation Request Expiry provided in the SAM_REQUEST_EXPIRY_PERIOD property in Global Settings > Advanced Settings. Note: Keep the following points under consideration:
|
||
|
Sole Control Assurance Level |
It is drop-down field that allows to select the required SCAL (Sole Control Assurance Level) from SCAL1 and SCAL2. |
||
|
Hash Algorithm for SAD |
Sets the hash algorithm for SAD from drop-down. These algorithms are supported:
|
||
|
User Authorisation Key Pair Settings |
This section defines the configurations that control authorisation key pair generation and authorisation mechanism. |
||
|
Key Algorithm |
Defines the key algorithm to be used for generating authorisation Key Pairs. These algorithms are supported:
Note:
|
||
|
Key Length |
Defines the key length to be used for generating authorisation Key Pairs. These key lengths are supported:
Note: The default value is 2048 for RSA and 256 for ECDSA. |
||
|
Hashing Algorithm |
Defines the hash algorithm to be used for signing the Authorisation Request Message on the User Device. These algorithms are supported:
The default value is SHA256.
|
||
|
Clock Tolerance on Certificate Validity |
ADSS SAM Service uses mobile device certificate in order to verify the signature created on SAD (Signature Activation Data). The mobile device certificate has a defined validity period as well, hence if the clock of the system that issued the certificate is not synchronized with the clock of ADSS SAM Service then there is a possibility of an error. In order to tackle this issue, we can configure Clock Tolerance where the operator can set a value for certificate validity period that will be used by ADSS SAM Service while validating the mobile device certificate. Note: It is an OPTIONAL field. Default value of the field can be set empty. If the value is set empty or set to '0', the system will use the current date/time of ADSS SAM Service. |
||
|
Maximum devices allowed to a user |
This field allows the operator to set a limit on the number of mobile devices allowed to a user. The user will not be able to register more devices than this limit. Note: The default value of this field is '0' that represents unlimited but actually its a large number 2147283647 i.e. the maximum number of devices that can be allowed to a user. |
||
|
Device must have biometric recognition capability |
Sets the requirement that the user must use biometric authentication on their Mobile Device to sign an Authorisation Request Message. |
||
|
Device must have secure element |
Sets the requirement that the user must have a Secure Element/Enclave on their User Device which will be used to generate authorisation keypair and for signing an Authorisation Request Messages. |


If operator enabled the checkbox Delegated user authentication via external IdP under User Signature Key Pair Settings, then following screen will be shown:
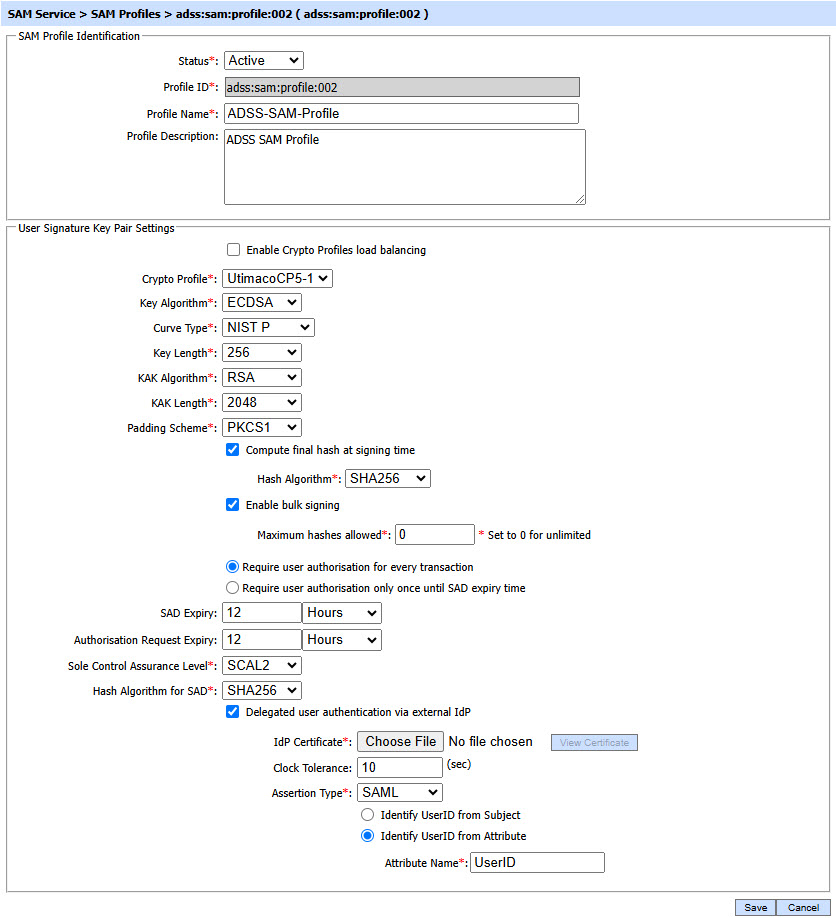
The configuration items for Delegated user authentication via external IdP checkbox are as follows:
|
Items |
Description |
|
Delegated user authentication via external IdP |
If this checkbox is enabled, the clients will be allowed to delegate user authentication to an external IdP during SAD generation. The business application will get the user authenticated by an IdP and add the assertion received from IdP to SAD (Signature Activation Data). The assertion will be verified by ADSS SAM Service during signing operation. |
|
IdP Certificate |
By using this field, an IdP Certificate can be uploaded from the file system that can verify the assertion signature created by IdP. |
|
Clock Tolerance |
ADSS SAM Service verifies the validity of assertion added to SAD. If the clock timings of external IdP and SAM Service are not synchronized, then an error can be returned. To tackle this issue, the operator can enter the clock tolerance (in seconds) that will be used by ADSS SAM Service while validating the assertion. Note: This is an optional field. Default value of the field is '0' (means no clock tolerance required). |
|
Assertion Type |
This drop-down allows the operator to select the required assertion type of the external IdP from list of supported assertion types (SAML, JWT etc) in ADSS Server. If IdP is SAML based, the SAML should be selected. and if the IdP is OpenID Connect based then JWT should be selected from the Assertion Type drop-down. |
|
UserID from subject |
If enabled, the user identifier will be picked from the Subject element for both SAML and JWT assertion. |
|
Identify UserID from Attribute |
If this radio button is enabled, the user identifier will be picked from the Attribute statement for both SAML and JWT assertion. |
|
Attribute Name |
This field will be available if Identify UserID from Attribute radio button is enabled. It allows the operator to set the attribute name to identify the user from assertion. |
The table of SAM profiles can be sorted in either Ascending or Descending order by selecting a table column from the drop down list. The list can be sorted by SAM Profile ID, SAM Profile Name, Created At time or Status.
Click on the Search button on SAM Profiles main page will display following screen:
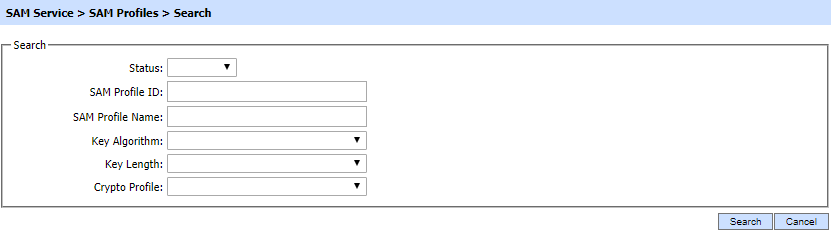
This helps to locate a particular SAM profile the ADSS SAM Service may have configured. The SAM signing profile can be searched based on Status, SAM Profile ID, SAM Profile Name, Key Algorithm, Key Length and Crypto Profile. If a search is based on multiple values, then these will be combined together using the “AND” operand, and thus only records that meet all the criteria will be presented.
|
|
If "_" character is used in the search then it will act as wildcard. |
|
|
The Duplicate profile will be created without the Name and Description of the selected Profile. The Unique ID generates automatically or the next available ID will be assigned to the Profile. |
See also
Step 1 - Configuring Hardware Crypto Source
Step 3 - Registering Business Application
Step 4 - Using Service Manager