Transactions Log Viewer
The OCSP Repeater Service Transaction Log Viewer provides a record of each request made to the OCSP Repeater Service and each response returned by the service: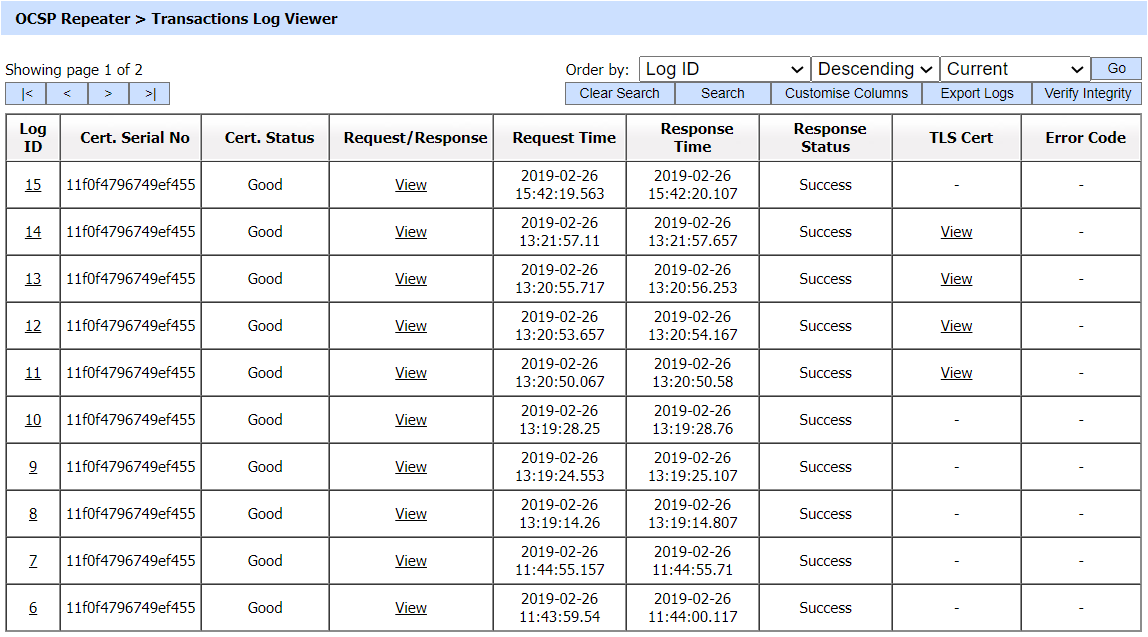
Each item in the above screenshot is described in the following table:
|
Items |
Description |
|
Clear Search |
After a Search this window will only show the filtered records. The Clear Search button is used to view the full set of records. |
|
Search |
This opens a new window where search criteria can be entered based on each column of the transaction grid. |
|
Customise Columns |
This opens a new window to configure which column need to be shown in the grid and which column need to be hidden. See below for more details. |
|
|< < > >| |
These buttons are for navigating the different pages of the transaction log. Note: The number of records shown per page is configurable from within Global Settings. |
|
Export Logs |
Exports the transactions logs into a zipped CSV file in human readable format. |
|
Verify Integrity |
Verifies the integrity of the signing service transaction log records. It detects tampered and deleted records and generates a report that can be exported to a physical drive. Note: When exporting HMAC verification reports, it is recommended to save the file with “.html” extension so that the report can be viewed in an internet browser. |
|
Show Archived |
This opens a new window where you can import and view previously archived file i.e. archived/exported transactions log. |
|
Log ID |
A unique serial number for the log record, it is system-defined and not part of the request/response messages. |
|
Cert.Serial No |
Serial number of the target certificate whose revocation was checked. |
|
Cert. Status |
Certificate status of the target certificate (Good or Revoked). |
|
Request/Response |
Provides a link to view the request/response messages. |
|
Request Time |
Records the date/time when the request was received. |
|
Response Time |
Records the date/time when the response was sent. |
|
Response Status |
This shows whether a “success” or “failure” response was returned. |
|
TLS Cert |
Clicking on “View” link under this column displays the TLS client authentication certificate. The “View” link is only present when TLS client authentication was used to send requests to the signing service. |
|
IP Address |
Records the IP address of the requester. |
|
Error Code |
Hover your mouse over the "View" link to show the error message e.g. Signature computation failure, Signing Service Disabled etc. |
|
|
After an OCSP transaction has been performed, it takes 10 seconds (approx.) to display the transaction details in the Transaction Log Viewer. |

The OCSP Repeater Service transaction records can be sorted in either ascending or descending order by selecting a table column from the drop down list. From the drop down menu in above screen, choose Import Archived and click on Go button. This will show the following screen:
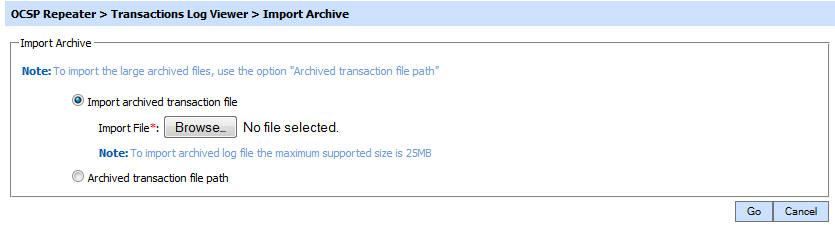
Each item in the screenshot is described below:
|
Items |
Description |
|
Import archived transaction file |
Use this option to browse the archived log file in zip format from the operator machine. By using this option the archived log file is uploaded on the ADSS Server. It can be an expensive operation if the file is of large size so the operator is allowed to upload a file with maximum size up to 25 MB. Use the archived file path option for files bigger than 25 MB. |
|
Archived transaction file path |
Use this option if the file size is greater than 25 MB. This option does not upload the archived file to the server. Rather the server reads the file from given file path before importing which is faster than the above option. You can either specify the local file system path or a network path. Note: Do specify the archived log file name in the file path. |
The archived files were created in the csv format till ADSS Server v4.7.5 but from v4.7.6 and onward the archived files are zipped to save the disk space when archiving. If you are importing the archived files created using a pre-v4.7.6 deployment to ADSS Server v4.7.6 or later then first zip them before importing otherwise ADSS Server will not recognise them as correct archived files.
|
|
Note that for OCSP Repeater Service, add the main and details file in the zip archive before importing. Follow these steps in the same order to create the zip:First, select the details file: First, select the details file Then select the main file Zip these files Import it in the OCSP Repeater Service If the above order is not followed then archive import will be failed for the OCSP Repeater Service. |
As described above the Search button allows log records to be filtered according to particular search criteria shown below:
If a search is based on multiple values, then these will be combined together using the “AND” operand, and thus only records that meet all the criteria will be presented. Using this search filter you can create custom reports based on:
- Which target certificates were validated)
- Which target CA was involved.
- Which relying party made the requests.
- Specific date ranges.
- Which source was used for revocation.
|
|
If "_" character is used in the search then it will act as wildcard. |
Clicking on the Customize Columns button on OCSP Repeater Transactions Log Viewer displays following screen:
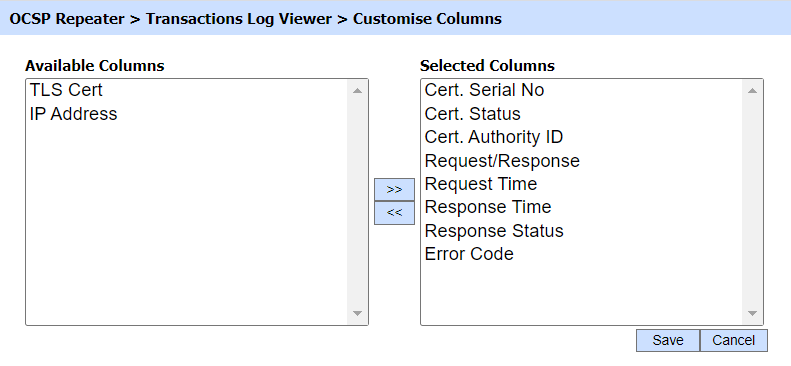
By default few columns are in the "Selected Columns" list. In order to hide a column move the required column to "Available Columns" list
Each log record within the database is protected with an HMAC checksum to detect any intentional or accidental modification of records. Clicking Verify Integrity button verifies the log integrity and generates a report as shown below
Click on the Export Logs button to export the request/response to a network file.
Clicking the Fix HMAC button will re-calculate the HMAC for tempered transaction logs records for this module.
Note: This option will not detect the unauthorized deleted records but it will only fix the unauthorized modifications and/or ambiguous records for which HMAC value is not present/incorrect.
|
|
After an OCSP transaction has been performed, it takes 10 seconds (approx.) to display the transaction details in the Transaction Log Viewer. |
OCSP transactions log can be exported to physical drive using Export Logs button. You can either export all OCSP logs or specific OCSP logs based on provided search criteria. Note when exporting log records, the original records remain in the database (i.e. they are not removed as part of the export function). In case of auto-archiving (explained later) the archived records will by default also be removed from the database. Therefore use auto-archiving if you want to trim your database.
It is also possible to view the low-level details of how a particular transaction was processed by clicking the link in Log ID column. Once clicked, the following screen will be displayed:
![]()
The columns in this table are as follows:
|
Items |
Description |
|
ID |
This is a unique number for of each step in the signature verification process. For example, there may have been multiple certificates requested for status checking within a single OCSP request. In this case the validation of each certificate will be sho wn with a unique log ID. |
|
Trans. ID |
This is the unique ID assigned to the selected OCSP transaction. |
|
Cert. Serial No. |
Serial number of the target certificate whose revocation was checked. |
|
Certificate Status |
Certificate status of the target certificate (Good, Revoked or Unknown). |
|
Certificate Authority ID |
This column provides the name of the required certificate authority (CA) that has issued the certificate. |
|
Request/Response |
This column provides a link to view the OCSP request that was received or the OCSP response sent by the OCSP service. |
|
Request Time |
Time when the request was made to the OCSP Service. |
|
Response Time |
Identifies the time when the response was sent by the OCSP service. |
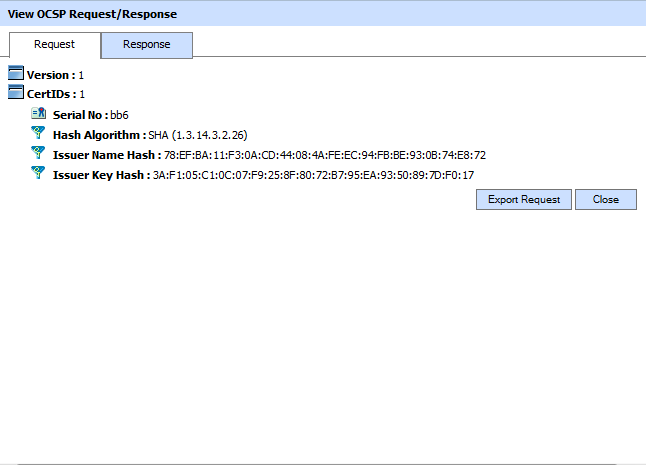
Clicking on either View link within the Request column or the Show Request button shows the OCSP Repeater request involved in this transaction as shown below:
Clicking on either View link within the Response column or the View Response button shows response for the OCSP Repeater transaction as shown below:
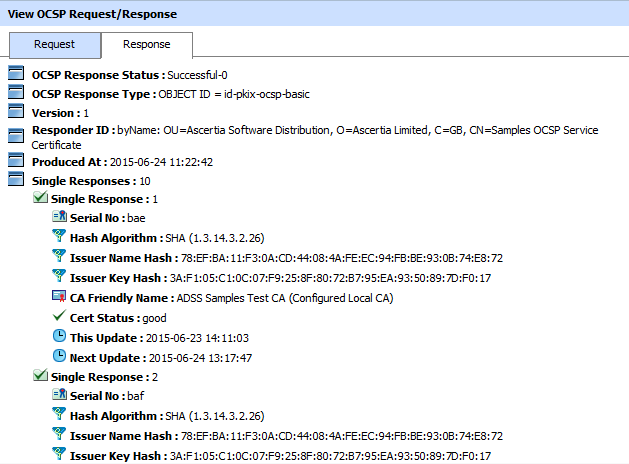
Click on the relevant export button to export the OCSP Repeater request/response on the physical drive.
See also
Configuring an OCSP Repeater
OCSP Repeater Access Control
Logs Archiving
Alerts
Management Reporting
OCSP Repeater Service Interface URLs