Step 2 - Configuring HMAC Profile
The ADSS HMAC profile is used to create profiles for different clients by using one or multiple HMAC keys, each profile can have its own distinct key. To manage the HMAC profiles click on the left hand menu option called HMAC Profiles:

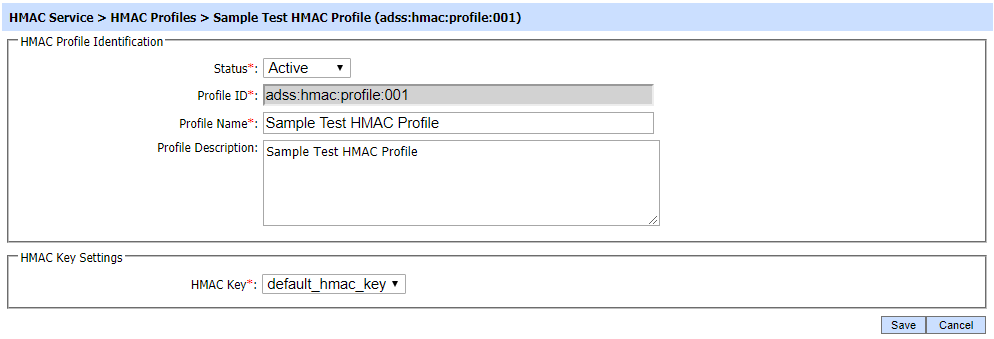
A new profile can be created by selecting the New button. Existing profiles can be changed by clicking on the Edit button. Create a replica of a profile by clicking Make a Copy button. The following screen is then shown (this screen shot assumes the demo data has been loaded and you are editing the default HMAC profile):
The configuration items for Use In-built HMAC settings are as follows:
|
Items |
Description |
|
Status |
A HMAC profile may be marked Active or Inactive. Note an inactive HMAC profile will not be used to process HMAC requests. |
|
Profile ID |
A mandatory field which provides a system-defined unique identifier for this profile. |
|
Profile Name |
A mandatory unique name defined by the ADSS Server Administrator for easier recognition of the profile within the ADSS Operator Console. |
|
Profile Description |
This can be used to describe the profile in more detail (e.g. in which circumstances will this HMAC profile be used). This is for information purposes only. |
|
HMAC Key |
All configured HMAC keys are available in HMAC key corresponding drop down. Select the required HMAC key for which the profile is created. |
The HMAC profiles can be sorted in either Ascending or Descending order by selecting a table column from the drop down list. The list can be sorted on basis of following columns: HMAC Profile ID; HMAC Profile Name; HMAC Key; or Status
Clicking on the Search button on HMAC Profiles main page will display following screen:
The search option helps an operator to identify a particular HMAC profile that have been configured. The HMAC profile can be searched based on Status, Profile ID, and Profile Name. If a search is based on multiple values, then these will be combined together using the “AND” operand, and thus only records that meet all the criteria will be presented.
See also
Step 1 - Generating HMAC Keys
Step 3 - Using the Service Manager